How to Blur a Part of an Image in PowerPoint
by  Lina Thorne • Updated · Posted in Photography
Images can make any presentation more memorable and eye-catching. But sometimes you might need to blur them – entirely or partially – for a number of reasons. Blurring is great because it’s effective, yet subtle and unobtrusive. You can blur an entire image and use it as a background of a slide, while the textual contents will still be perfectly readable. If you need to highlight something in an image, there’s no better way to do so than by keeping the most important part sharp and in focus while blurring everything around it.
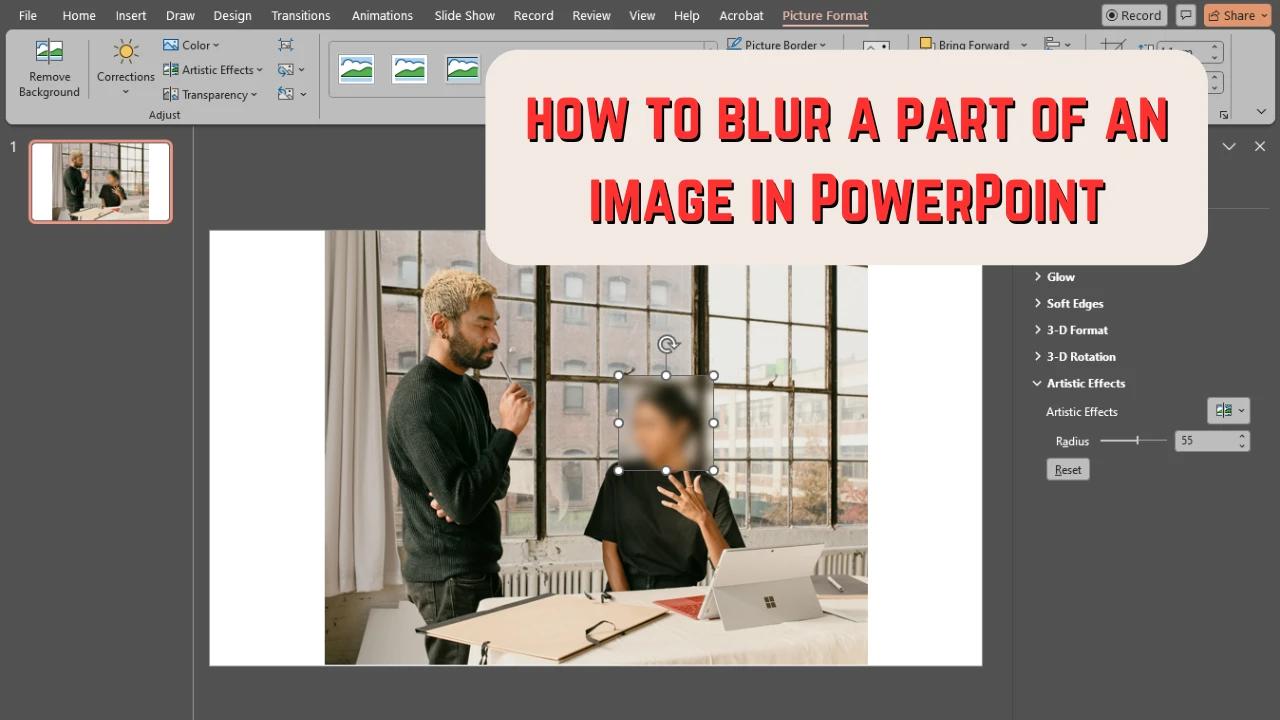
In most cases, you might need to blur a part of an image to hide some sensitive information or protect someone’s identity. Maybe, there’s a screenshot that needs to be added to your presentation, but it contains some personal information that you can’t just crop out. Instead, you can simply blur it. Or maybe you need to add a photo of your colleagues, but one of them didn’t give you permission to use a photo of them. So, to avoid any issues, you can cover their face with a blur.
Finally, this may come as a surprise, but blurring can also be used as a storytelling tool; especially in a presentation. You can show an entirely blurred image first. Then reveal a part of it in the next slide. Then another part of it in the third slide and so on. This can help you present new points in a fascinating way.
PowerPoint is a versatile and user-friendly software for designing presentations. But you can actually use it to make some basic image editing, as well. This article features detailed instructions on how to blur a part of an image in PowerPoint as well as how to blur an entire picture and blur only the background.
All of this can be done right in PowerPoint, and you don’t have to spend lots of time mastering some advanced image editing software like Photoshop. Even if you’re new to PowerPoint, it will still take you only a few minutes to do this. And if you want an easier and quicker way to blur objects in a single or even multiple images, here you will learn about a browser-based app that can help you with that.
If you want to learn more, keep reading.
How to Blur an Entire Image in PowerPoint
Let’s start with something simple. And there’s nothing easier than blurring an entire image in PowerPoint. It’ll take you just a couple of steps:
- First, you need to import the image that you want to blur into your presentation. To do this, open the necessary slide, then go to the Insert tab in the ribbon and click on Pictures. You will see a small menu with three options: This Device, Stock Images, or Online Pictures. To import your image from your computer, choose This Device. Find where you want to source your file from, then import it.

- Your image is now on your slide. It should already be selected, but if it’s not, click on it to select it. With the help of your cursor and sizing handles, make your image bigger or smaller. If you need to reposition your image, click on it, then drag it with your cursor.

- Make sure that the image is still selected. In the ribbon go to Picture Format. If you don’t see this tab, it means that your image isn’t selected. In the Picture Format tab navigate to Artistic Effects > Blur.

- If you want to make the blur more intense, click on Artistic Effects Options in the Artistic Effects section.

- This will open a menu on the right. In the Artistic Effects section adjust the Radius slider or enter a number from 0 to 100 into the input area next to the slider. The higher the number, the more intense the blurring effect will be.

That’s it! Now, your entire image is blurred. Super quick and easy!
How to Blur a Part of an Image in PowerPoint
Okay, you’re probably really eager to learn how to blur a part of an image, right? That’s why you’re here, after all. It’s not particularly complicated, though it’ll require some time. Follow these steps:
- Once the image is imported, you need to duplicate it. To do this, use the CTRL / COMMAND + D shortcut.

- Now, you need to align the copy with the original and you have to be extra precise with this.

- Make sure the copy is selected. Go to Picture Format > Crop. There are a couple of options in the Crop menu. But you don’t really need to crop into a circle or crop to a certain aspect ratio. You need to be able to adjust the cropping area however you want. So, select the Crop option.

- Next you need to crop the copy. Adjust the cropping area so that only the part of the image that you want to blur remains. Press Enter to apply the changes.

- Now, make sure that the cropped copy is selected. Go to Picture Format > Artistic Effects. Then select the Blur effect.

- Voila! Only the face is blurred. But the blur is quite mild, isn’t it? Let’s fix that.

- Right-click on the image and select Format Picture. This will open the Format Picture menu on the right. The Artistic Effects section should be at the bottom.

- Toggle the Radius slider or enter a higher number in the input area. Now, the blur is more intense!

- The edge of the blurred area is quite sharp, though.

- Let’s make it softer. Go to the Format Picture menu again, then navigate to the Soft Edge section. Select one of the Soft Edge options and adjust its size.

- Close the menu to apply the changes. Now the blurred area has a soft edge.

- Press CTRL / COMMAND + A. The original and the copy will be selected.

- Go to the Picture Format tab, then select Group> Group. This will group both of your images into one. It’ll be much easier to reposition or resize it now.

- If you want to export this image, you can right-click on it and pick “Save as Picture”.

All done! It does take some time, but it’s not extremely difficult. This is pretty much the only way to blur a face, a license plate or some other object in an image in PowerPoint.
There are a couple of downsides to this method, though. If you need to blur several objects in an image and they aren’t positioned next to each other you will need to repeat this process with each and every object. There’s no batch-processing feature in PowerPoint either so you will also need to repeat this process with every picture that you need to add a blur to. As you can imagine, this can be quite time-consuming.
How to Blur Background in an Image in PowerPoint
You will be able to blur the background and a little bit of the foreground in an image with this method. It’s also more complicated than the previous one, so it might be slightly confusing for beginners. Nevertheless, this editing trick might come in handy. So, let’s take a look at how you can do this:
- Import your image into the necessary slide, then right-click on the slide and select Duplicate Slide.

- Make sure that you are on the first slide. Select the image by clicking on it, then go to Picture Format > Artistic Effects > Blur.
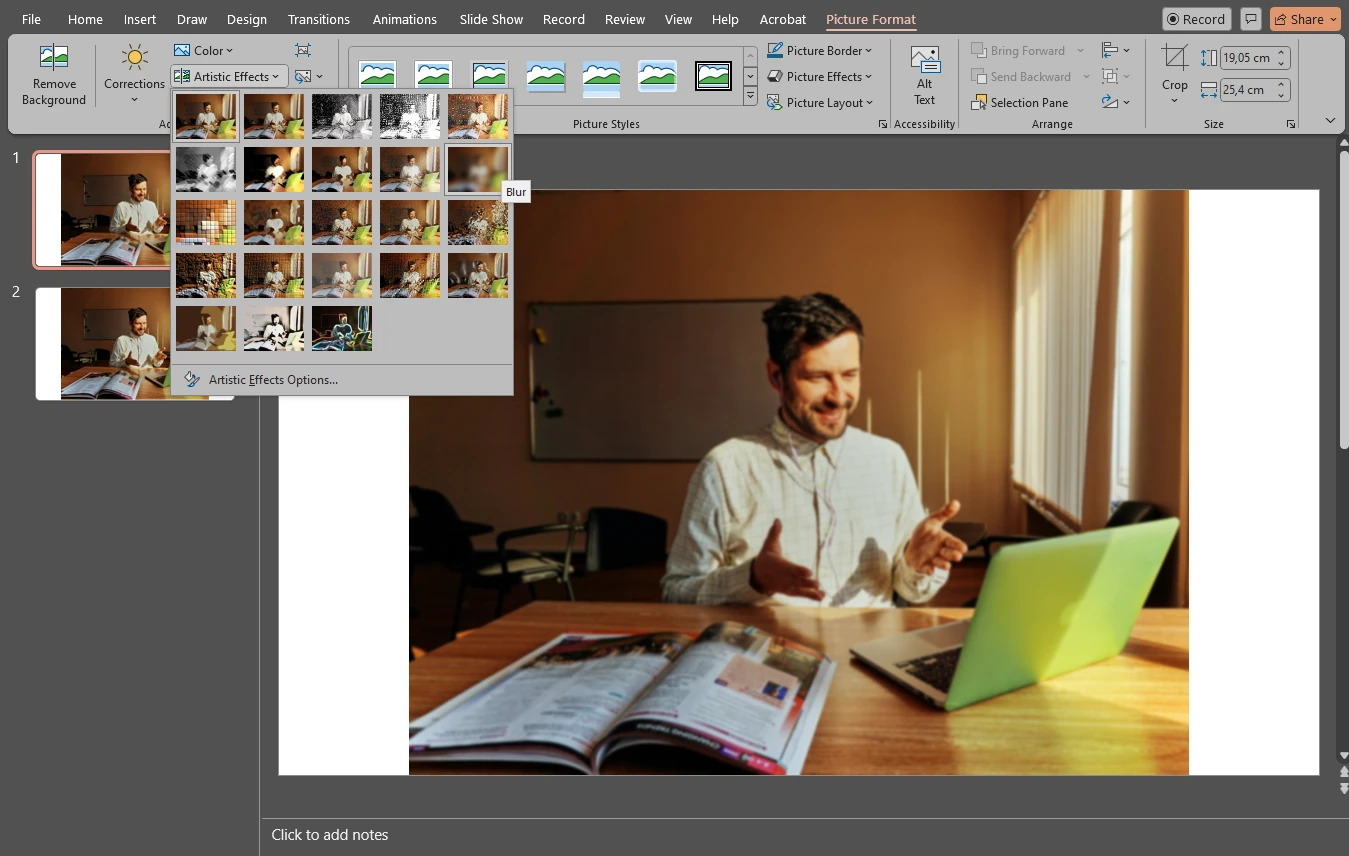
- In the Artistic Effects Options adjust the intensity of the blur if necessary. The entire image in the first slide has to be blurred now.
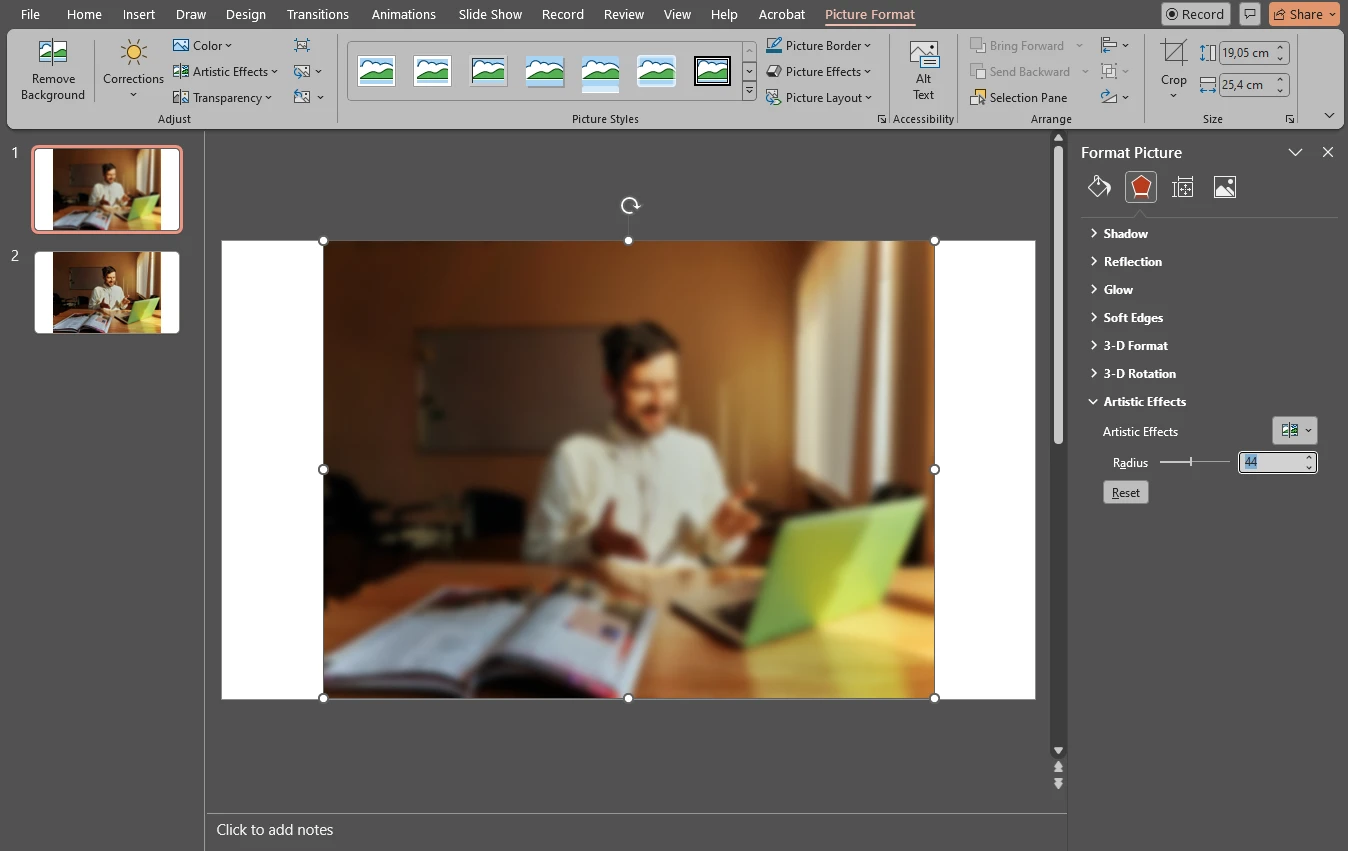
- Switch to the duplicated slide. Select the image and go to the Picture Format tab. There, select Remove Background.
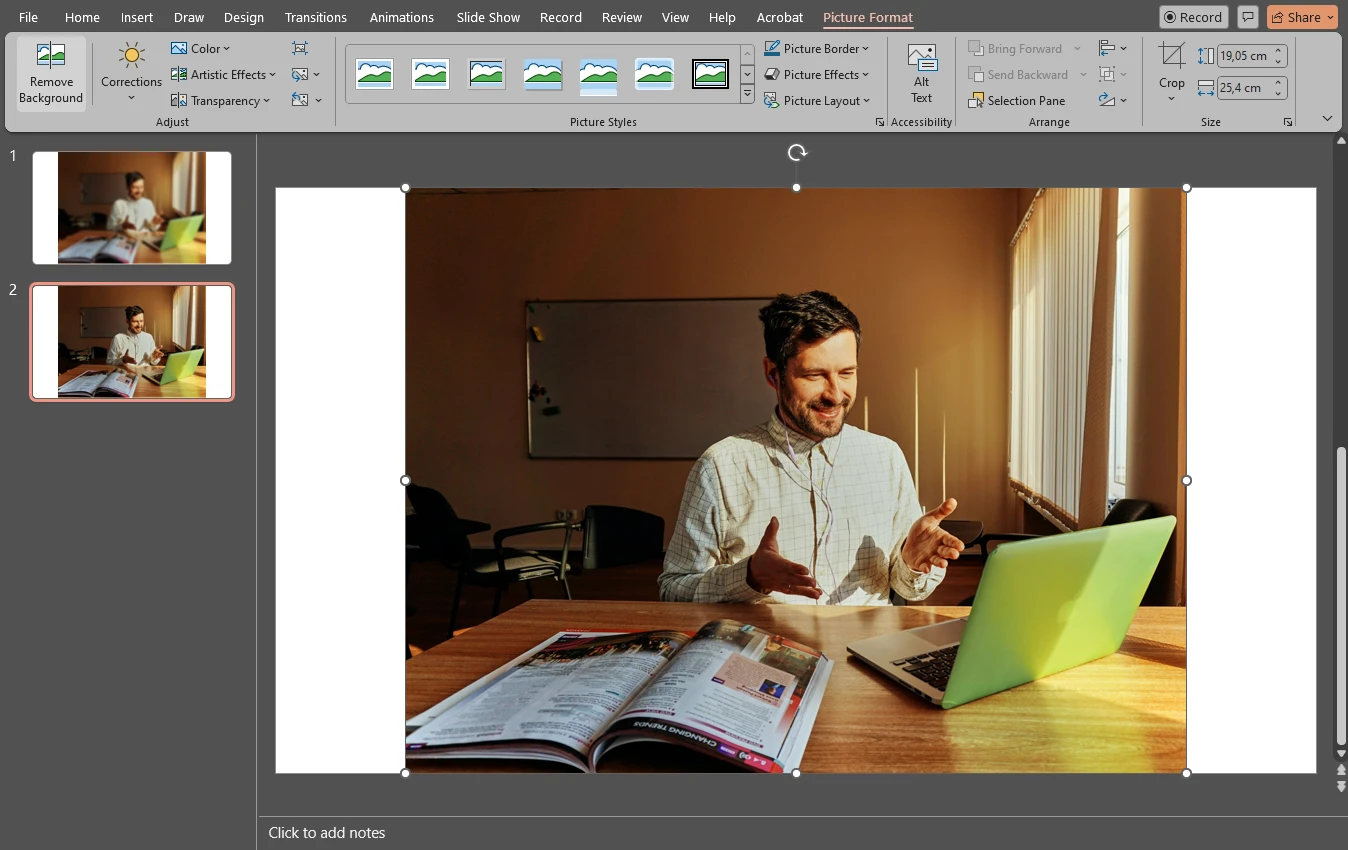
- Click on Mark Areas to Keep and pick the areas that should stay unblurred. You don’t really need to be super precise here.
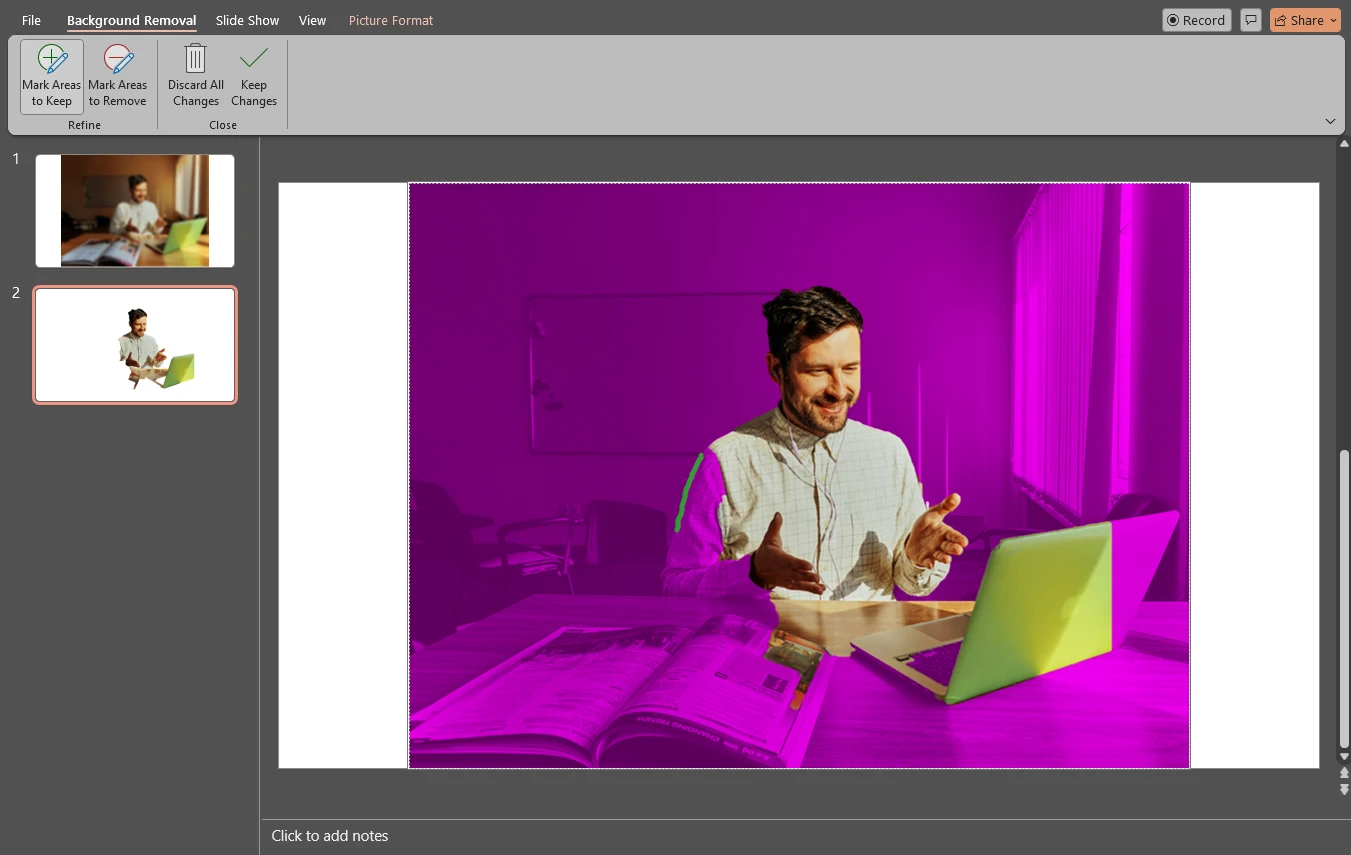
- If you went a bit overboard, click on Mark Areas to Remove and select the areas that should be blurred.
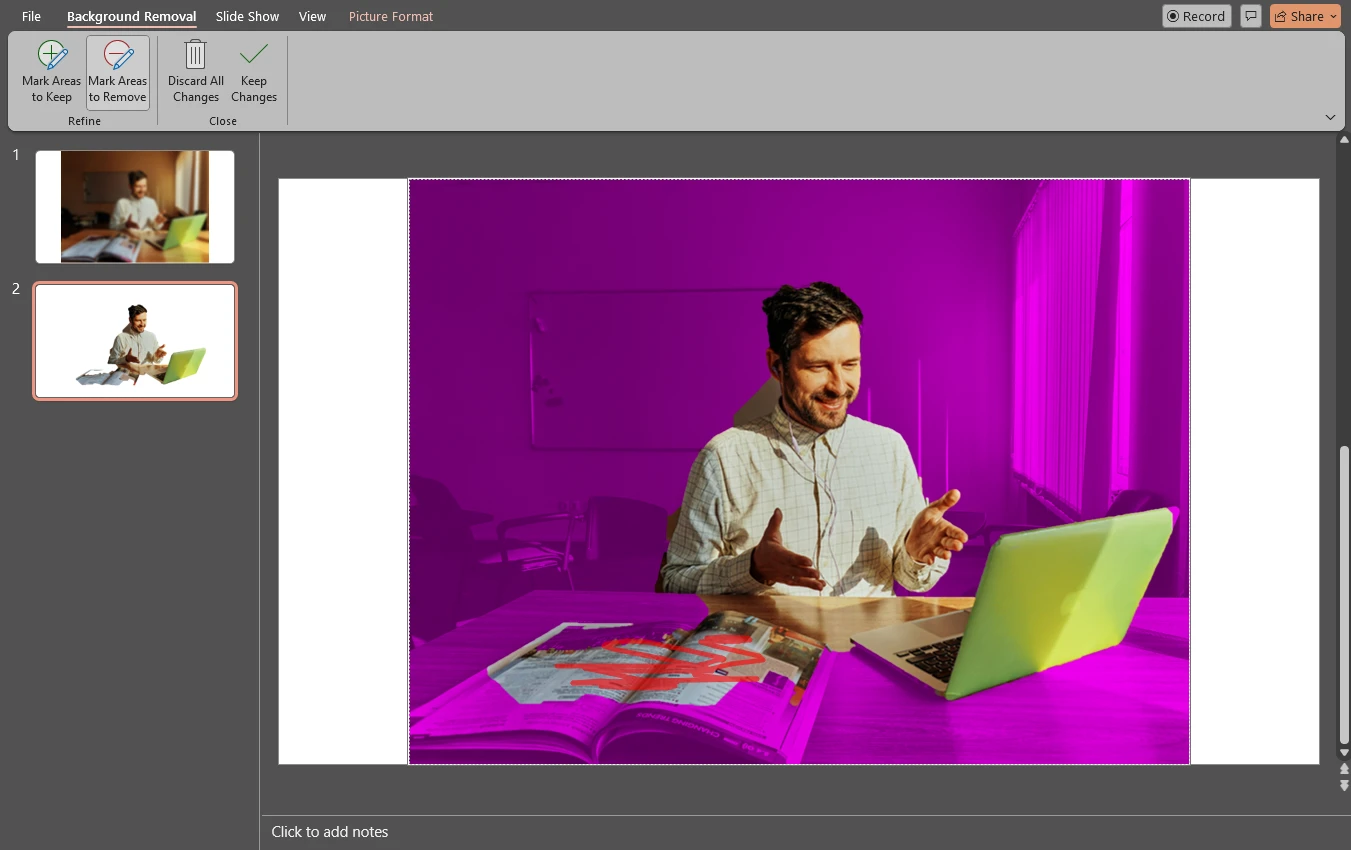
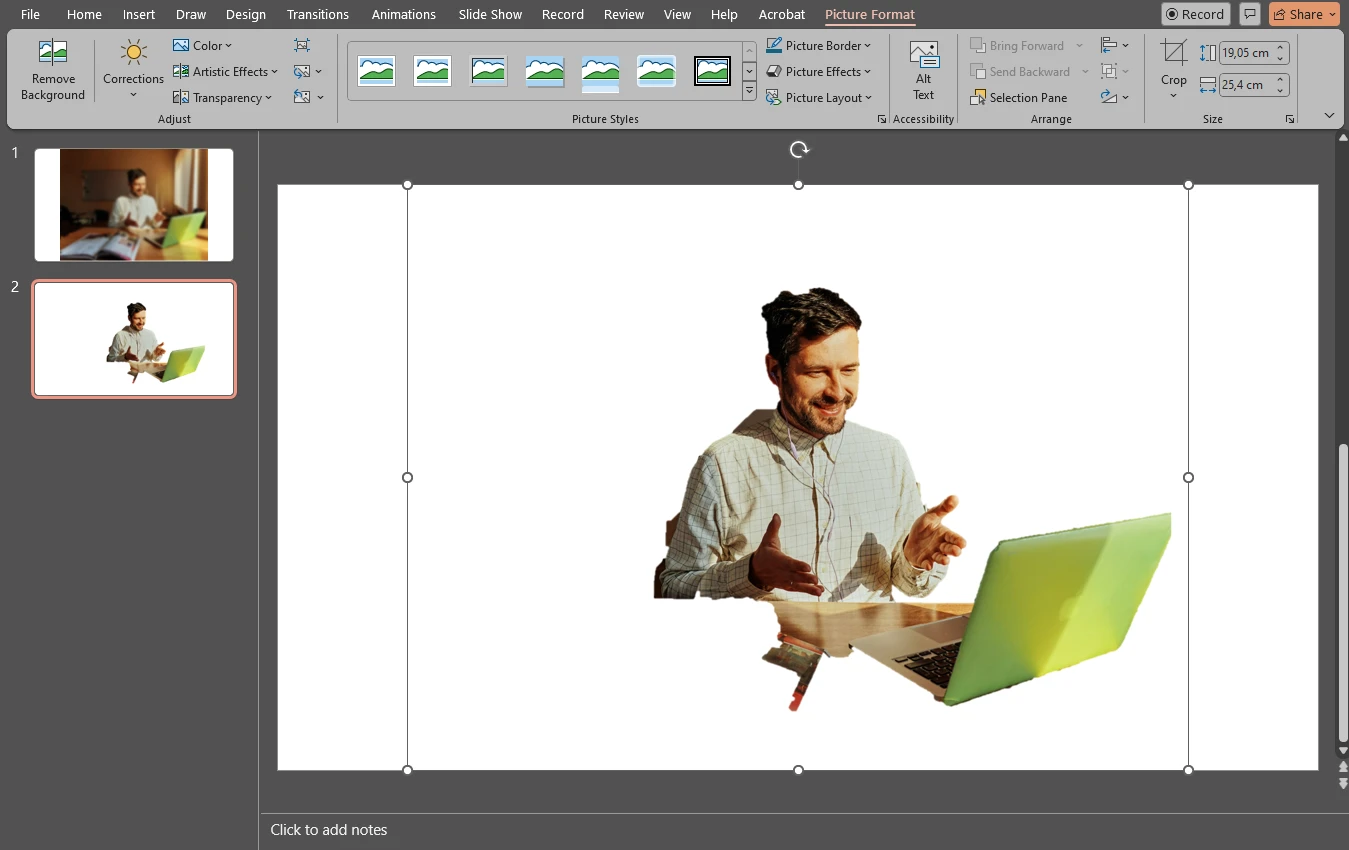
- Finally, click on Keep Changes.

- The background and the foreground are removed now.
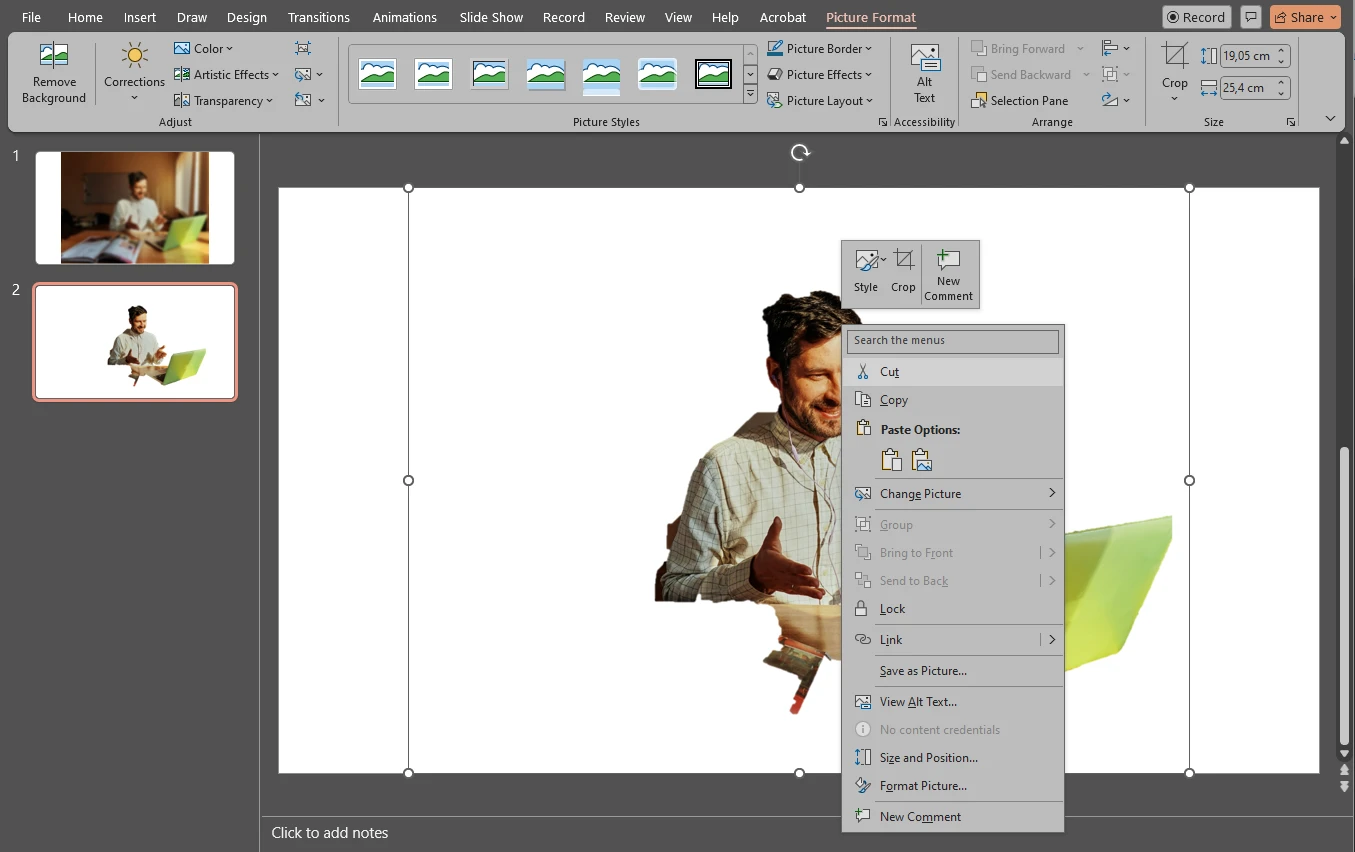
- Right-click on the image and select Cut. You can also use the CTRL / COMMAND + C shortcut.
- Switch to the first slide. Use the CTRL / COMMAND + V shortcut to paste the modified image.

- Align the unblurred image with the blurred original. It has to look like the background and the foreground are blurred. Now, all the attention will be on the part that’s sharp and in focus.

- Delete the second slide by right-clicking on it and selecting Delete Slide.
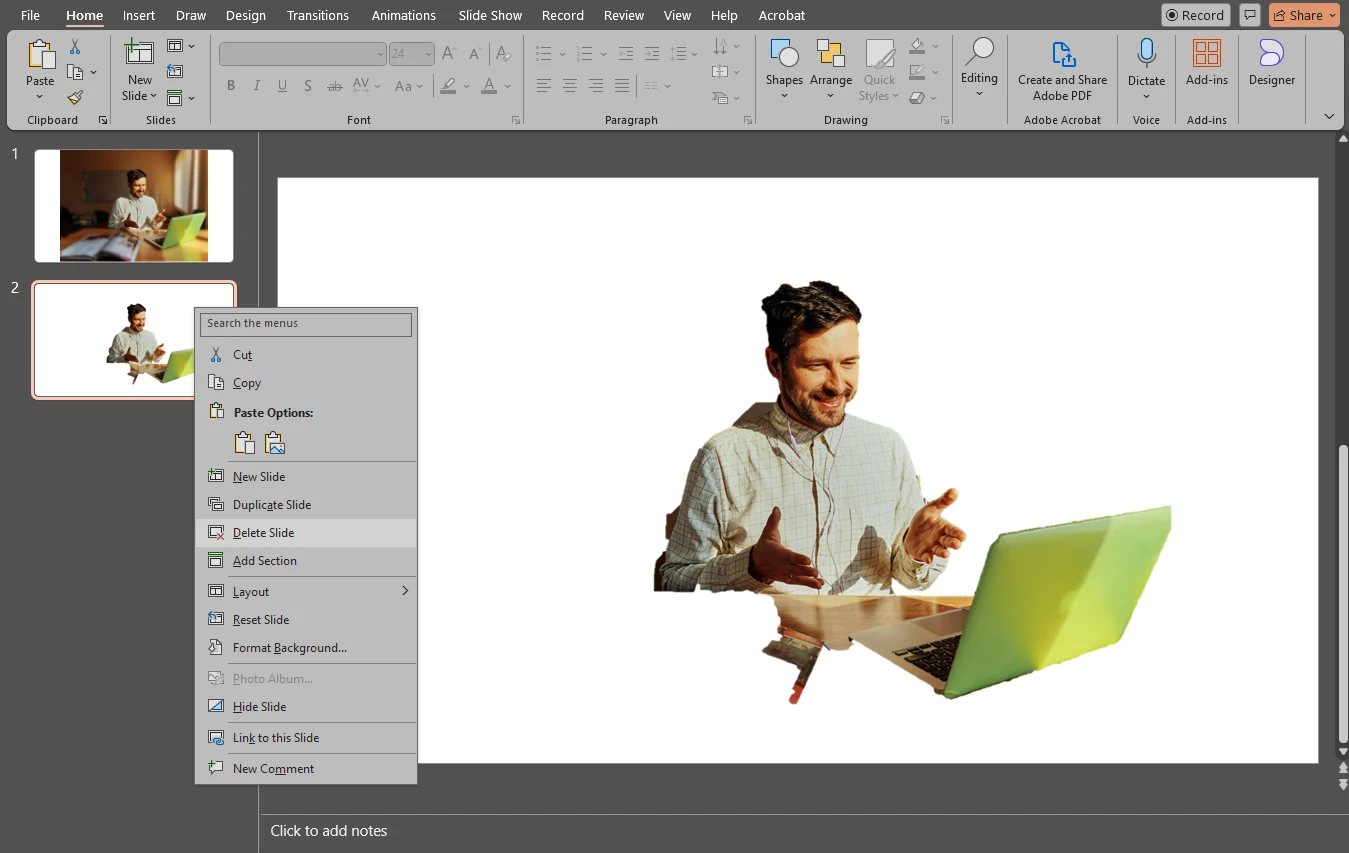
- Similarly to the previous method, first select both images by pressing CTRL / COMMAND + A, then go to Picture Format > Group > Group. Your images will now be grouped.

All done!
No doubt that this method is the most complicated of all, but this is exactly how you can blur background in an image in PowerPoint. Please note that if your image has a lot of details, then it might be impossible for you to get realistic-looking results.
Frankly speaking, it might better for you to use another tool to achieve this result. Canva has a tool called Auto-Focus. With this tool you might be able to get more natural-looking results.
A Faster Way to Blur Objects in Images
Now you can blur an entire picture or only a part of an image in PowerPoint. It’s not particularly hard and you’ll definitely be able to do this if you’ve never done it before. Basic image editing is possible in PowerPoint, but it’s somewhat complicated. It’s just as complicated as blurring a part of an image in Photoshop or Canva. But fortunately for you there is an easier way. You can use Watermarkly app.
It’s worth mentioning right away that you won’t be able to upload your PowerPoint presentation into Watermarkly, because it doesn’t support this format. But what you can do instead is make all the changes to your images in Watermarkly first, then import them into your presentation.
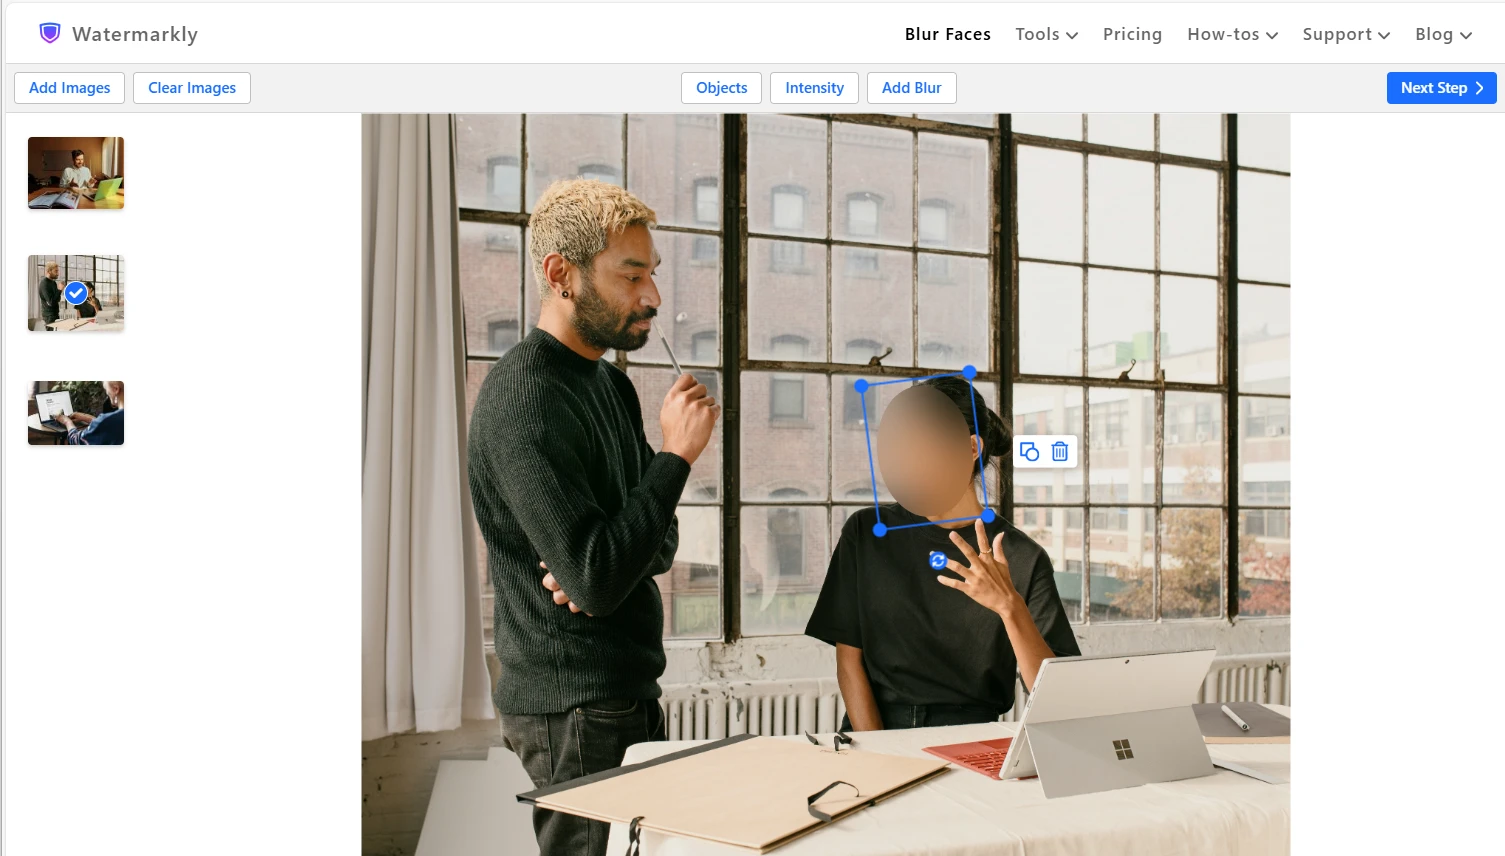
Yes, you’re probably not looking for another app. However, what’s great about Watermarkly is that it’s a website with a selection of online tools which work in a browser. So, there’s no need for you to download or install anything. Watermarkly has both a free and a paid version.
The free version does have a couple of limitations. Some apps allow you to process only a limited number of files per day, while others will add Watermarkly’s logo to your processed files. You can get rid of these limitations by purchasing a license. With the paid version you will get access not only to the full version of the Blur tool. You will also be able to crop image, resize photos, convert them to JPG, add a watermark to PDF and more. You will also have access to the desktop software to watermark photos, which is a great way to protect your visual content and promote your brand.
The main advantage of Watermarkly is that it’s much easier to blur objects here. There’s no need to duplicate your image and make all the changes to the copy. Let’s take a look at some advantages that Watermarkly’s blurring app has over PowerPoint:
- No need to soften the edges. That’s right, the edges of your blurred areas will be softened automatically after the export. Yes, in PowerPoint you can control the degree of softness. You can make edges more or less soft, and that’s not possible in Watermarkly. However, in this app you won’t have to adjust the softness of edges for each blurred area manually. You won’t have to do anything to make edges soft at all, which can really speed up the entire process.
- Pick the blur shape. In Watermarkly your blur can be rectangular or oval, and while you are editing, you can switch between these shapes. It’s possible to crop an image into a circle in PowerPoint, but this process requires some extra steps. And if you want to change the shape of your blurring area mid-editing, you’ll have to start over, meaning that you’ll need to undo all the changes and re-crop your duplicated image. In Watermarkly you can select the rectangular shape, then switch to the oval one, then go back to the rectangular shape again by simply selecting the blurred area and clicking on the shape icon. That’s it!
- Blur objects in multiple images. Blurring multiple objects in a single image can be time-consuming in PowerPoint, because you’ll need to create multiple copies, align them with the original, crop the copies, then add the blurring effect to them. It will require quite some time and precision. And that’s just for a single image! What if you need to blur objects in multiple images? It can take hours! Luckily, you can simply click on the “Add Blur” button in Watermarkly to add a new blurred area. No need to create any copies. Also, Watermarkly supports batch-processing, so you can import multiple images and blur objects in them.
- Benefit from AI algorithms. Watermarkly utilizes AI algorithms to detect and blur license plates and faces automatically. It is possible to make some minor tweaks to the blurred areas, as well. For instance, you can tilt the blurred area a bit more, if necessary. You can also unselect some of the faces and license plates in the Objects sections – and they won’t be blurred anymore. Yes, if you need to blur any other objects in your image, you will need to add a blur manually. But, if you need to blur faces and license plates quite often, this will save you lots of time and effort.
- Use on any device. PowerPoint has a mobile version, but it’ll be more complicated to blur a part of an image in PowerPoint on the tiny screen of your smartphone. Luckily, Watermarkly can be used on any internet-connected device and any operating system. All you really need to use it is internet connection and a browser. What’s more, its mobile version is well-optimized, so it won’t be an issue for you to blur a part of an image right on your smartphone. Thus, you can blur all the necessary images in Watermarkly, then import them into your PowerPoint presentation. It will be easy to do all this on the go.
Watermarkly’s blurring app does have a couple of disadvantages. There’s no tool that will allow you to blur only the background. So, you won’t be able to create this kind of blurring effect in the app. In addition to this, if you need to blur an entire image, you will need to add a rectangular blurred area, then resize it so that it covers the entire image. Thus, blurring an entire image in Watermarkly is a bit more complicated than in PowerPoint.
But…that’s it! These are the only disadvantages that Watermarkly has. If you only need to blur a part of a single image, using PowerPoint will be more than enough. But if you need to blur objects in multiple images or if you need to blur parts of images for PowerPoint presentations regularly, you should consider using Watermarkly. It will make your entire workflow faster, easier and more efficient.
Conclusion
It’s possible to use PowerPoint for some basic image editing, though it’s a bit more complicated since its toolkit is somewhat limited. If you need to blur an object in an image or two, you can perfectly do this right in PowerPoint. You can blur an entire image as well as blur only the background to highlight the most important part of your image.
It might be a bit complicated for beginners, yet it’s still not an overly advanced task. Hopefully, the instructions in this article has shown you exactly what to do and made things clearer for you. However, if you need to blur objects in multiple images on a daily basis, you should use Watermarkly’s blur tool instead. With its help you can really optimize your workflow. You will be truly surprised how much time it can actually save you.
More Articles:
How to Add a Watermark in PowerPoint
How to Сrop a Picture into a Circle in PowerPoint
How to Compress Images in PowerPoint