
How to Compress Images in PowerPoint
by ![]() Lina Thorne • Updated · Posted in Photo Editing
Lina Thorne • Updated · Posted in Photo Editing
If your PowerPoint presentation contains a lot of images, its file size can quickly become difficult to manage. Large presentation files are harder to upload, send by email, store, and open smoothly — especially if they contain high-resolution photos.
Fortunately, PowerPoint includes a built-in Compress Pictures feature that can help reduce file size without noticeably affecting image quality. In this guide, you will learn how to compress one or all images in PowerPoint, which compression option to choose, and how to keep your presentation sharp while making the file smaller.
Why You Should Compress Images in PowerPoint
You may be wondering whether image compression is really necessary. If your pictures already look sharp and clear, why not leave them as they are?
The main reason is simple: high-resolution images can make your PowerPoint presentation much larger than it needs to be. And when a PPT file becomes too heavy, it is harder to store, upload, share, and present smoothly.
Here are the main benefits of compressing images in PowerPoint:
Reduce file size
This is the most common reason to compress pictures in PowerPoint. Large, high-resolution images can quickly increase the size of your presentation, especially if your deck contains many photos or graphics. Compressing them helps reduce the overall PowerPoint file size and makes the presentation easier to manage.
Make sharing easier
Smaller presentations upload faster, download faster, and are easier to send by email or share through cloud storage. If you often work with presentation files online, image compression can save a lot of time.
Save storage space
If you keep presentations on a laptop, tablet, phone, or cloud drive, smaller files take up less space and are easier to organize. This is especially useful when storage is limited or when you work with many presentations at once.
Improve PowerPoint performance
Presentations with large, uncompressed images may load more slowly and feel less responsive, especially on older devices. Compressing images can help your slides open faster, run more smoothly, and transition with fewer delays.
How to Compress Images in PowerPoint
The most common way to compress images in PowerPoint is as follows:
- Open your presentation
- Find the slide containing the images you want to compress.
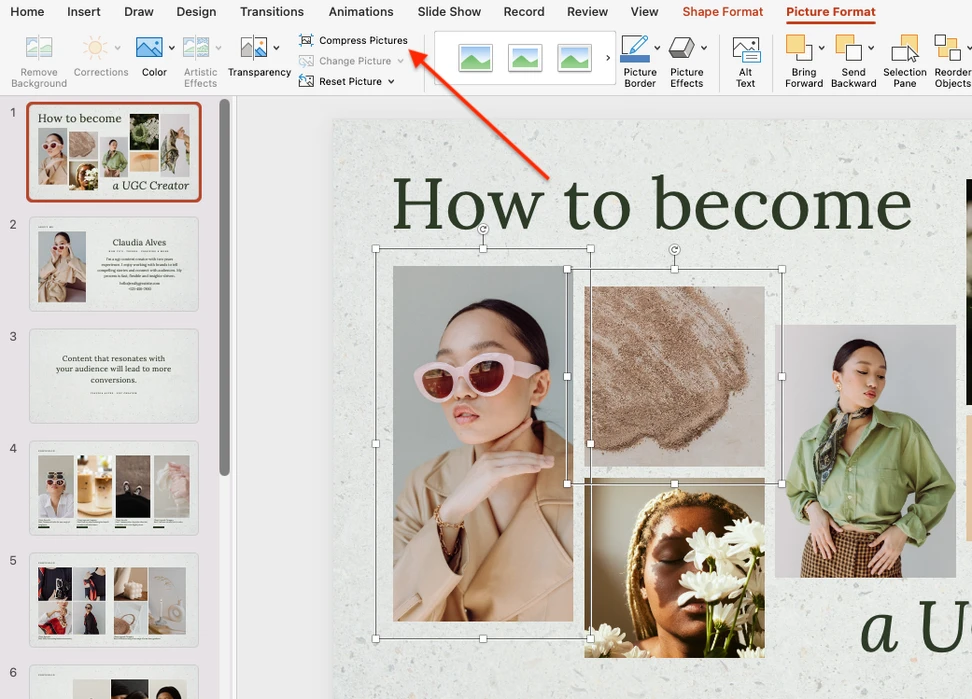
- Select the image. If you need to compress multiple images, hold down the Shift key and click each picture on the slide. Alternatively, you can use the Ctrl/Cmd + A shortcut to select all elements.
- Click the Picture Format tab.

- Find and click Compress Pictures.
- Choose your settings. They may vary slightly between Mac and Windows.
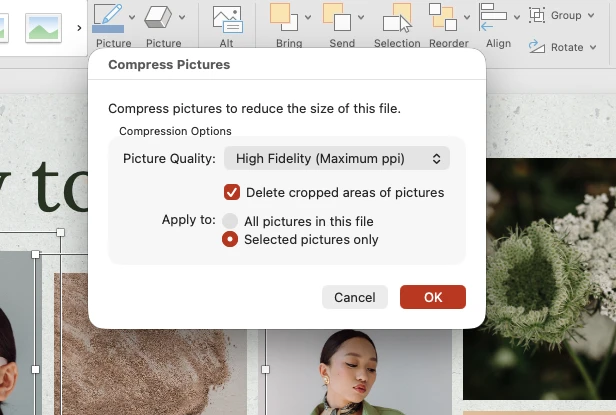
Here, you can decide whether to compress only the selected images or all images in the presentation. Finally, click OK to reduce the file size.
If you are using a Mac, there is a quicker way to open the compression settings window. Go directly to File > Compress Pictures.
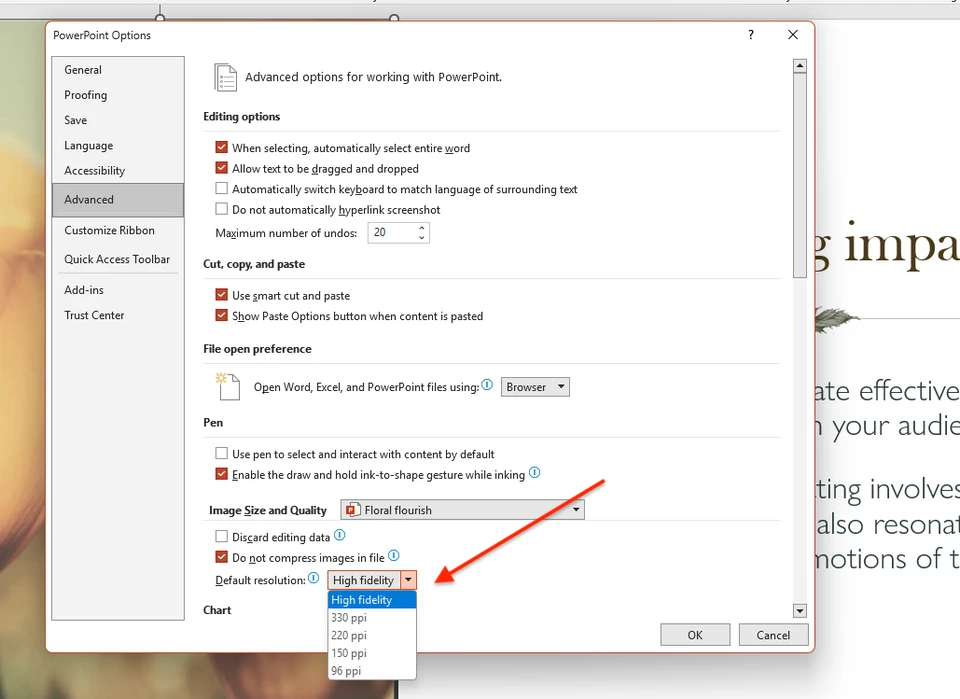
On Windows, the alternative method is a little less obvious. Go to the File tab, find Options at the bottom, then click Advanced and locate the Image Size and Quality section to change the resolution. Note that this setting applies to all images in the presentation. So if you only want to compress a single image, use the method described above.
Note: The Compress Pictures feature is available in the desktop version of PowerPoint for Windows and Mac. In PowerPoint for the web, these compression options may be unavailable or limited.
PowerPoint Compression Settings Explained
As you can see, finding the image compression tool in PowerPoint is quite simple. The key part of the process is choosing the right picture quality. PowerPoint offers six options, each of which determines the target output resolution.
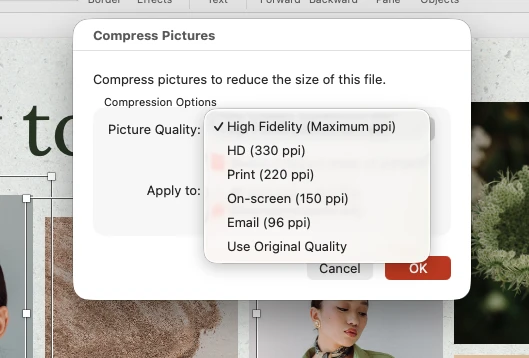
The rule is simple: the lower the ppi, the smaller the file size and the greater the risk of visible quality loss. The higher the ppi, the better the image quality and the less file size reduction you get.
Nowadays PowerPoint uses High Fidelity as the default image resolution. It keeps images at very high quality with minimal compression and is optimal for rendering on high-resolution displays.
The other less aggressive option is Use Original Quality. It means PowerPoint tries to preserve the image’s original resolution/quality instead of downsampling it to a lower preset. In practical terms, this gives little or no size reduction compared with the lower ppi options.
High Fidelity and Use Original Quality are best for:
- presentations shown on large high-resolution screens;
- slides with detailed screenshots, UI mockups, charts, or text-heavy images;
- presentations that may later be exported, repurposed, or printed professionally;
- situations where file size is not a big concern.
HD (330 ppi) is a high-quality compression option. This means PowerPoint compresses your images to about 330 pixels per inch while preserving high visual quality.
HD (330 ppi) is best for:
- presentations viewed full-screen on good monitors;
- client-facing decks where image quality matters;
- presentations that may be printed in decent quality;
- visual portfolios, marketing decks, product presentations.
Print (220 ppi) is a balanced option between quality and size. The 220 ppi resolution is typically enough for standard printing and for most professional presentations.
Print (220 ppi) is best for:
- decks that may be both shared digitally and printed;
- presentations with photos where quality still matters;
- general business use when you want a safer middle ground.
On-screen (150 ppi) is a good option if you need to reduce file size significantly. It is best for:
- presentations shown on laptops, office monitors, Zoom/Teams screenshares;
- internal decks;
- training materials, webinars, classroom presentations.
Email (96 ppi) is the most aggressive standard compression preset. It can dramatically reduce the file size, which means your images may appear blurred or pixelated when displayed on large screens. This option is best for:
- presentations that must be small enough to email quickly;
- decks with many photos where size matters more than visual polish;
- quick sharing, drafts, review versions, or archive copies.
Here is a comparison of the final presentation file sizes after compressing the images using the methods listed above:
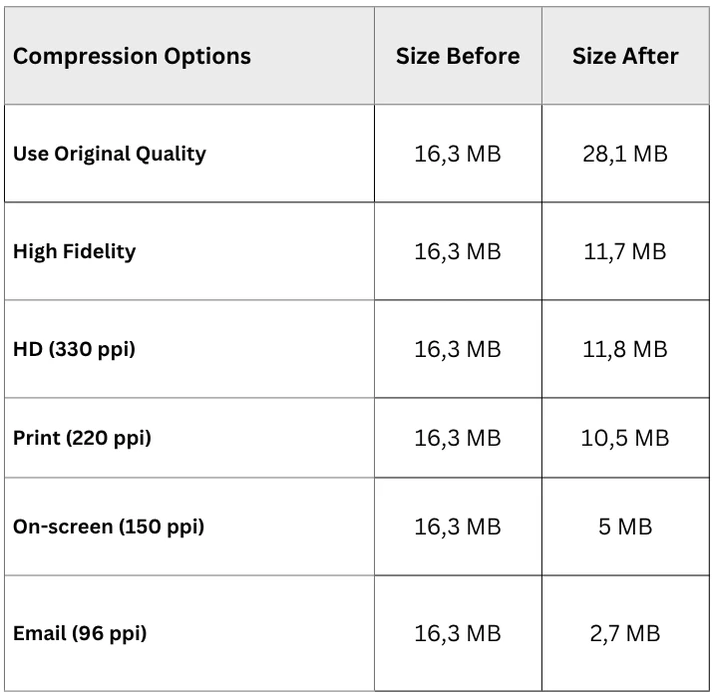
There are a few important points to keep in mind:
- If you choose Use Original Quality, your presentation file may actually become larger. This can happen because PowerPoint may preserve images at a higher quality after editing and may also retain editing data.
- A small difference between the results for High Fidelity and HD may indicate that the images in the presentation are already well optimized. In that case, switching from High Fidelity to HD will have little to no effect, and the slight difference in file size may simply result from the way the file is resaved.
- The greatest reduction in file size - often more than half - usually comes from compression options such as On-screen and Email.
It is also worth noting that PowerPoint’s image compression settings include another option that can help reduce file size: Delete cropped areas of pictures. By default, when you crop a picture in PowerPoint, the cropped-out portion often remains stored in the file, which keeps the presentation larger and allows the hidden parts to be restored later.
If you enable this option, PowerPoint will permanently remove the parts of the image that were hidden by cropping. As a result, the presentation file size can be reduced.
How to Reduce PowerPoint File Size Without Losing Image Quality
If you want to reduce PowerPoint file size without making your images look blurry or pixelated, the best approach is to optimize them before inserting them into your presentation.
Compress images before adding them to PowerPoint
Instead of relying only on PowerPoint’s built-in compression, reduce the size of your images in advance. This gives you more control over the final quality and can significantly reduce the size of the presentation file. If you need to process multiple images at once, a batch image compressor can make this step faster.
Resize images to match the slide dimensions
If your image is 5000 × 3000 pixels but it only needs to appear at 1920 × 1080 or smaller on a slide, resize it before inserting it into PowerPoint. You can use a free image resizer or follow this guide on how to resize an image without losing quality. Oversized images add unnecessary weight to the file without improving on-screen quality.
Choose the right image format
Use JPEG for photos, since it offers efficient compression and smaller file sizes. Use PNG for logos, icons, screenshots, and graphics with transparent backgrounds, because it preserves sharp edges and fine details better.
Crop images before inserting them
Remove unnecessary areas from the image in advance using an online image cropper whenever possible. PowerPoint allows you to crop pictures, but hidden cropped areas may still remain stored in the presentation file unless they are deleted during compression.
When images are properly optimized before insertion, PowerPoint can preserve their visual quality more effectively while keeping the overall presentation file smaller.
Conclusion
Compressing images in PowerPoint is one of the easiest ways to reduce presentation file size and make your slides easier to store, share, and present. In most cases, the best approach is to use PowerPoint’s built-in compression tool and choose the resolution that matches how the presentation will be used.
If file size matters most, options like On-screen (150 ppi) or Email (96 ppi) can significantly reduce the size of the presentation. If image quality is your priority, it is better to optimize pictures before inserting them into PowerPoint by resizing, cropping, and saving them in the right format.
With the right balance between compression and image preparation, you can keep your PowerPoint presentation smaller without making your visuals look blurry or unprofessional.
More Guides About Editing in PowerPoint
How to Add a Watermark in PowerPoint
How to Сrop a Picture into a Circle in PowerPoint
How to Blur a Part of an Image in PowerPoint