How to Resize PNG Images in Watermarkly
Resizing PNG images in Watermarkly takes only a few seconds. The PNG resizer works online in your browser, so you can use it on any device without installing software. Your files stay private and are processed securely.
How to resize a PNG step by step:
- Add your PNG images to the app.
- Choose a resizing method.

- Enter the new dimensions, percentage, or target file size.
- Save and download the resized PNG files.

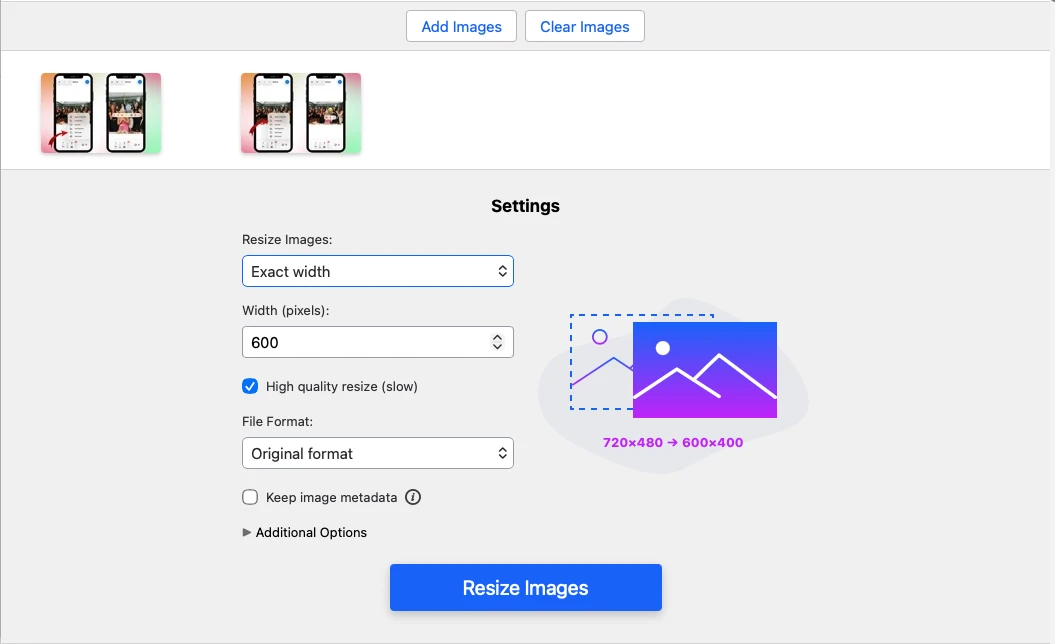
Choose Exact Width or Exact Height if you want to resize PNG images while keeping the original aspect ratio. Watermarkly will automatically adjust the other side to prevent stretching or distortion.
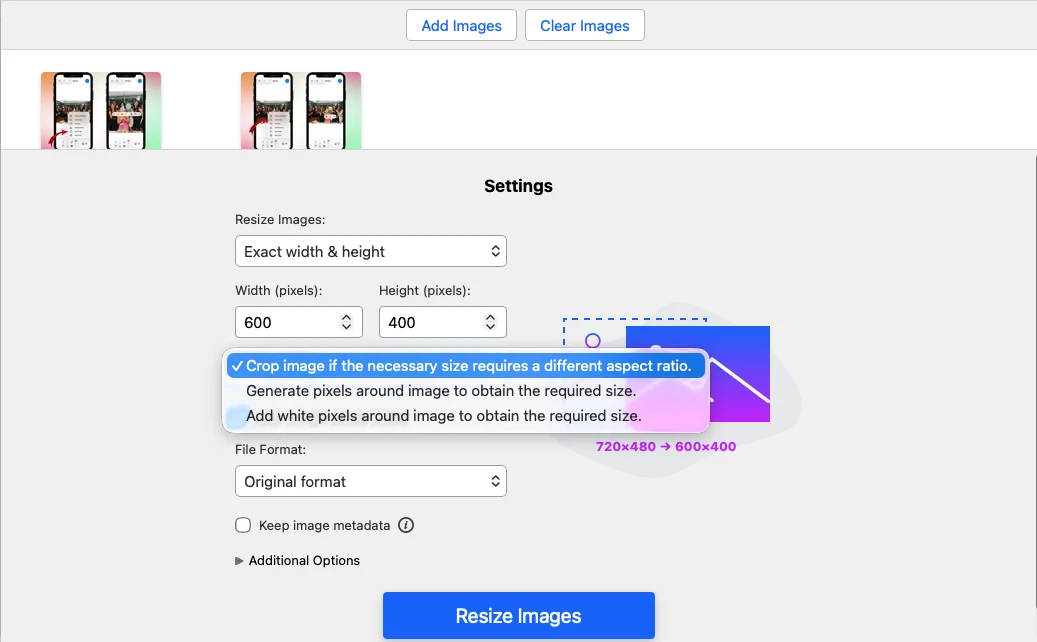
Choose Exact Width & Height if you need specific values for both sides in pixels. If the new proportions are different from the original image, you can either crop part of the image or keep the whole image by adding extra pixels around it.
Choose No Larger Than if you want to make sure that neither side of your PNG exceeds a specific size in pixels.
Choose Percentage if you want to reduce or enlarge a PNG image by a certain percentage.
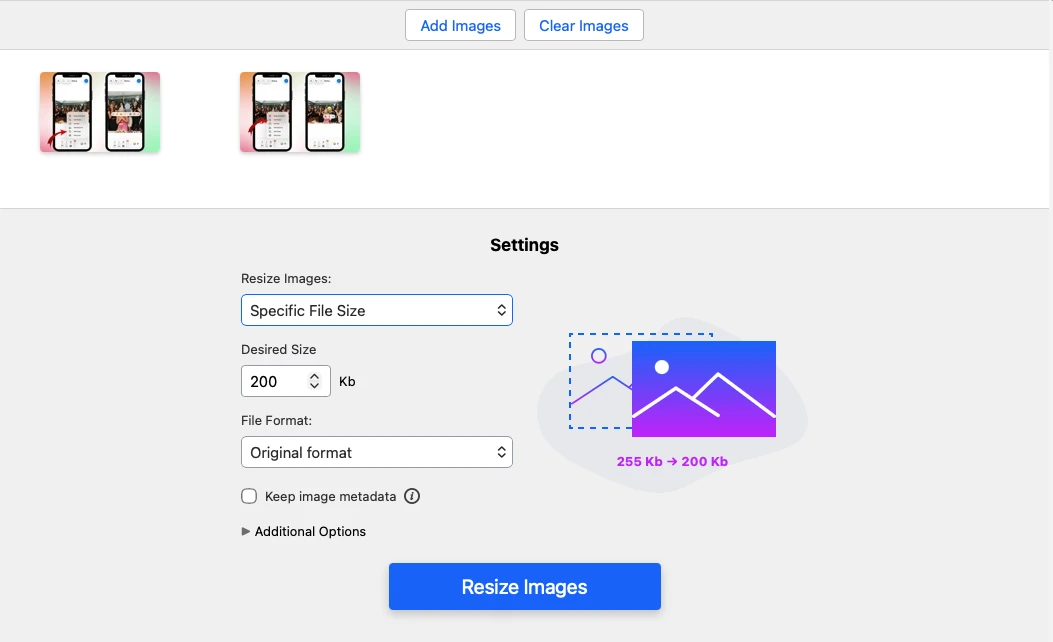
Choose Specific File Size if your main goal is to reduce the PNG file size in KB or MB rather than change its pixel dimensions.
 Resize PNG Online
How to Resize a PNG Without Losing Quality
Changing the pixel dimensions of a PNG can affect image quality, especially if you make the image much larger or smaller than the original. For the best result, avoid extreme resizing and keep the original aspect ratio whenever possible.
If the new width and height do not match the original proportions, your PNG may look stretched, squished, or distorted. To prevent this, resize by percentage or enter only one dimension and let the PNG resizer adjust the other one automatically.
Watermarkly helps you resize PNG images while preserving sharpness, transparency, and overall image quality. You can change PNG dimensions online and download a clean, high-quality result in seconds.
Resize PNG OnlineWhen PNG Is the Right Format for Resizing
PNG is a good format for images that need sharp details, clean edges, and transparency. It is especially useful for logos, icons, screenshots, illustrations, infographics, and images with text.
Sharp lines and text
PNG uses lossless compression, which helps preserve crisp edges, solid colors, and readable text. This makes it a strong choice for screenshots, graphics, diagrams, and other images where clarity matters.
Transparent backgrounds
PNG supports full and partial transparency, so it is ideal for logos, icons, stickers, and design elements that need to be placed on different backgrounds. When you resize a transparent PNG in Watermarkly, the transparent background is preserved.
Repeated editing
PNG does not add lossy compression artifacts each time you save the file. This makes it a better option than JPG for graphics that may need to be edited, resized, or exported more than once.
Limited color palettes
PNG works well for images with solid colors and fewer color variations, such as icons, UI elements, charts, and simple illustrations.
Resize PNG OnlineWhen You Should Resize a PNG
You may need to resize a PNG when the image has to fit a specific layout, upload requirement, screen size, or design template. Changing PNG dimensions helps you control how large the image appears without cropping it.
Meeting size requirements
Websites, blogs, marketplaces, apps, and social media platforms often require images to have specific pixel dimensions. With Watermarkly’s PNG resizer, you can set the exact width and height your PNG needs, so it fits the required format and looks clean.
Preparing images for websites and blogs
Large PNG images can take up too much space on a page or overlap surrounding content. Resizing helps your images fit neatly into blog posts, landing pages, product pages, banners, and other web layouts.
Making PNGs look good on different devices
Images may appear differently on desktop screens, tablets, and smartphones. By resizing PNG files to suitable dimensions, you can make logos, screenshots, graphics, and illustrations look sharp and properly scaled across devices.
Reducing image dimensions
If your PNG is much larger than needed, resizing it to smaller pixel dimensions can also reduce the file size. However, if your main goal is to make a PNG lighter in KB or MB, use PNG compression instead.
Making a PNG bigger
You can also enlarge a PNG when you need it to appear larger in a design, presentation, or document. For best results, avoid extreme upscaling, because making a small PNG much larger can cause blurriness or pixelation.
Resize PNG OnlineFAQs
How to resize a PNG image?
The easiest way is to use an online PNG resizer. It lets you change the image dimensions directly in your browser without installing extra software. You can set a new width and height, resize by percentage, or choose a target file size depending on what result you need.
Can I resize a transparent PNG?
Yes. Watermarkly keeps the background transparent when resizing PNG images, so it won’t be replaced with white or another solid color. This is useful for logos, icons, stickers, product images, and design elements that need to be placed on different backgrounds.
How to resize a PNG on Mac?
Mac’s built-in Markup Toolbar can resize a PNG, but it works best for one image at a time. If you need to process several PNG files or use more flexible resizing options without installing software, an online PNG resizer will be faster and more convenient.
What is the best way to resize a PNG image?
The best method depends on your goal. Use exact width or height to keep the original proportions, exact width and height when you need specific dimensions, percentage to scale the image up or down, and specific file size when you want to make the PNG lighter in KB or MB.