
How to Blur Faces in Photoshop
by ![]() Lina Thorne • Updated · Posted in Photo Editing
Lina Thorne • Updated · Posted in Photo Editing
There are a number of reasons why you might want to blur faces in a photo. Maybe you took a group photo and want to post it online, but a couple of people aren’t comfortable with you sharing a picture of them. In this kind of situation you have two options – not posting the photo at all or blurring those people’s faces.
Another reason might be that you live in a country that has laws or regulations, according to which you need to get a permission from a person to share a photo of them online. And what if you can’t get this permission because, say, you’re a street photographer who took a photo of a stranger? You can blur that stranger’s face and post the photo on Instagram without worrying about anything!
Maybe there are no regulations in your country, but you still want to blur someone’s face to protect their identity for ethical reason. Or maybe you want to protect your own identity! After all, we live in a world where face recognition algorithms exist, and they can be used for both good and bad purposes. Thus, it’s important to be careful when sharing photos of strangers and even your friends and family online. You might consider blurring their faces to keep their identities safe.
Whatever your reason may be, it’s not that challenging to blur a face in a photo. For that, you can use one of the most powerful, complex and advanced software, Photoshop. It will take you only a few simple steps! In fact, there are three different ways to blur faces in Photoshop – each is slightly more difficult than the previous one. But there’s no need to panic if you are a beginner.
You’ll be able to blur faces in Photoshop no matter which method you’ll choose. In this article, you will find detailed instructions that will be incredibly helpful for you. You will also learn about an easier and quicker way to blur faces in photos.
Let’s dive in!
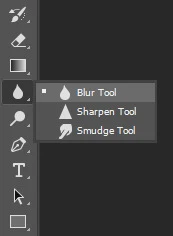
How to blur a face in Photoshop with Blur Tool
Yep, Photoshop actually has a tool specifically for blurring. You can use it to blur any object in your image. Here’s how you can do it:
Click on the icon of the Blur Tool to select it.
In the Options menu at the top, you can adjust the strength of the blur or pick a different blending mode.
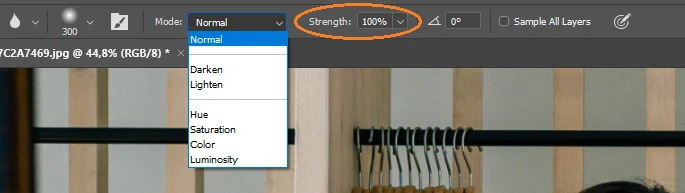
Here’s a tip! You can change the size of the stroke by pressing the left or right bracket keys – “[” and “]”.
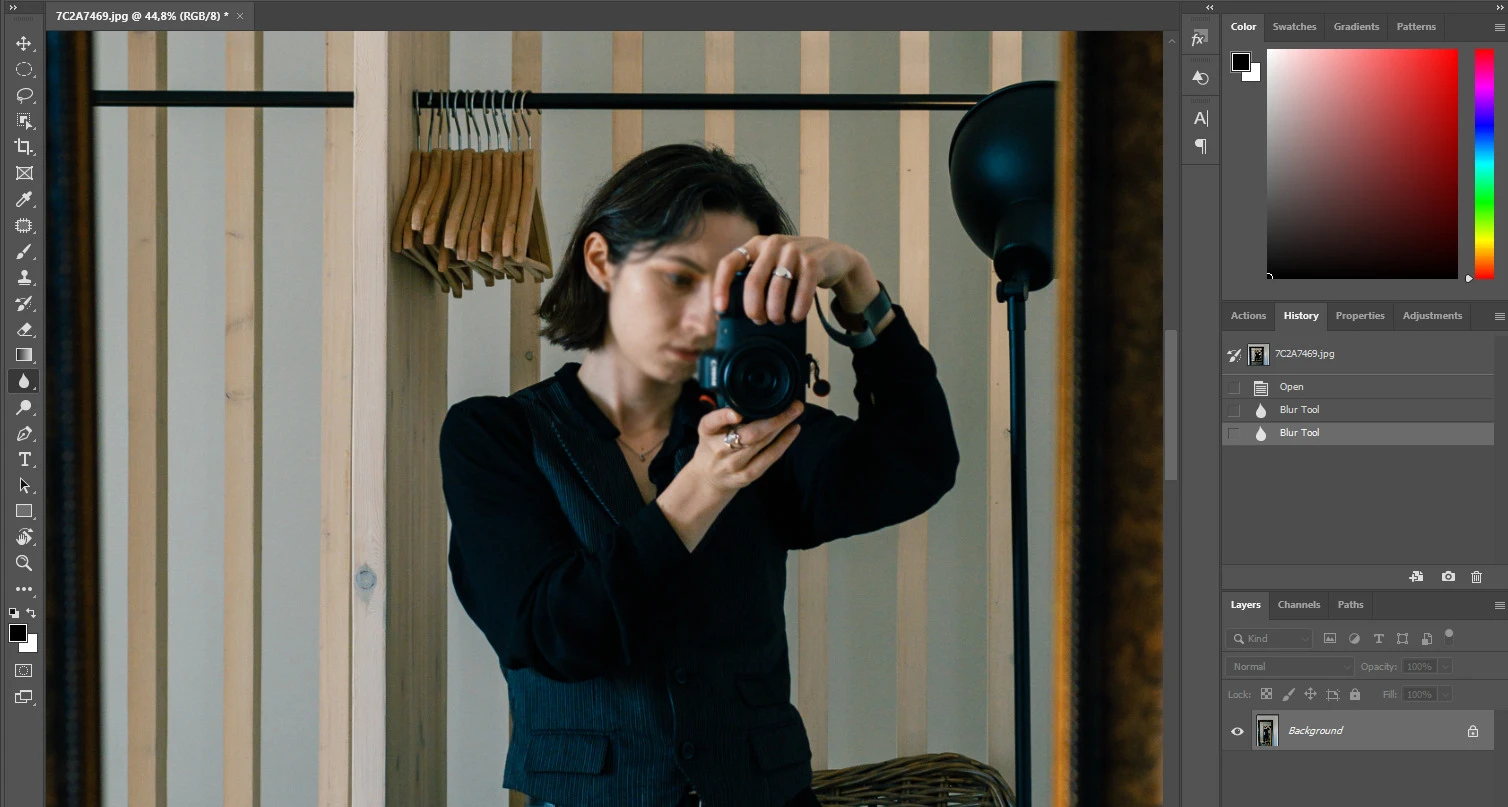
Once you adjusted the size of the stroke and the strength of the blur, paint over the face. You can paint over the face a few times to make the blurring effect more intense.
All done!
The drawback of the Blur Tool is that it produces quite a mild blur. Even if the strength of the blur is set to 100% and you paint over the same area 5 or 10 times, in most cases, a face will still be recognizable.
If you need to blur a face in Photoshop only slightly, then this tool might be a good fit for you.
But what if you want a more intense blur? What else can you do?
How to blur a face in Photoshop with Marquee Tool
This method is pretty easy, and you will have a lot more control over the intensity of the blur compared to the previous option. Let’s take a look:
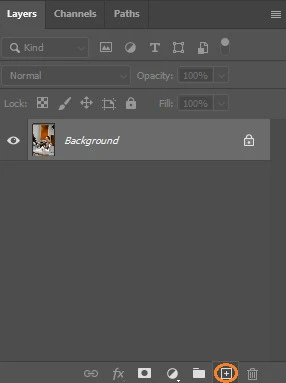
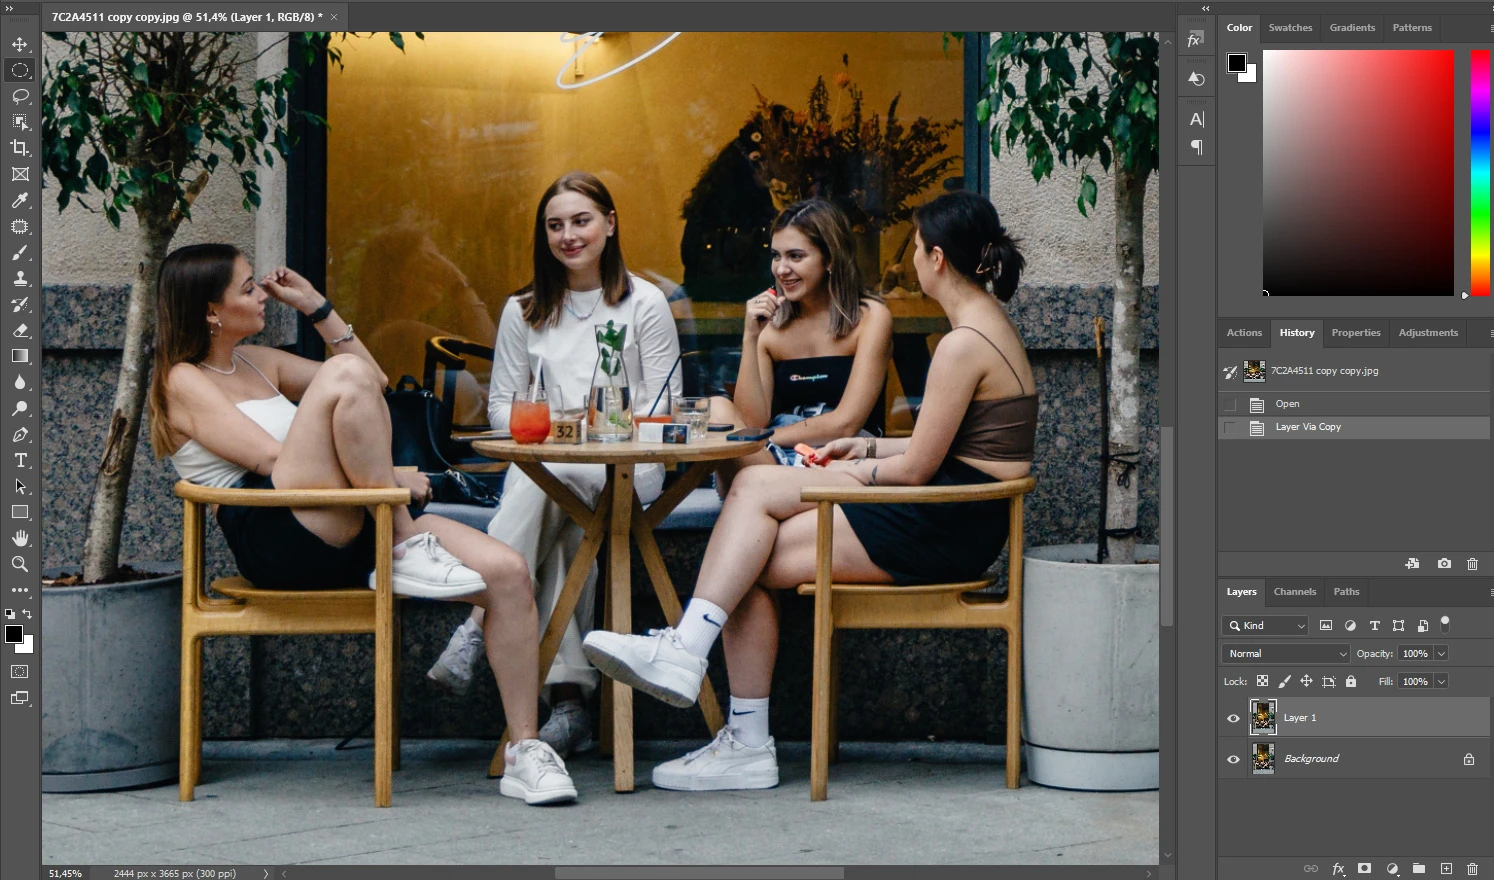
- Import the image that you want to work with into Photoshop and duplicate the layer by clicking on the “Create New Layer” icon in the Layers panel.

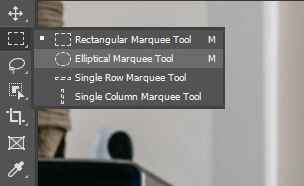
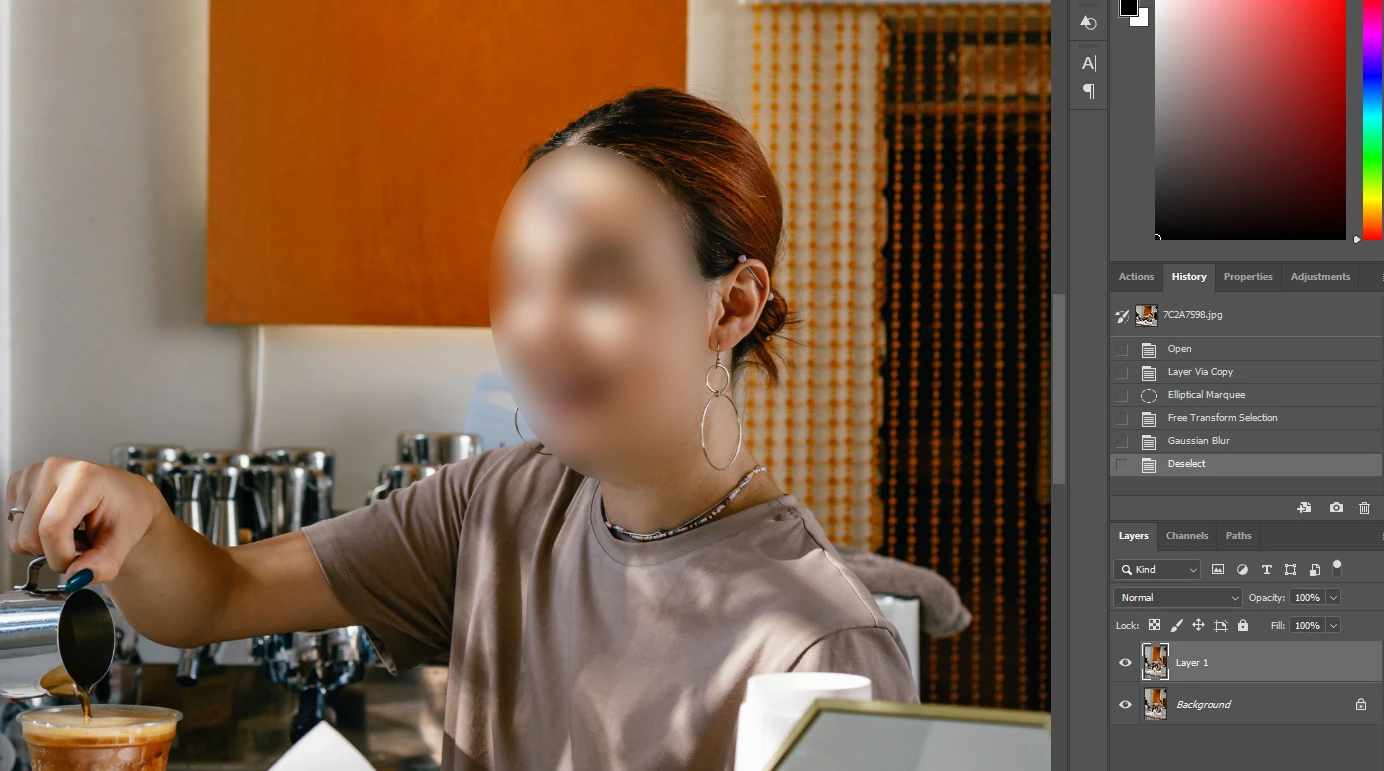
Duplicating isn’t essential for this method. You can skip this step, if you want. But it’s a good idea to create your blurred area on a separate layer. This way, you’ll be able to start over by simply deleting the duplicated layer, if necessary. - Go to the Tool Bar and choose the Marquee Tool; you can also press “M” to enable it. There’s a high chance that your Marquee Tool is set to the shape of a rectangle. Naturally, your blurred area can be rectangular, but since you are blurring a face, it would be better to switch to an oval. To do this, right click on the icon of the Marquee Tool and select the “Elliptical Marquee Tool.”
- Next, draw your selection over the face that you want to blur. If you want to create a perfect circle, hold SHIFT while you are drawing.

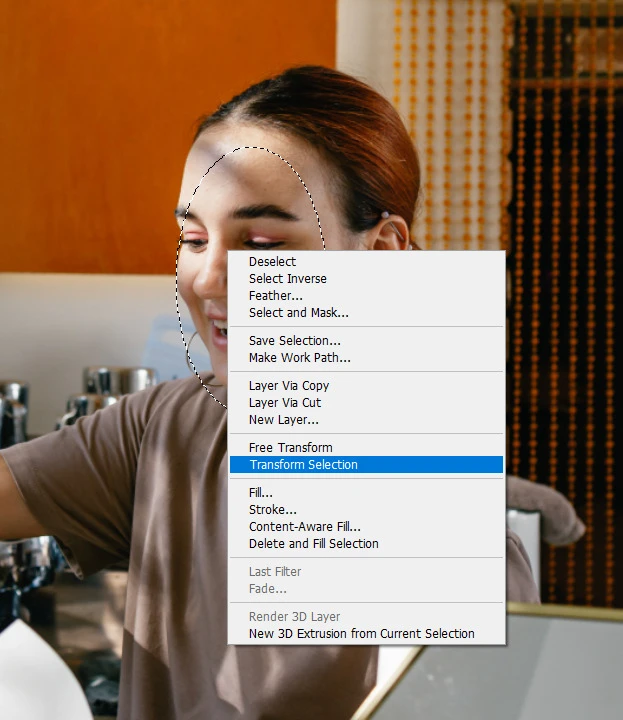
- If you want to adjust the selection that you’ve just created, right-click inside the selection to open the drop-down menu. Pick “Transform Selection.”
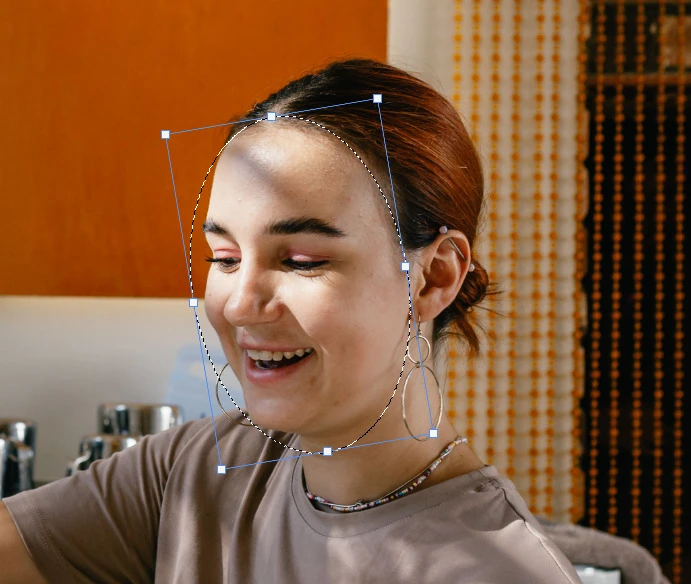
- Drag the blur borders with the cursor to resize your selection. Here, you can also tilt as well as reposition your selection. Press “Enter” when you are done.
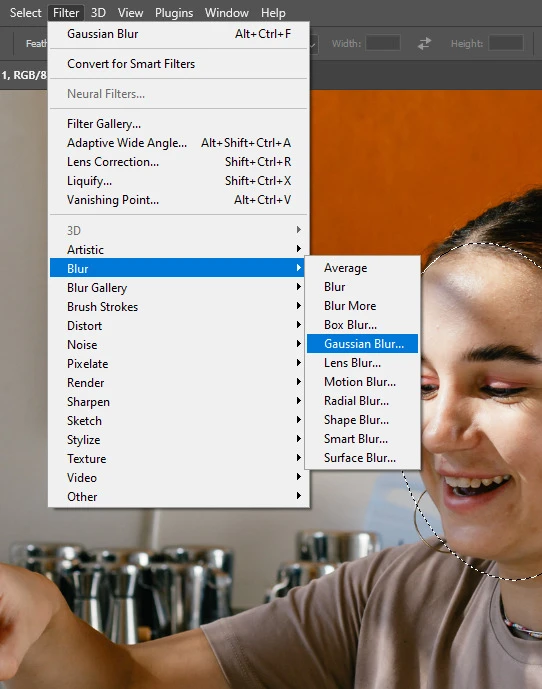
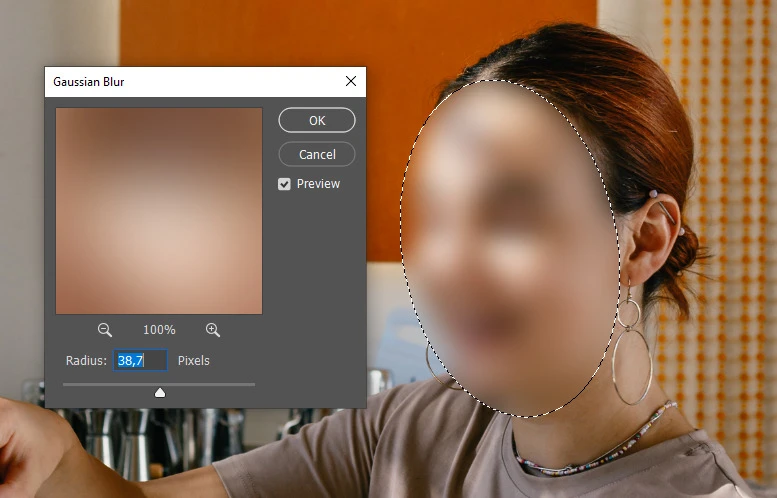
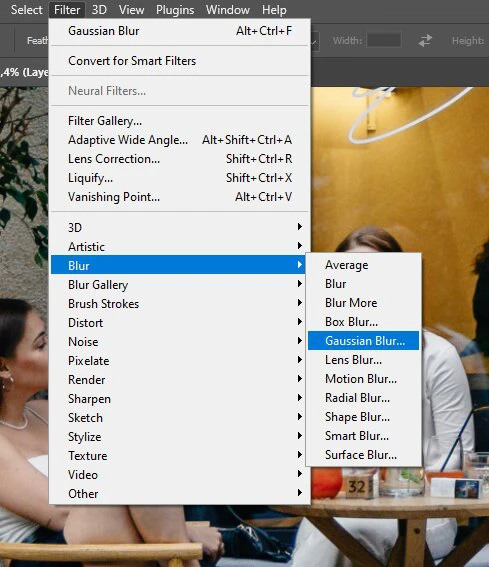
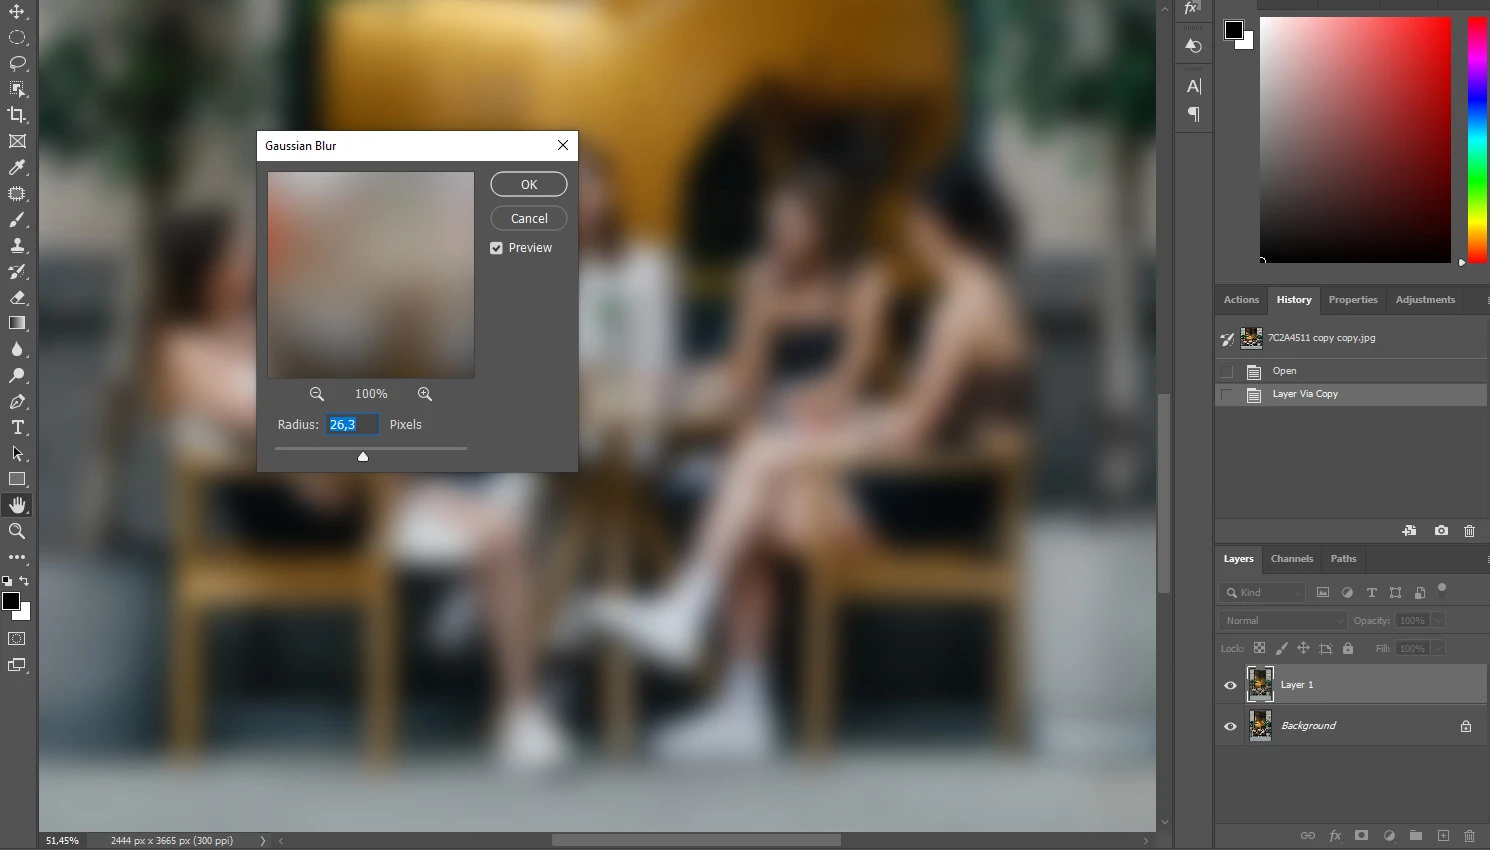
- Go to Filter > Blur > Gaussian Blur. This will open the settings of the Gaussian Blur.
- To make the blur more or less intense, you can adjust the slider or enter a specific number of pixels for the radius. There’s a preview that will help you choose what radius works best for you. Hit “ OK” to apply the changes.
- If you want to see what your image looks like without the selection being active, press CTRL + D or COMMAND + D to deselect.
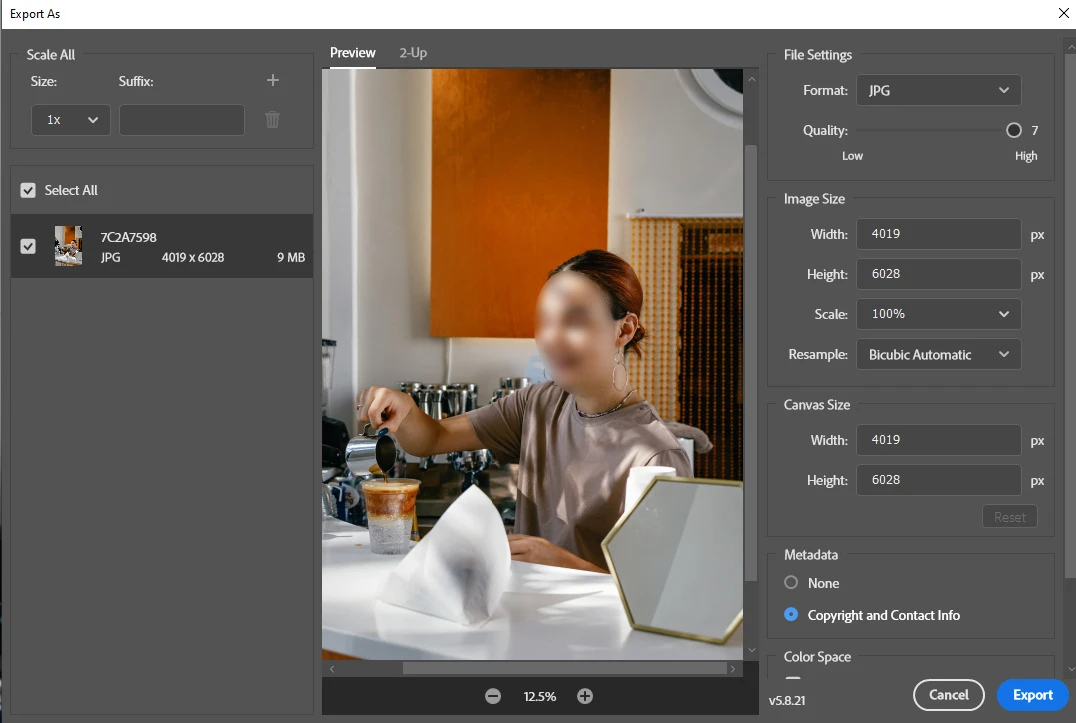
- Once you are ready to export your image, go to File > Export > Export As.
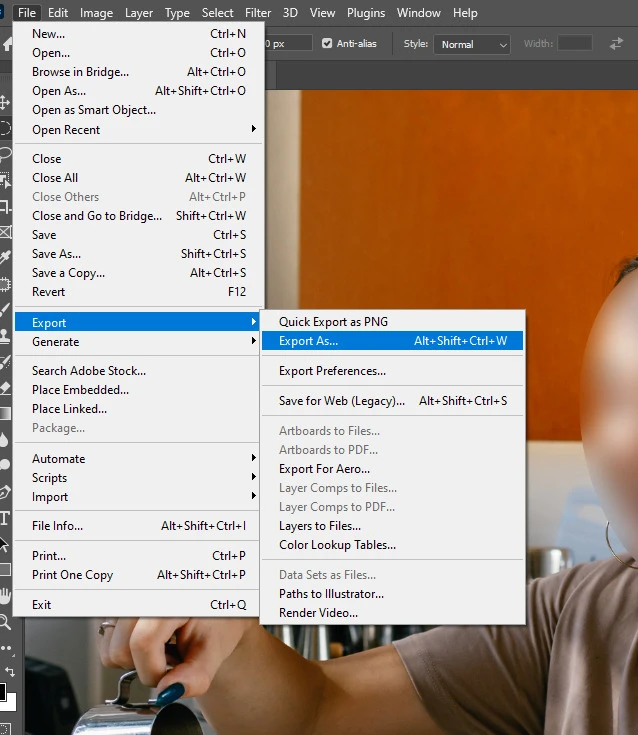
- Specify the export settings and click “Export”.
The drawback of this method is that the blurred area will have a sharp edge. It might look quite aesthetically displeasing, unprofessional and even distracting for viewers. In addition to this, if you want to blur several faces in a single image, you will need to repeat this process for each face.
How to blur faces in Photoshop with Layer Mask and Brush Tool
Fortunately, there’s a way to blur faces in Photoshop, where the transition between the blurred area and the rest of your image will be rather smooth and seamless.
Follow these steps:
- Once your image is in Photoshop, you’ll need to create a copy of your layer. The Background layer should be selected in the Layers panel. Then, press CTRL + J if you are on Windows or COMMAND + J if you are on Mac.
 Please note that you cannot skip this important step here.
 - Make sure that the duplicated layer is selected.
- Go to Filter > Blur > Gaussian Blur.
- Adjust the intensity of the blur with the help of the slider or by entering the necessary number of pixels. Click “OK”. Your entire image will be blurred – that’s how it should be.
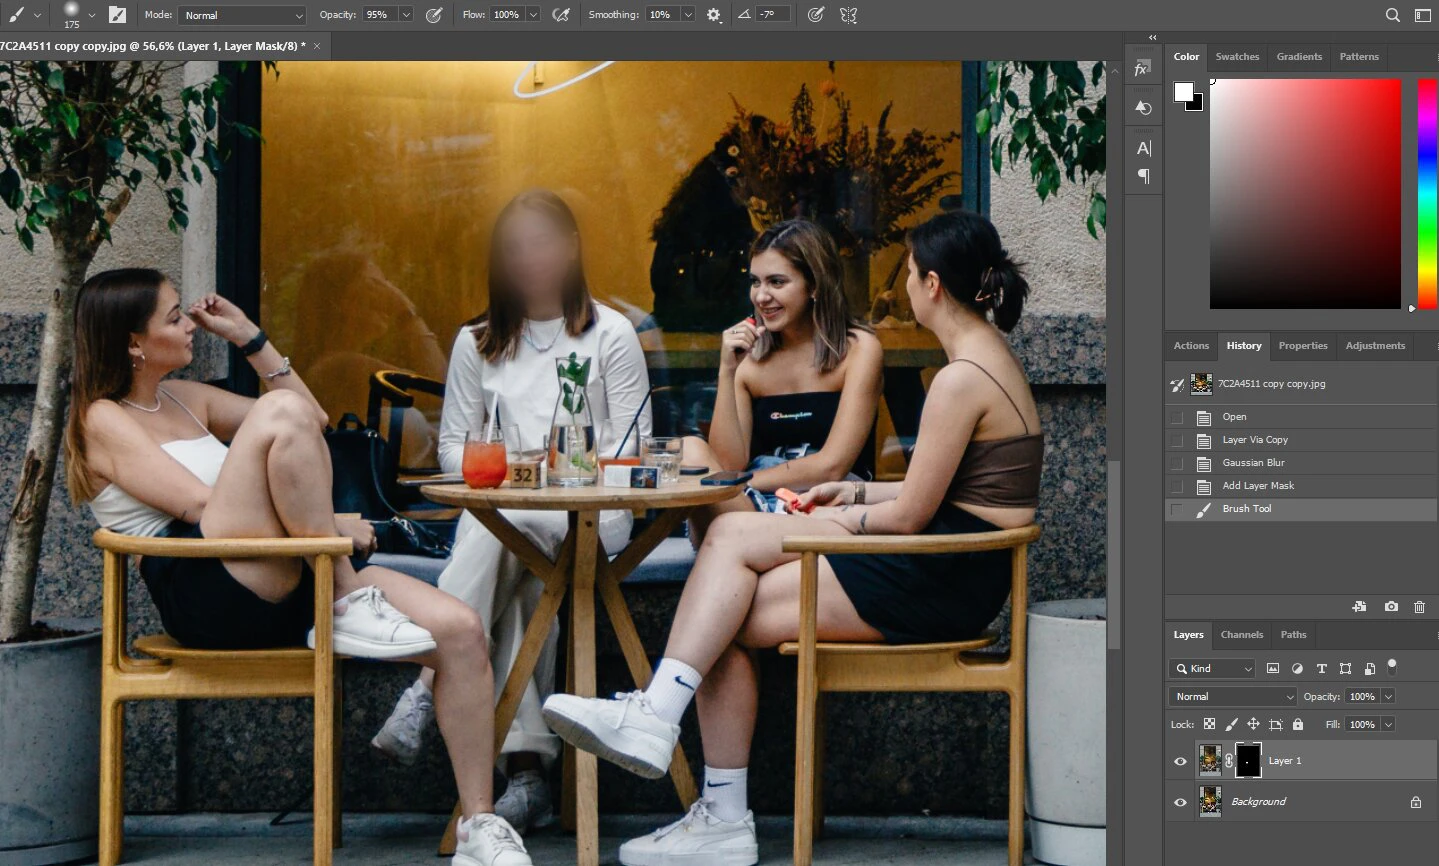
- Hold ALT (Windows) or OPTION (Mac) and click on the “Add Layer Mask” icon in the Layers panel.

It’s important to press ALT / OPTION because this way your blurred layer will be hidden behind a mask. Your image won’t be blurred anymore, and you will see a black rectangle next to your duplicated layer in the Layers panel.
- Select the Brush Tool in the Toolbar. There are two things that you need to keep in mind. First, white should be set as the foreground color. In other words, it needs to be on top of the black one in the toolbar. This is crucial because your mask is black. And you’re going to add the blur hidden underneath the mask by painting with the white color.

Second, in the Options menu, set the hardness of the brush to 0% or any other small number; the smaller the better. This is because you need the brush to have a soft edge since you want your blurred area to have a smooth transition.
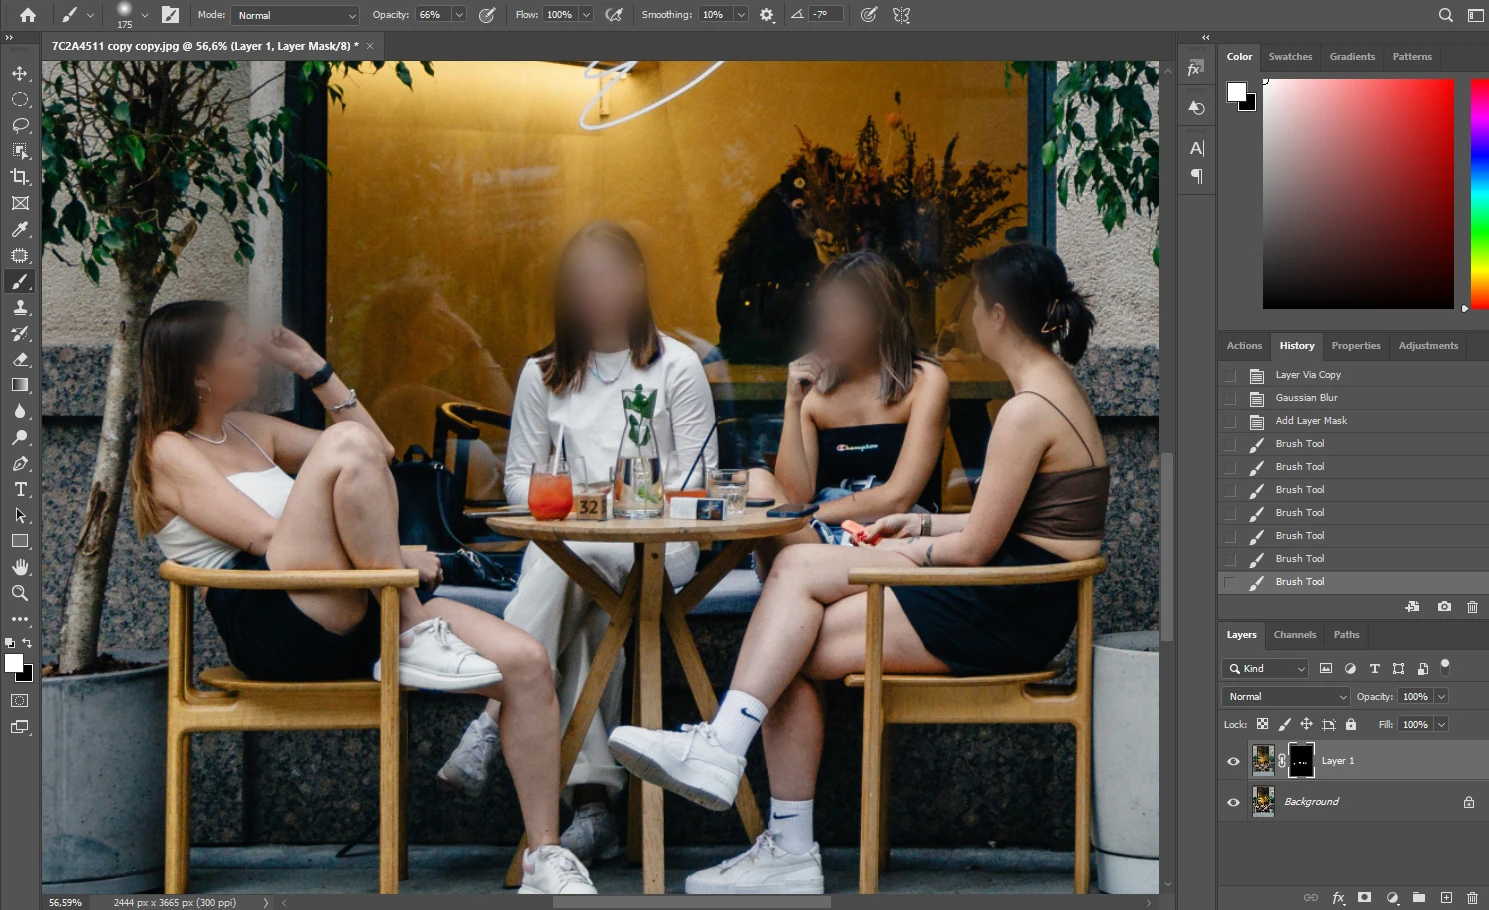
- Make sure that the black rectangle is selected in the Layers panel and paint over the face that you want to blur.
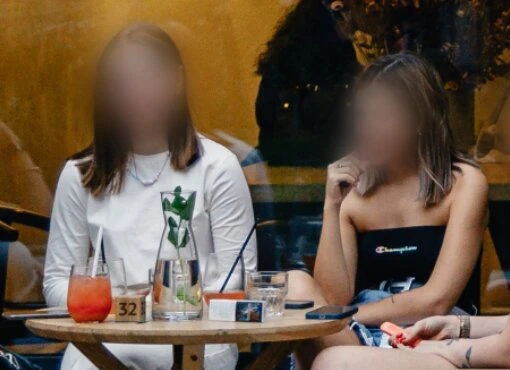
- You can paint over one and the same face a few times to get a more intense blur. You can also experiment with opacity of the brush. For instance, in this image, two brush strokes were applied to both faces. But the first face was blurred with the brush’s opacity set to 95%, while the second one – with the opacity set to 65%.
- Voila! The faces are blurred, and you can proceed to exporting your image.
The main benefit of this method is that you can quickly blur faces in a photo. You won’t have to create and adjust the selection for each face separately. Thus, this method will be perfect for you if you need to blur several faces in a single image in Photoshop. Plus, unlike with the previous method, the blurred area here is unobtrusive since it has a smooth edge.
The drawback of using the Brush Tool is that you won’t exactly be able to create a perfect circle or an oval and it’s much more difficult to adjust the tilt of your blurred area.
Blurring faces can be easier and quicker
Photoshop is amazing and undoubtedly powerful. But it’s also advanced and intricate. As the result, performing a simple task of blurring a face requires you to create new layers and use different tools. Watermarkly can make this much faster and less complicated.
Now, you’re probably thinking that you don’t want to download and install another app – you already have Photoshop, and it already takes up a decent amount of memory space. Is that right? Well, Watermarkly is a web-based app which means it works in a browser. So, it won’t take up any of your precious memory space.
Since it’s an online app, you might be worried about your privacy and the safety of your files. But you’ll be happy to know that you won’t have to provide any personal information to use Watermarkly. You won’t have to sign up, create an account or subscribe to anything. You can simply open the face blur app and start blurring faces anonymously. What about your files you may ask? All the processing will be done right in your browser. Your files won’t be uploaded to or stored on our server. No one will be able to steal your files since no one will have access to them. Neither your privacy nor the safety of your files will be violated.
Another thing about Photoshop is that it can process several images in one go, but it will take you some extra steps to set up batch-processing. With Watermarkly, this is much easier, too. Surely, there’s a chance that you might need to do some minor tweaking on every or almost every photo in the batch. But even with that in mind, the entire process will still be easier and quicker than in Photoshop.
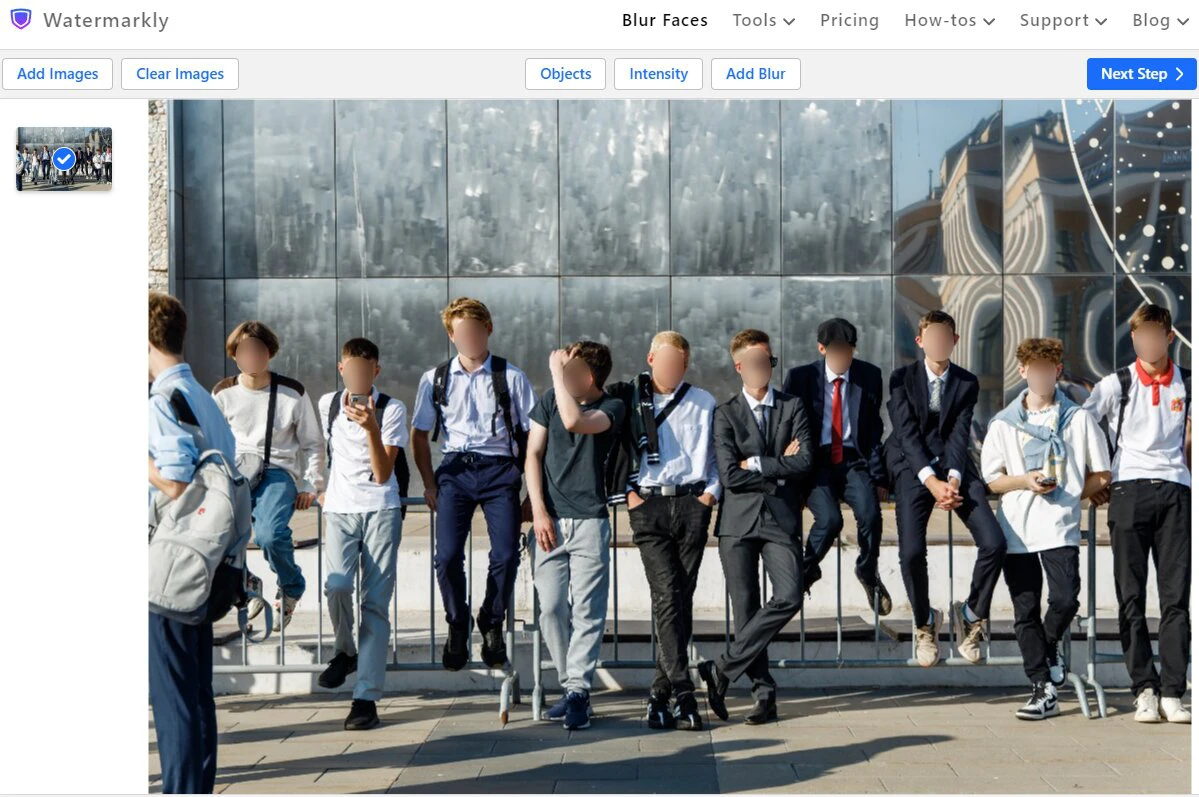
You’ll be genuinely surprised how effortless it is to blur faces in Watermarkly! It will take you only a couple of minutes if not less. First, you import one or several images directly from your device – it may be a laptop, a smartphone, a tablet or a computer. If some of your files are stored on Google Drive, Google Photos or Dropbox, you can import them from either of these cloud storage. In addition to this, it’s possible to copy and paste a link to the image that you want to work with.
Next, the app will use the AI algorithms to blur faces automatically.
That’s right!
The main advantage that Watermarkly has over Photoshop is that it can detect human faces, then blur them without you doing anything. This will save you a significant amount of time and effort.
But what if you want some flexibility? What if the app won’t be able to detect one of the faces in the photo? What if you’ll want to do some tweaking?
You’ll be able to do all that!
Once Watermarkly is done detecting and blurring faces automatically, you can do some further editing. By clicking on Objects and selecting the faces that you don’t want to blur, you can remove some of the blurred areas. If the app was unable to detect a face, you can click on the “Add Blur” button to create a new blurred area, which can have the shape of an oval or a rectangle. If you need to edit one of the blurred areas, click on it. Drag the blue borders to resize it. The blue button with round arrows will allow you to adjust the tilt of the blurred area. With the help of the Intensity button, you can make your blurred areas more blurred or less blurred; please note that the changes will be applied to all the blurred areas.
Finally, once you are done, you can go to the export settings, specify them and export your image.
Another difference between Watermarkly and Photoshop is that the edges of the blurred areas will be smoothed automatically after the photo is exported.
No Marquee Tools or adding Layer masks. The process is quite simple and fast, yet you still have a lot of control over the result.
Conclusion
Blurring faces in Photoshop might seem like a difficult task, but it’s not; no matter how familiar you are with image editing. It does require some time and effort and depending on the method of your choice, you’ll get slightly different results. However, thanks to AI technologies in Watermarkly, blurring part of an image can be much easier and faster since this app can detect faces and blur them automatically. The blurred areas will fit into your photos unobtrusively. Your processed images will look beautiful and professional, while the identities of people in them will be protected.
More articles
How to Resize an Image in Photoshop
How to Crop in a Circle in Photoshop
How to Upscale an Image in Photoshop