How to Resize an Image on Mac

Do you want to know how to resize an image on a Mac without downloading any additional software or paying extra fees? It couldn’t be easier! The Mac OS has some built-in tools for basic image editing, including cropping, compressing, resizing images, and even changing their resolution. In fact, you can effortlessly change the width and height in pixels, if you need to prepare your images for online publication, or in centimeters/inches if you want to print your images.

Additionally, on a Mac, it’s perfectly possible to streamline the resizing process to reduce the size of multiple photos at once.

Naturally, these built-in tools can be great and useful, but they do have a couple of limitations and drawbacks; you’ll learn about them in just a moment. That’s why it’s a good idea to try an online image resizer as an alternative. For instance, Watermarkly! Why is that, you may ask? Well, it can work on any operating system or device and doesn’t require installation or downloading. On top of that, it’s available for free and can provide the same results in a faster and easier way.

Now, let’s explore all the ways that you can resize an image on a Mac.

Resize Photo Online

How to Resize an Image on Mac

Do you need to resize a single image on a Mac? Let’s take a look at how exactly you can do that. First, open your image in the Preview app, then do the following:

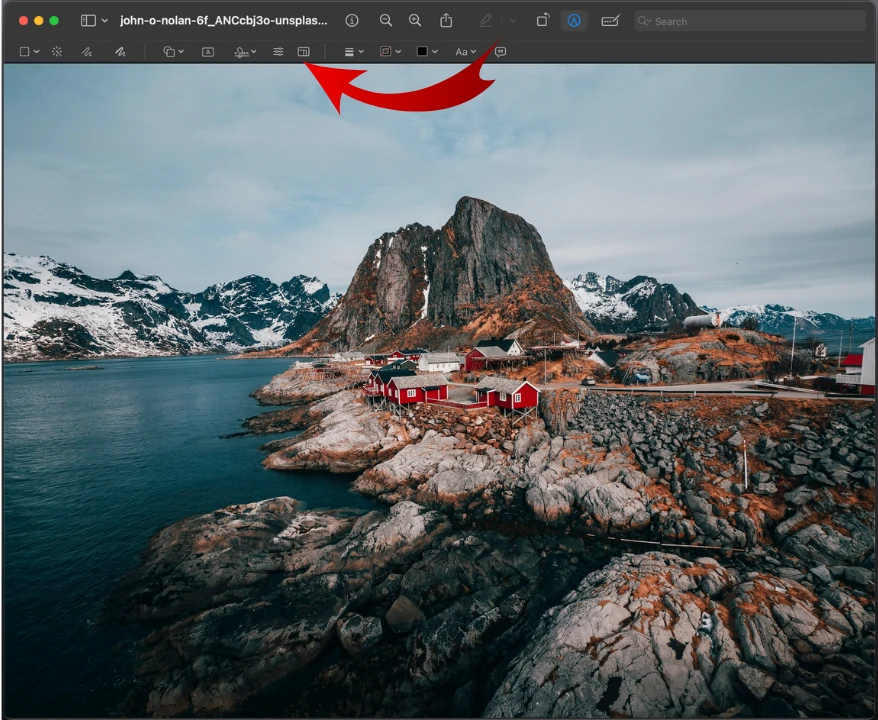
  1. Open to the Markup toolbar by clicking on the “Pen” icon at the top. how to resize an image mac
  2. Select the "Adjust Size" tool. how to resize an image mac
  3. In the settings window, enter new values for the width, height and resolution. You can select the necessary unit of measurement here, as well. For example, it can be pixels or inches. resize image mac
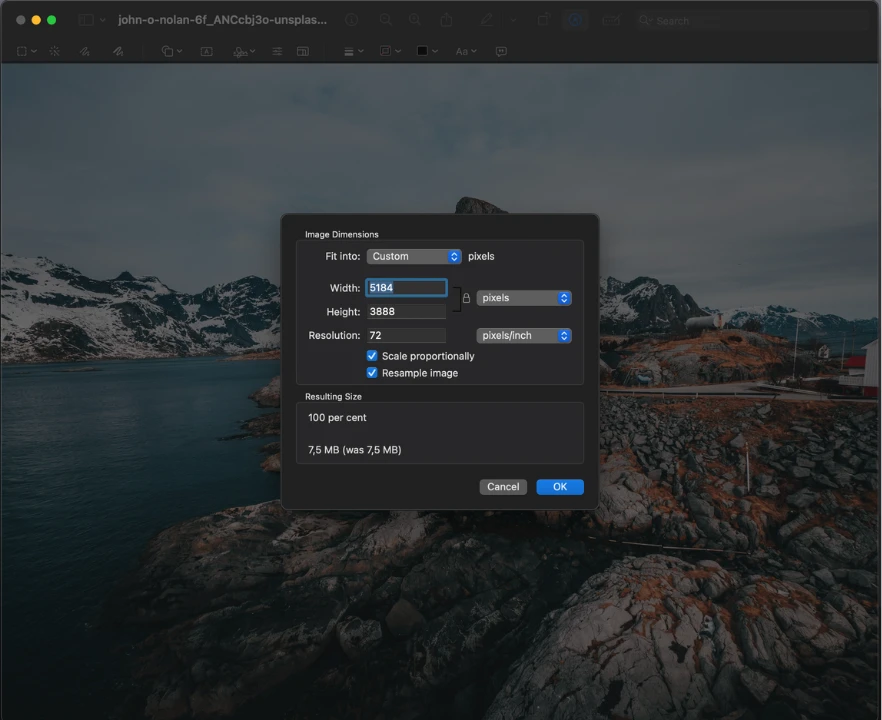
  4. When you’re ready, click on the „OK” button. Please note that the resized copy will replace the original photo.

Here are all the resizing options that you can make use of:


Resize an image while maintaining its aspect ratio

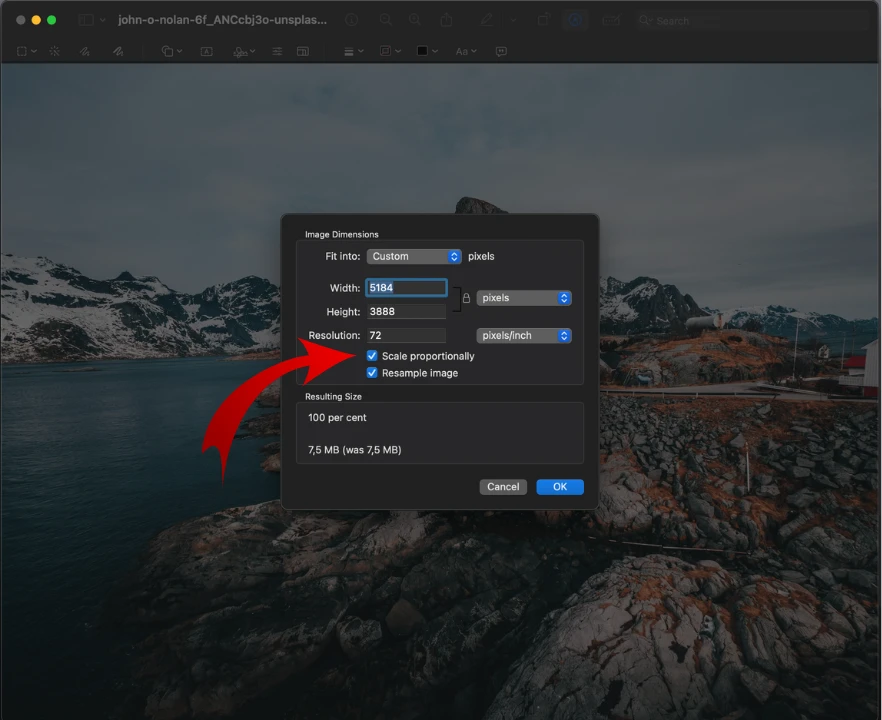
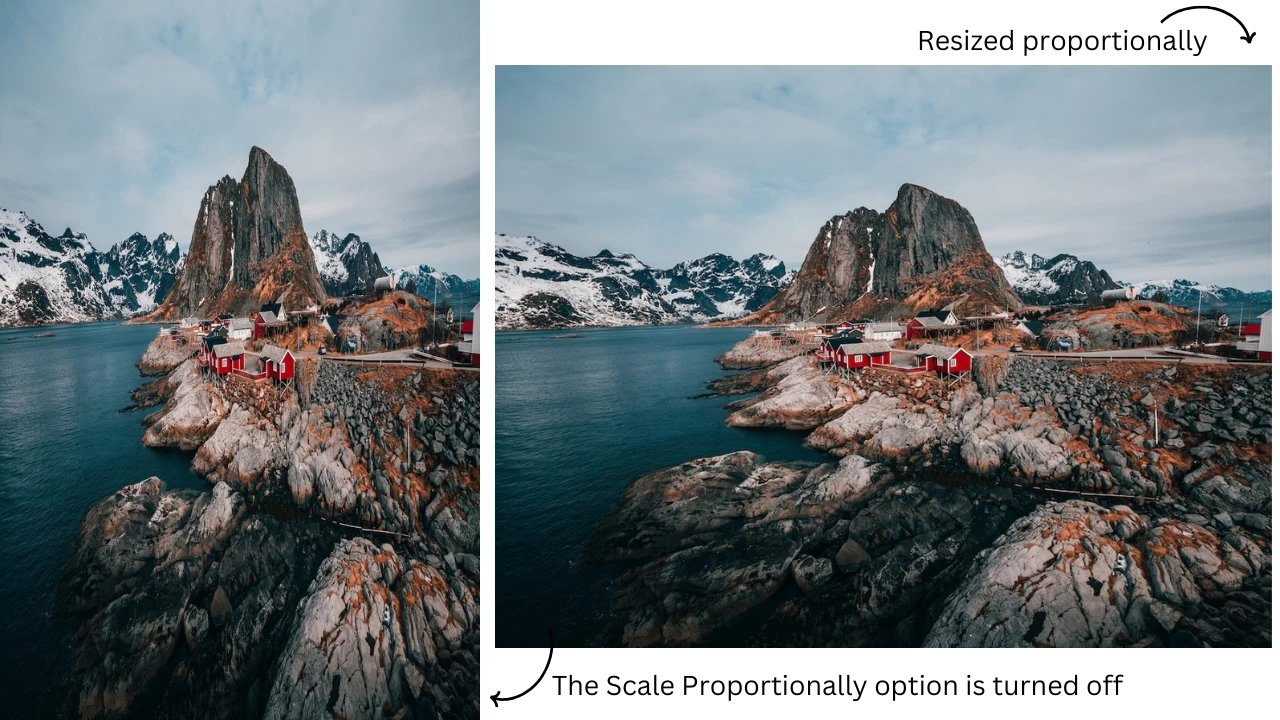
To ensure your photo is resized without any distortion or loss of quality, the "Scale Proportionally" option should be enabled. You’ll see a padlock icon to the right of the width and height input fields. It means that the aspect ratio is locked and will be maintained. What’s more, you will need to enter only one new value – either for the height or the width. When you change the width, the height will change automatically and vice versa.
how to resize image on mac

Here are two resized photos. One of them was scaled proportionally, while the other one was not. The difference is pretty big, right?
how to resize image on mac

Resize an image on Mac by percentage

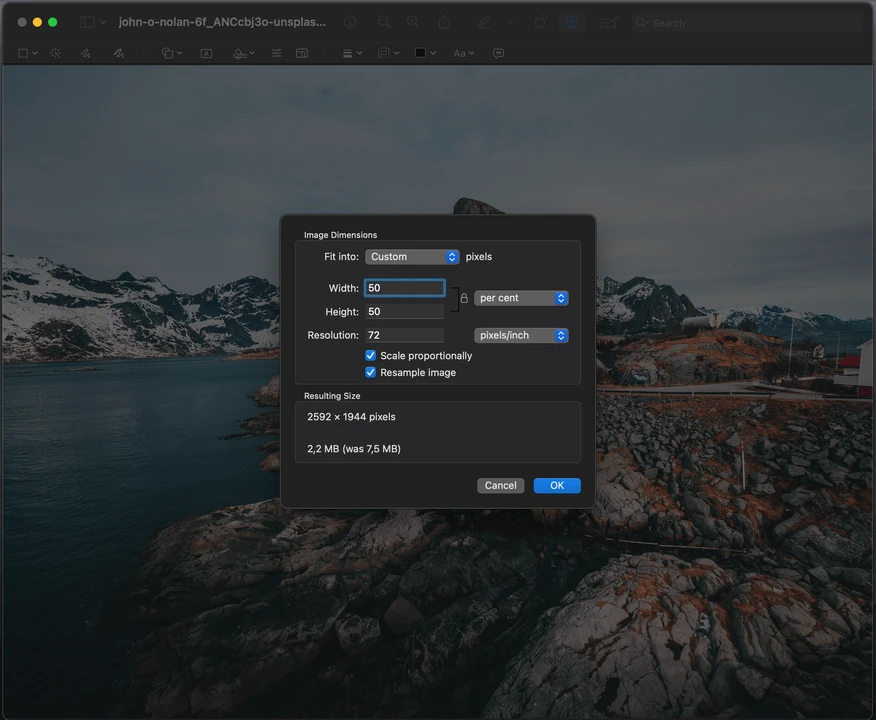
Let’s say that you don’t need a specific image size in pixels. You just need to make your image smaller. Well, you can do that pretty easily! First, change the measurement unit. In the dropdown menu that’s next to the Width and the Height, select the Per cent option. The values for the width and the height will instantly change to 100%. Now, enter a new value. For example, 50. Once you do that, you’ll see the new pixel dimensions of your image in the Resulting Size section at the bottom. The new file size in kB or MB will be shown here, as well. Pretty convenient, huh?
how to resize image on mac

Change the pixel dimensions

There are two things that you need to be aware of. Here’s the first one. When resizing an image on Mac in pixels, always make sure that the “Resample image” option is enabled. If it’s not, nothing will happen to the pixel dimensions. You will be able to change only the size in inches or centimeters based on the resolution (DPI / PPI). So, to make the necessary changes, make sure that the Resample image is checked.

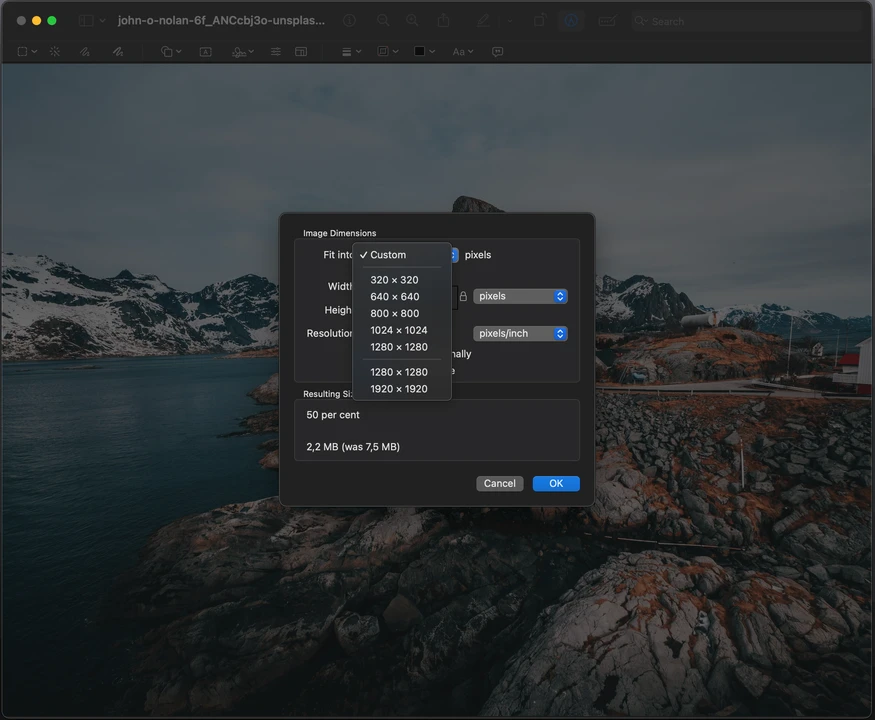
To resize an image, you will need to enter a new value either for the width or for the height. As an option, you can choose one of the ready-made presets in the Fit Into menu. And here’s the second thing that you need to know. If the “Scale Proportionally” option is disabled and you select a ready-made preset, your image will be cropped into a square and the height will be equal to the width. But if you select one of the presets, while the Scale Proportionally option is enabled, then only the longest side will be changed. For instance, if you have a landscape oriented image, then its width will be changed.
how to resize an image on mac

It’s worth noting that it’s possible to increase the size of an image using this built-in tool, as well. However, an online image upscaler will undoubtedly do a much better job and produce higher-quality results. The Markup tool will achieve the necessary size by simply stretching the image. As a result, it’ll become blurrier. Meanwhile, some third-party resizing apps use AI algorithms and can actually upscale an image while maintaining excellent image quality. So, your upscaled image will be sharp and clear. See for yourself! The difference is pretty obvious.

resize image mac Resize Photo Online

How to Resize Multiple Images on Mac

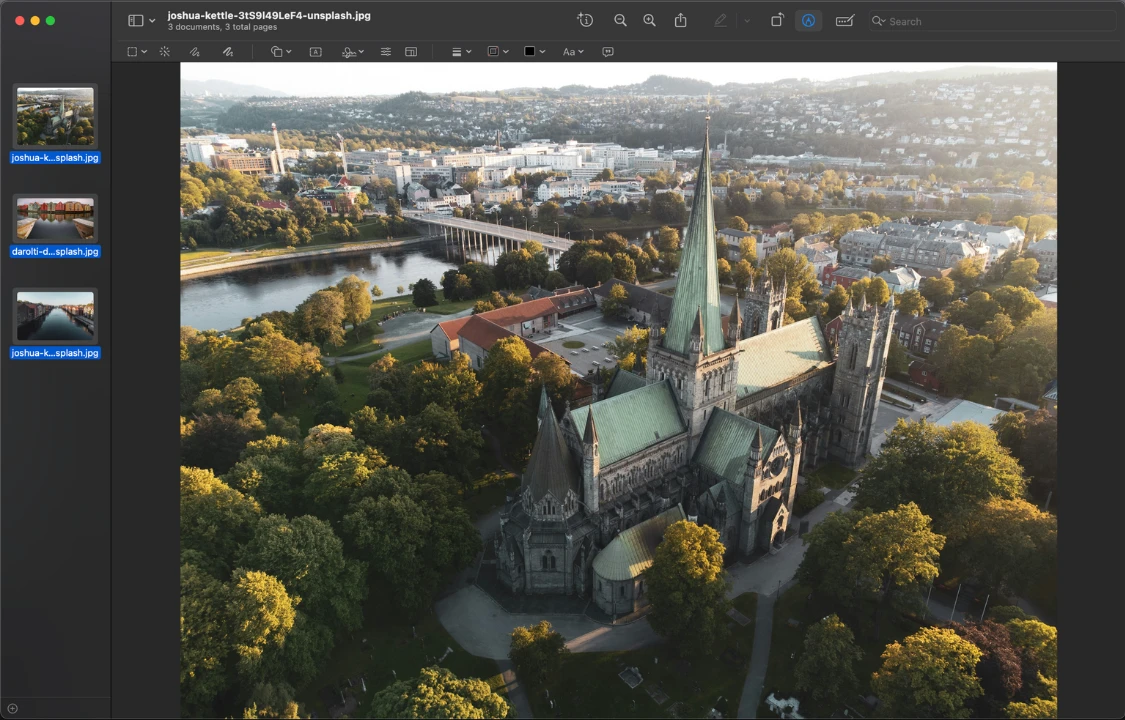
Alright, what if you need to resize multiple images to the same size in pixels? It can also be done using the Markup toolbar. First, select all the necessary images. Right-click and choose the Open with Preview option.

Then follow these steps:

  1. Make sure all the images in Preview are selected. Otherwise, you will change the size of only the image that’s selected. how to resize image on mac
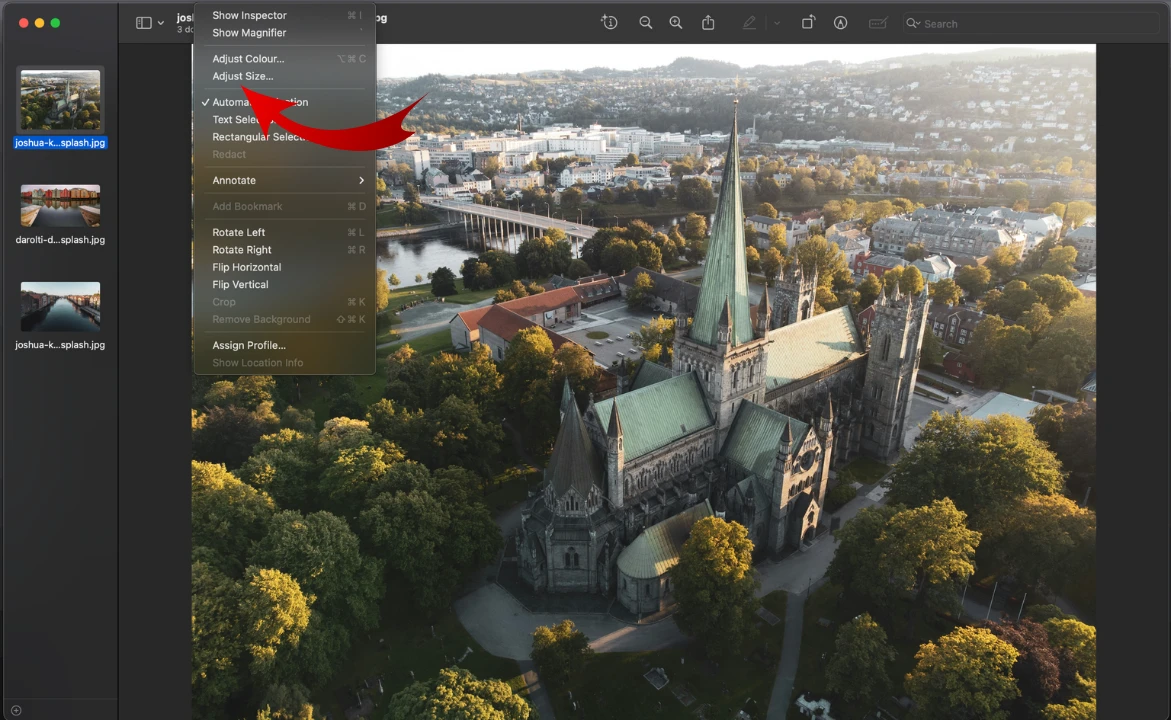
  2. Go to Tools > Adjust Size. resize image mac The settings window will look the same. Now, it’s time to enter a new value. Let’s say that you want the height of all your horizontal images to be 720 pixels. resize image mac
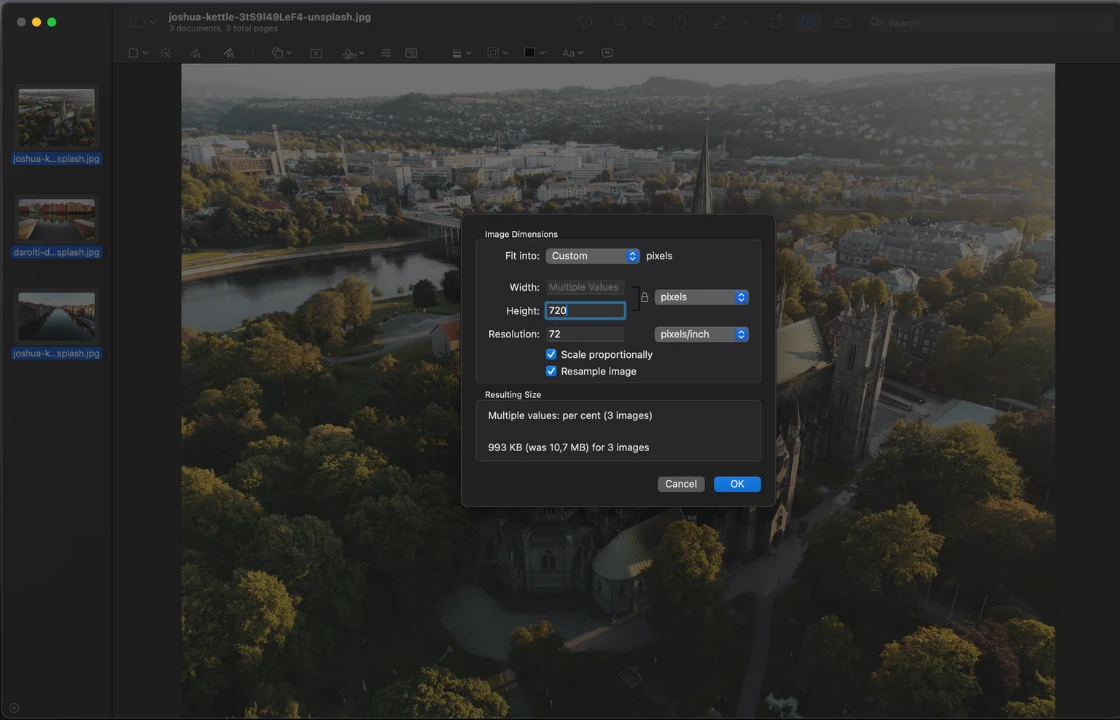
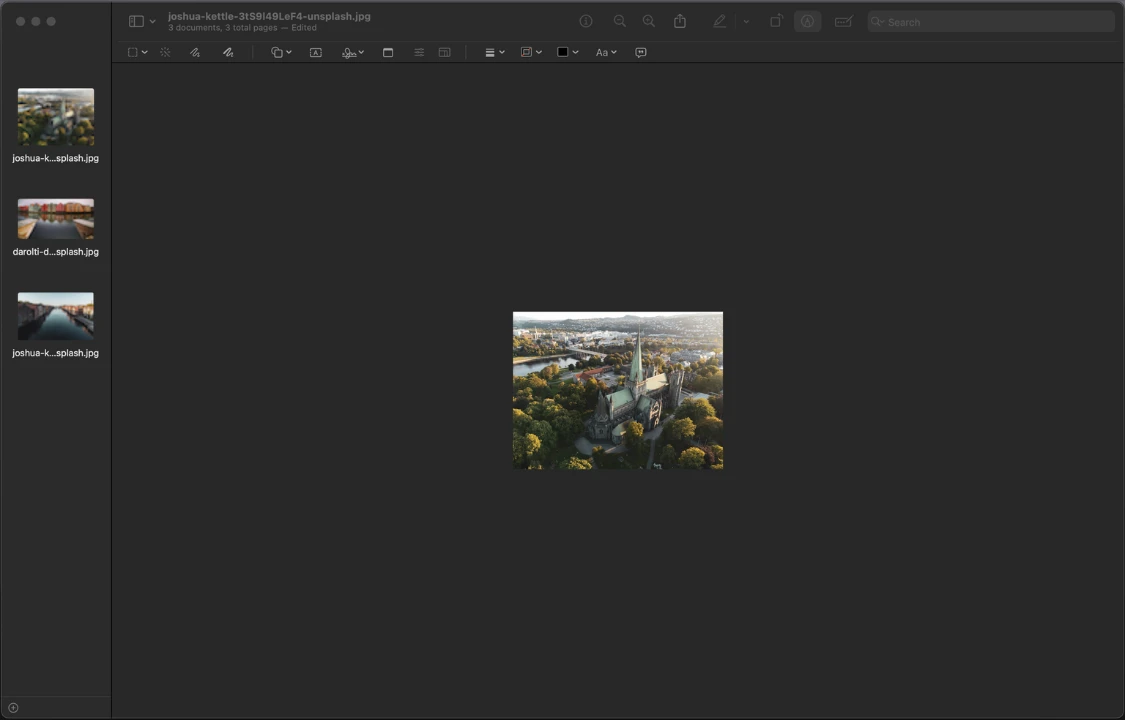
  3. As soon as you click the OK button, all the images will be resized. They will also shrink. Don’t worry, this is how the app visually demonstrates that your images have become smaller. If you open the image in a separate window, you’ll be able to view it in the full screen mode. resize image mac
  4. If you are not happy with the result, you can undo the changes by selecting all the photos again and pressing Cmd+Z or going to Edit > Undo.
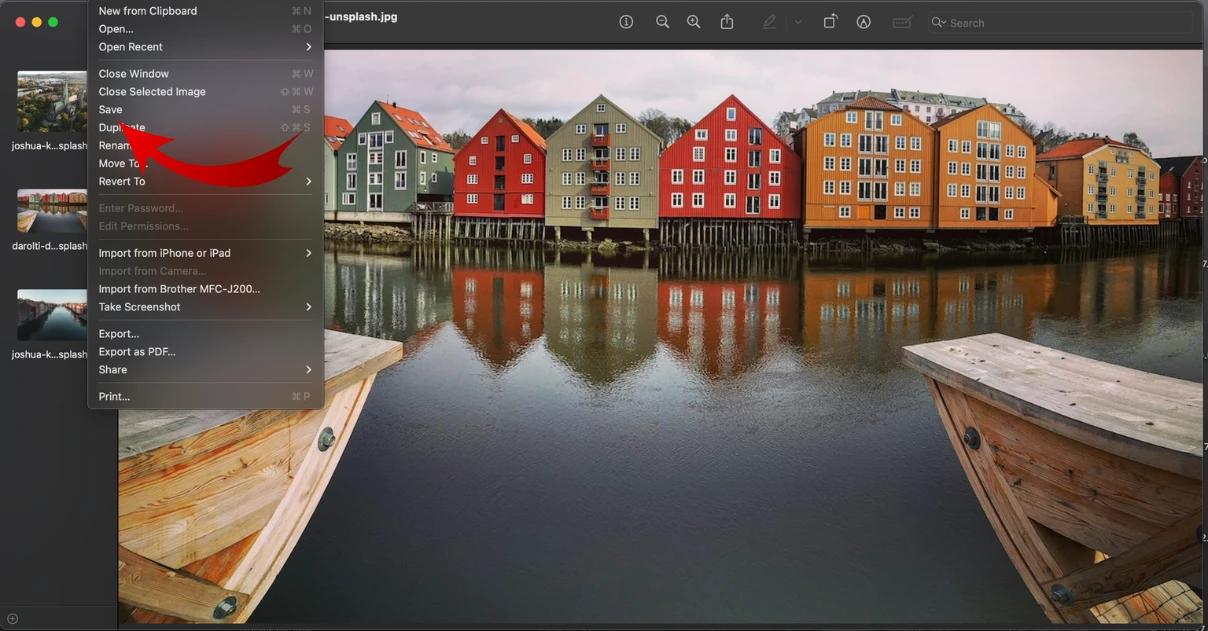
  5. Finally, to apply all the changes, go to File > Save. The resized versions will overwrite the originals. resize image mac

That’s it!

Here are the main benefits of using the Markup Tool for resizing images on Mac:
  • it’s free;
  • it’s already available in the Preview app;
  • it offers a wide range of resizing options;
  • you can see the preview of the resulting size during editing;
  • it allows you to optimize an image for the web and for printing.
Are there any disadvantages? Yes, here are some of them:
  • It overwrites the originals. If you want to keep the original or need to resize one image for several different online platforms, then you will have to make a copy of it before resizing it on Mac.
  • It can upscale an image, but the image quality will unavoidably get worse.
  • Batch-processing is possible but can be a bit complicated.
Resize Photo Online

How to Resize Images on Mac in a Quicker Way

If you need to resize images to the same size in pixels on Mac on regular basis, you might consider saving yourself some time by using Quick Actions. This feature allows you to automate the resizing process, making it quicker and more convenient. Basically, you will create a shortcut for all the steps to be performed automatically.

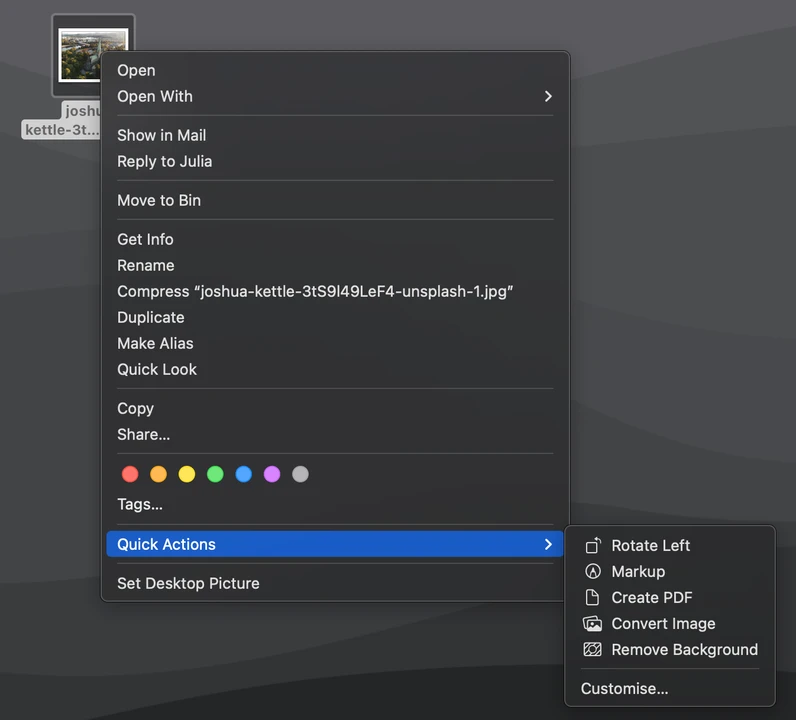
By default, the Quick Actions menu should already offer such options as "Convert Image" or "Remove Background." But it is possible to add the resizing option to this list.

resize image mac

Here’s how you can do this:

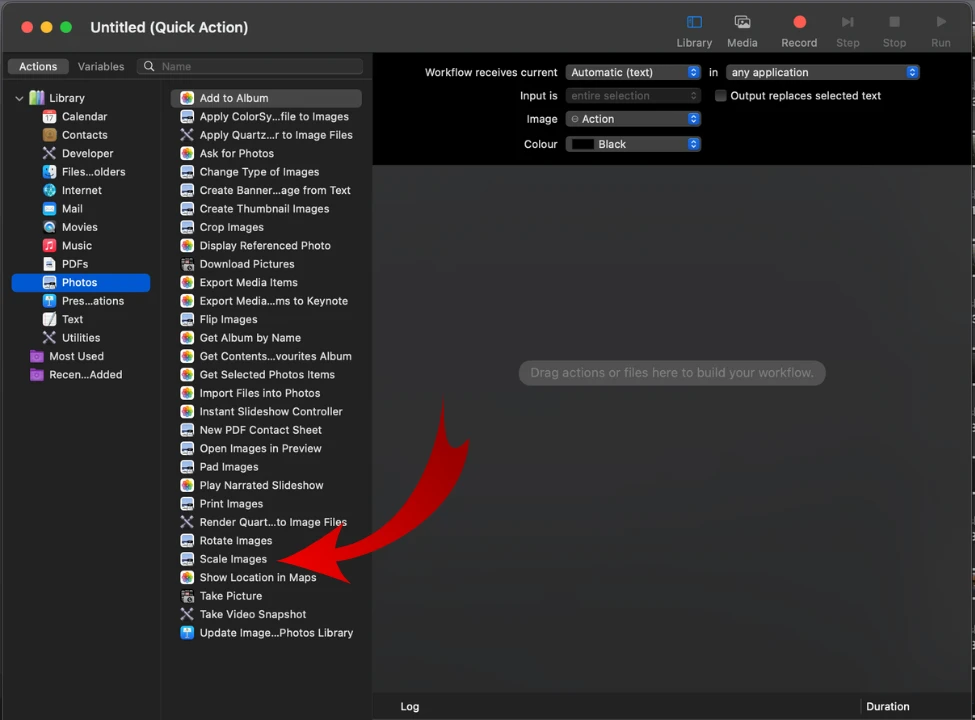
  1. Find the Automator app in the Launchpad.
  2. Choose Quick Action in the menu.
  3. Here, you need to work from left to right. So, choose Photos first, then click on Scale Image and drag this option into the window next to it. Finally, click “Add”. resize image mac - quick actions
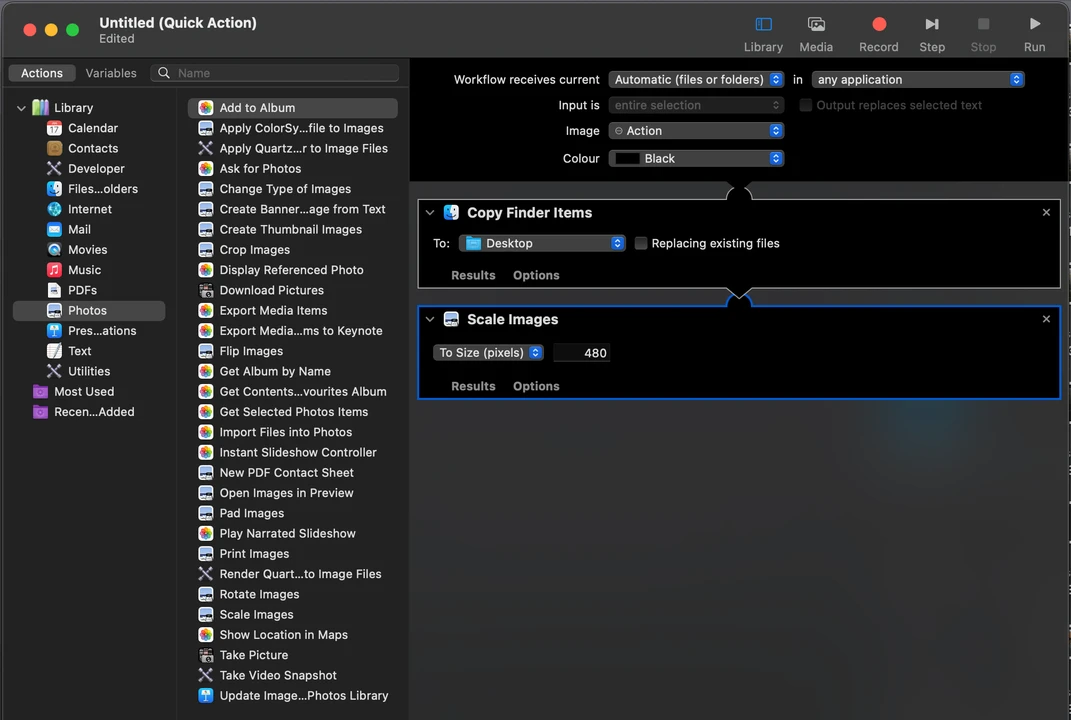
  4. Two new elements will be added to your workflow. The first action will allow you to select the export folder for your resized image on your Mac as well as decide whether they will replace original files or not. Let’s say you want to create copies and export them to a separate folder on your desktop. Then open the dropdown menu, select Other… > New Folder, name it, and click Choose. This new folder will be immediately added to the Quick Actions settings and will also appear in the location you specified. resize image mac - quick actions Now, let’s switch to the second action. In the Scale Images action enter the necessary value in pixels for the longest side of an image. The shortest side will be scaled proportionally.
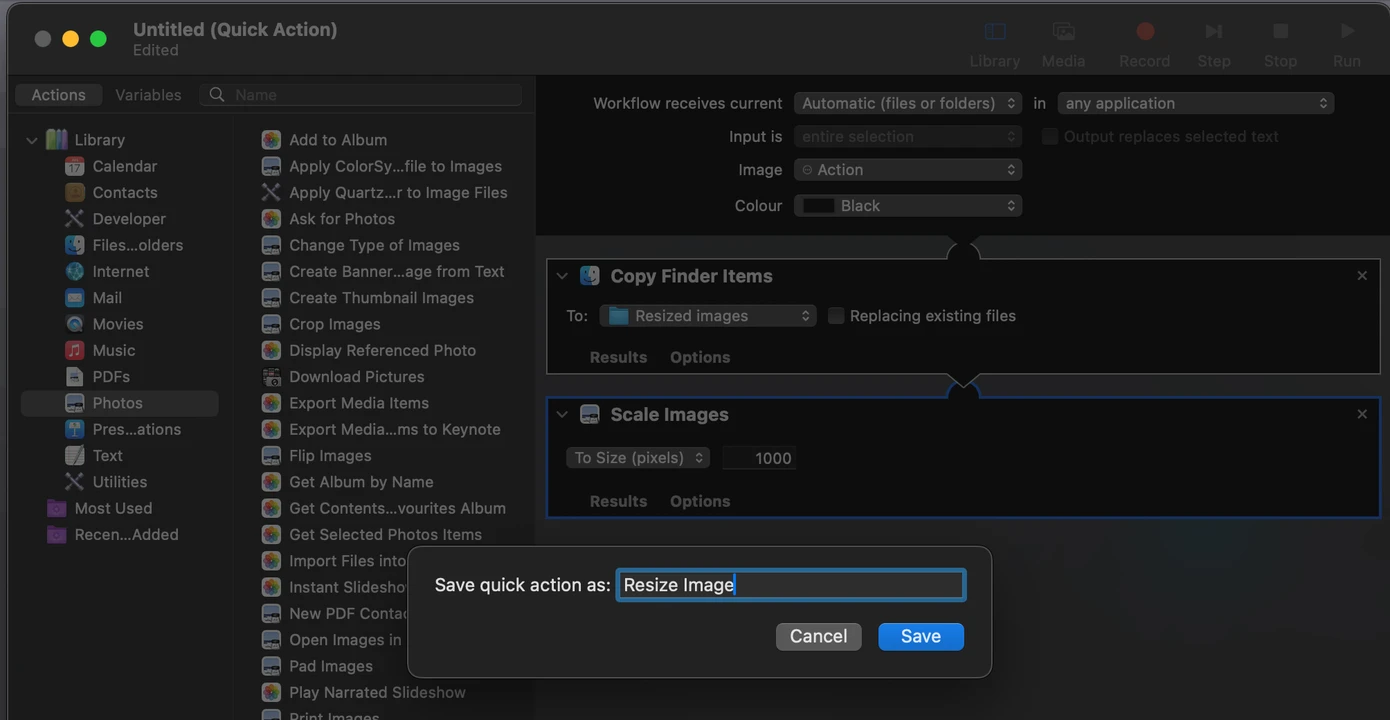
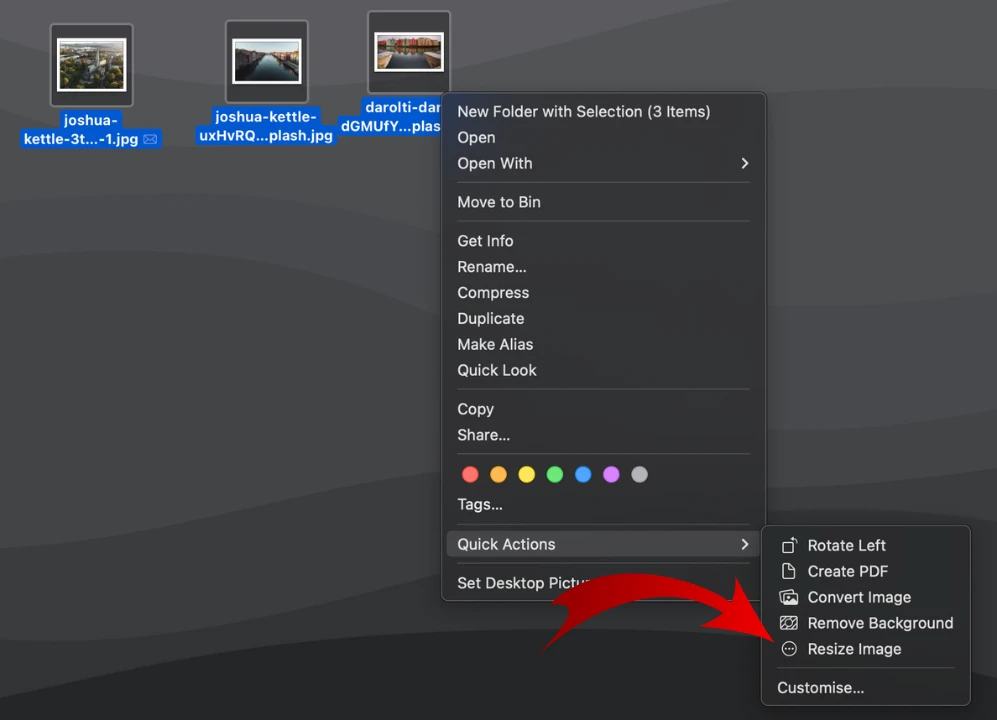
  5. To save the settings go to File > Save. Name your action and save it. Finally, close the Automator app. resize image mac - quick actions

Now, all that’s left to do is to select all the necessary images, right-click, choose Quick Actions and select your newly created action for resizing. In a couple of seconds check your export folder – your resized copies should be there.

resize image mac - quick actions

This method allows you to resize a large number of photos on Mac in little to no time. All with the help of the tools that you already have!

But what if you’ll need to resize images with different orientations or to different sizes in pixels? Surely, you can create a new action for each size in pixels that you need. But it can be quite tedious. Luckily, there’s an online tool Watermarkly that can be a lifesaver for you. What’s great about it is that you won’t need to install it. It doesn’t overwrite originals. And your files will be processed right in your browser, so no one will be able to get their hands on them.

With the help of this app, you’ll be able to resize multiple images in just 4 steps:

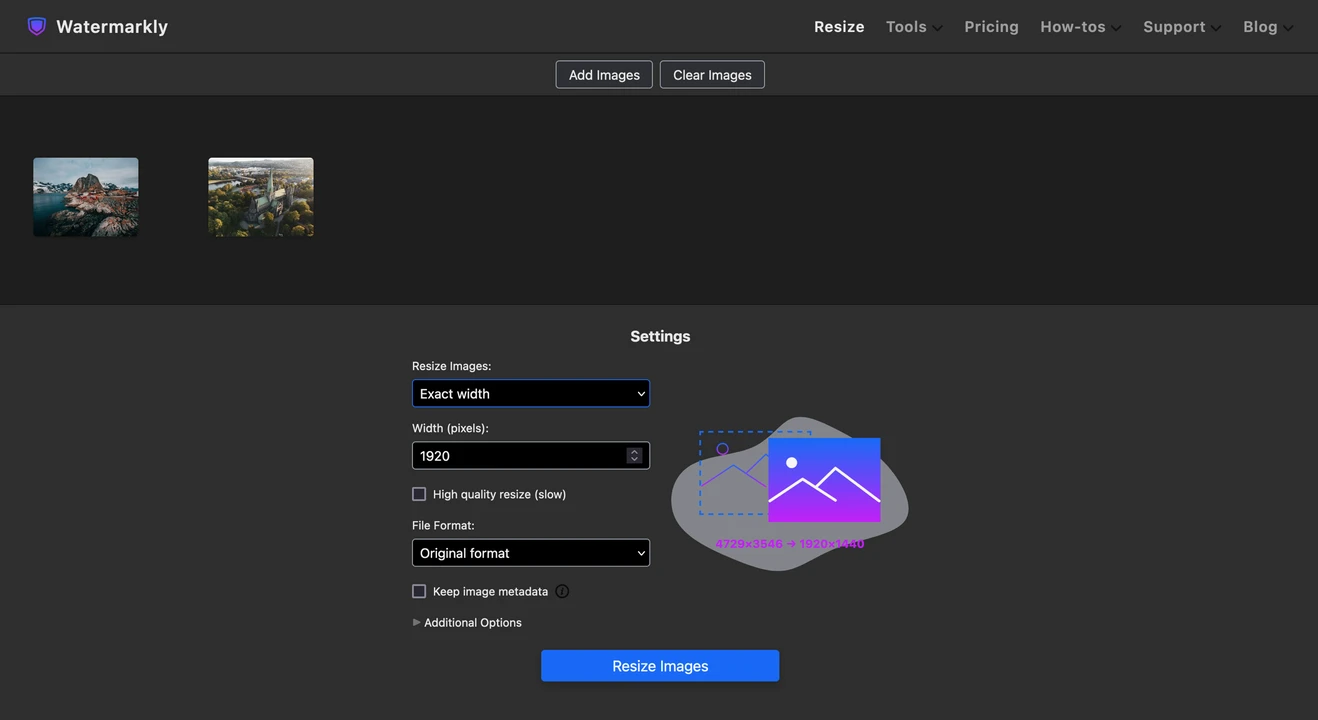
  1. Go to watermarkly.com > Tools > Resize Photos
  2. Upload all the necessary images into the app. resize image mac - watermarkly
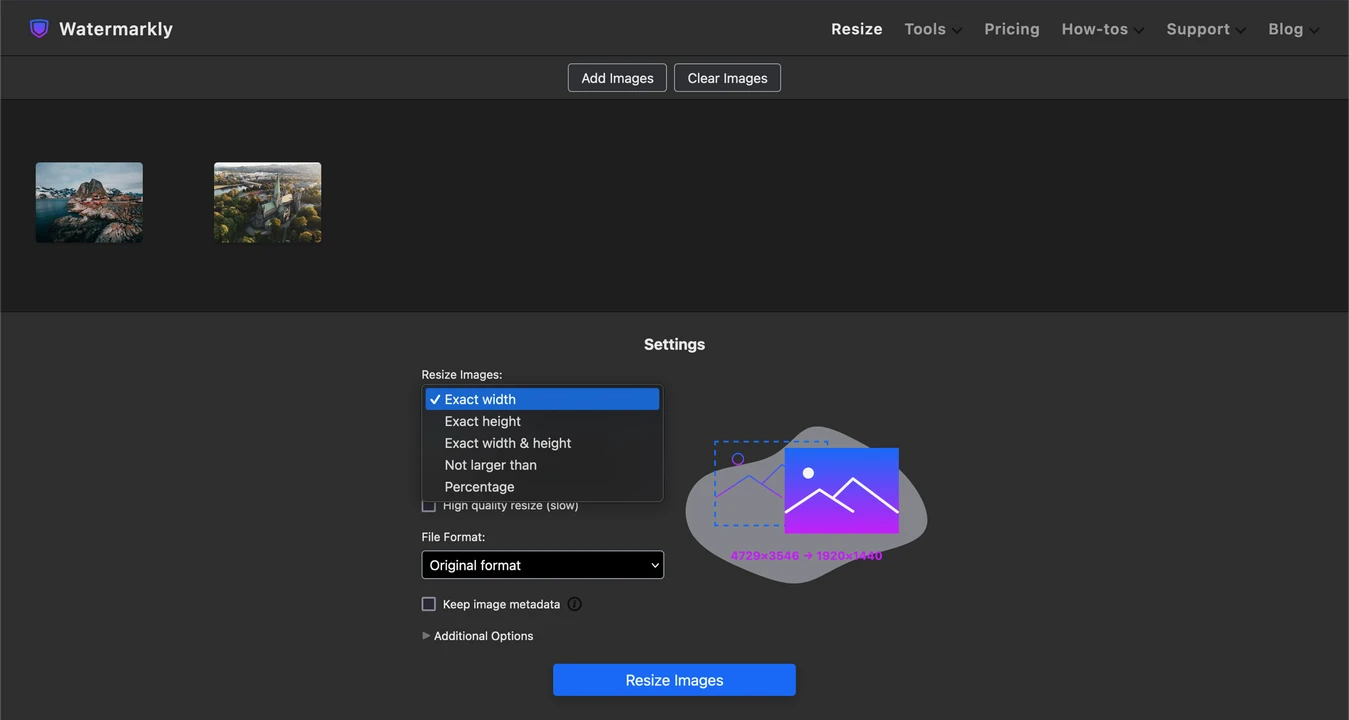
  3. Choose the resizing option that you need. Similarly to the Markup Tool, you can change the size in pixels or by percentage, with or without maintaining the aspect ratio. The resulting size will be shown in the preview on the right. resize image mac - watermarkly Please note, though, that here you won't be able to change the size in centimeters or inches. It’s impossible to enter a new value for the image resolution, either. That said, unlike the Markup Tool, you can actually upscale an image while maintaining excellent image quality. To do this, simply enable the "High quality resize" option.
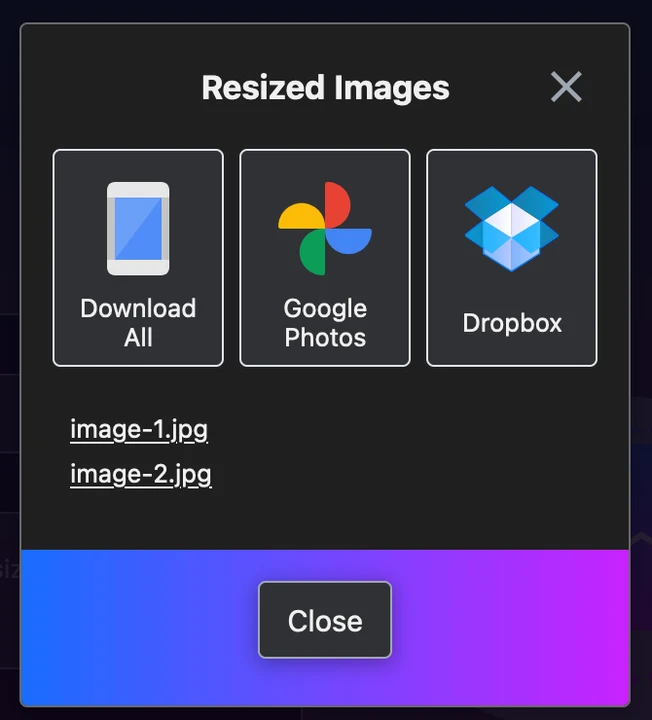
  4. Finally, click on the “Resize Images” button. When the app is done with processing, download your resized copies to your device or import them into one of the supported cloud storages.
    resize image mac - watermarkly

As you can see, this method is very simple and straightforward. What’s more, it’s not time-consuming at all, yet it will provide you with the kind of flexibility that Quick Actions cannot offer. It can be especially helpful if you need to resize images on Mac to different sizes in pixels frequently.

Resize Photo Online

Wrapping Up

Hopefully, this article has equipped you with some practical methods of resizing an image on a Mac. The step-by-step instructions showed you how exactly this can be done using built-in tools or an online app if you need some extra flexibility. Being aware of all the nuances, now you should be able to achieve various goals – resize a single image, change the size of multiple images or upscale images while maintaining high quality. This article highlights all the benefits and limitations that each tool has. This should help you determine which one will suit your needs best.