How to Edit a PDF on Mac for Free
by  Lina Thorne • Updated · Posted in Marketing
PDF editing on a Mac can involve a variety of different tasks: some might be easy and simple, so even a beginner won’t have any trouble doing them, meanwhile others can be more advanced and require some skills. It’s possible to make small tweaks like adding annotations, watermarks or other elements. More complex editing includes editing the actual text or changing the structure of a document. For instance, you can delete, rearrange or merge pages of your PDF.
As you may know, the formatting of a document is usually maintained no matter what device is used to view it. This is one of the main features and benefits of PDF format. For this reason, advanced PDF editing might pose some challenges. However, basic editing on Mac is pretty easy and straightforward. In fact, it can be done either with a built-in app that you already have or with a browser-based app that you won’t have to install.
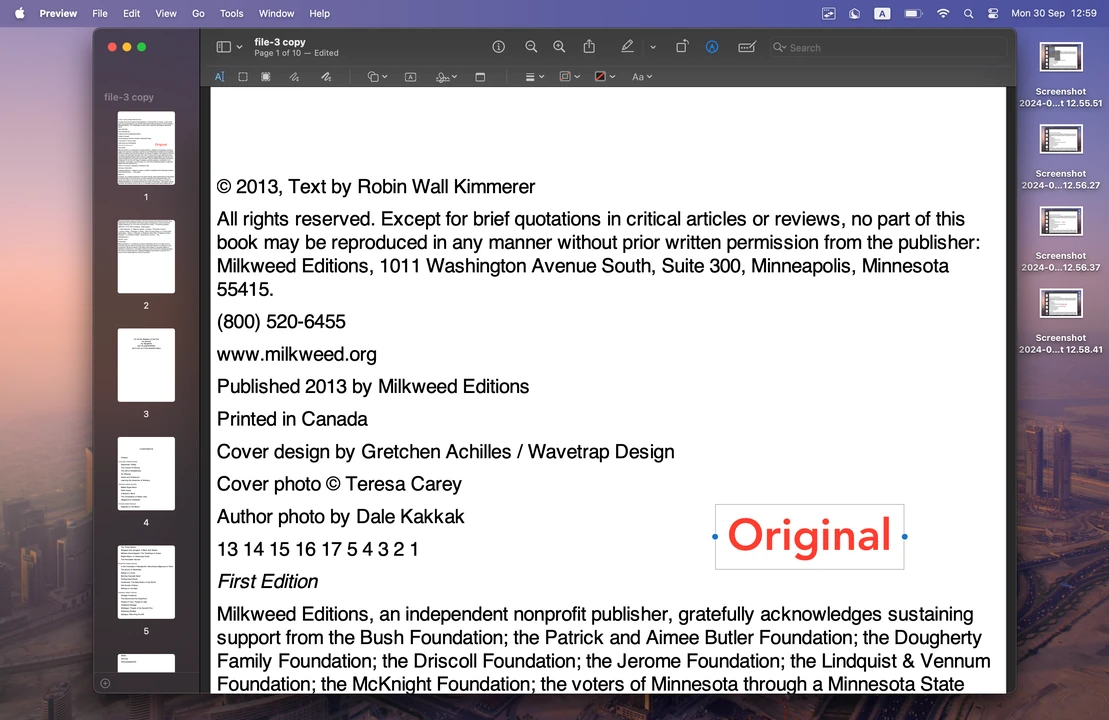
This article focuses only on basic PDF editing on Mac. In other words, you will learn how to make some quick edits without altering the original content or layout of your document.
Here’s what basic editing usually involves:
1. No changes are made to the original content or formatting of a PDF document
Unlike documents in the Word format, editing a PDF itself – e.g. changing a word if you found a spelling mistake – can be quite tricky because it usually requires some special software or paid advanced features that most people don’t have. The same is true for altering the core structure of a document. When doing basic editing, however, you simply add a new element to the existing content. For instance, you can add a signature or a watermark as well as highlight some text without changing it.
2. You won’t have to install any additional software or purchase advanced features
Making changes to the content of a PDF requires special software like Adobe Acrobat. But that’s not the case for basic PDF editing. You can easily make some small tweaks and add a new element to a document with the help of an app that is either pre-installed on your Mac or available online for free. Thus, you won’t have to download or install anything. You’ll be able to do basic PDF editing quickly and without paying a cent.
3. Basic PDF editing usually includes: adding text to fill out forms or leave notes, inserting a signature into official documents, and highlighting key information for easy reference.
Basic editing doesn’t require any skills or experience. But you will need to learn how to edit a PDF file on Mac to perform any of the tasks mentioned above.
Luckily, macOS has Preview that provides some tools and features for editing PDFs. Since it’s a built-in app, you won’t have to pay for it. But this isn’t the only option you have. There are also online tools that can be used for free. For instance, you can add a watermark to your PDF or make some other tweaks with the help of Watermarkly.
In this article you will learn how to edit PDFs on a Mac with the help of Preview and Watermarkly. It’s worth noting that in both cases you’ll get similar results, but you’ll need to follow a different sequence of steps. It’s important for you to learn about both these methods to have a clear understanding of when you should use each of them and how to do so effectively.
How to Edit a PDF on Mac: Adding Text
Adding text to a Word document, for instance, is pretty easy – you just open it, find the place where new text needs to be added, then enter it. That’s it. On the other hand, the PDF format was designed to be secure and maintain the formatting, which is why it cannot be edited easily. Nevertheless, you might need to add text to a PDF for a variety of reasons. Here are a few examples:
- Filling out non-interactive PDF forms: There’s no need to get any additional tools or features, if you need to fill out an interactive PDF form. However, non-interactive forms are non-editable. To put it simply, you cannot just click inside the field and start entering your information. If you need to complete a non-interactive PDF form, you’ll either need to print it out and fill out by hand or use a special tool that will allow you to add your text digitally.
- Providing feedback: You might need to annotate a PDF to provide clear and effective feedback. This is useful when you’re reviewing a document and need to leave comments or suggestions as well as point out any mistakes.
- Leaving notes or giving explanations: This is pretty similar to the previous point. You might need to leave important reminders, give specific clarifications or simply emphasize some key points. Adding notes to certain parts of a document can help you achieve this.
- Adding headers, footers, or watermarks: It’s a good idea to add headers or footers as this can bring some order into your document and improve its readability. Also, watermarks can help you protect your copyright, prevent unauthorized use and promote your brand, which is why you might also consider adding them.
How to Add Text to a PDF Using Preview (Mac’s Built-in App)
Preview is a versatile built-in app that is available on all Macs and doesn’t really require connection to the Internet. It can be used for a wide range of PDF editing tasks, including adding text. Here’s a step-by-step guide on how to edit a PDF document on Mac using Preview if you need to add text:
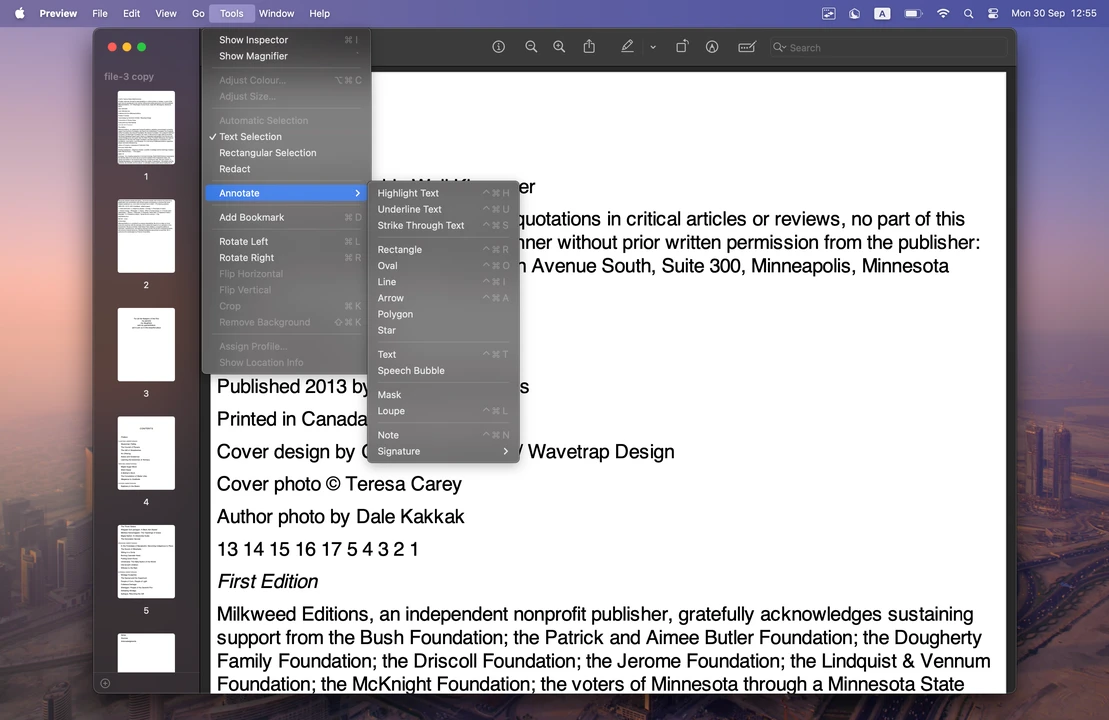
- Position Your Cursor: Open your PDF in Preview and navigate to the location where you want to add your text. Then click on the Tools menu at the top and select Annotate > Text.
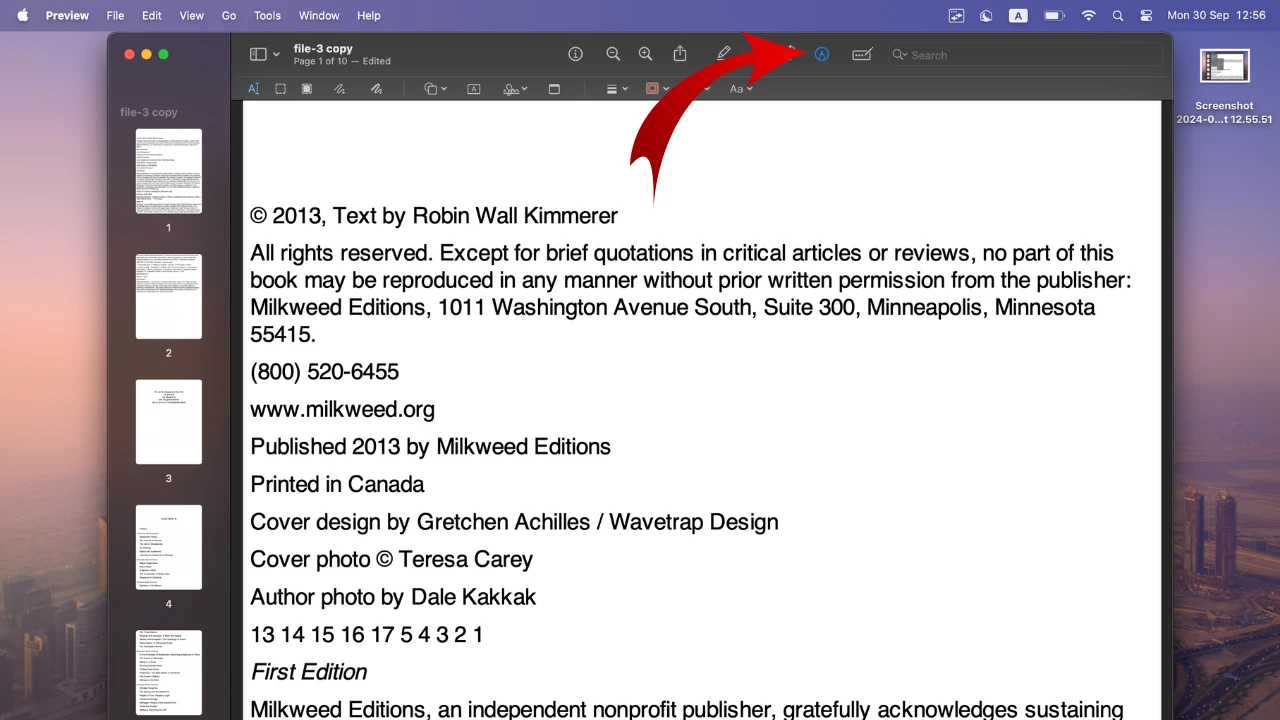
 Alternatively, you can click on the Markup tool (the pen icon), which can be found in the top-right corner, and click on the Text icon (a rectangle with an “A” inside).
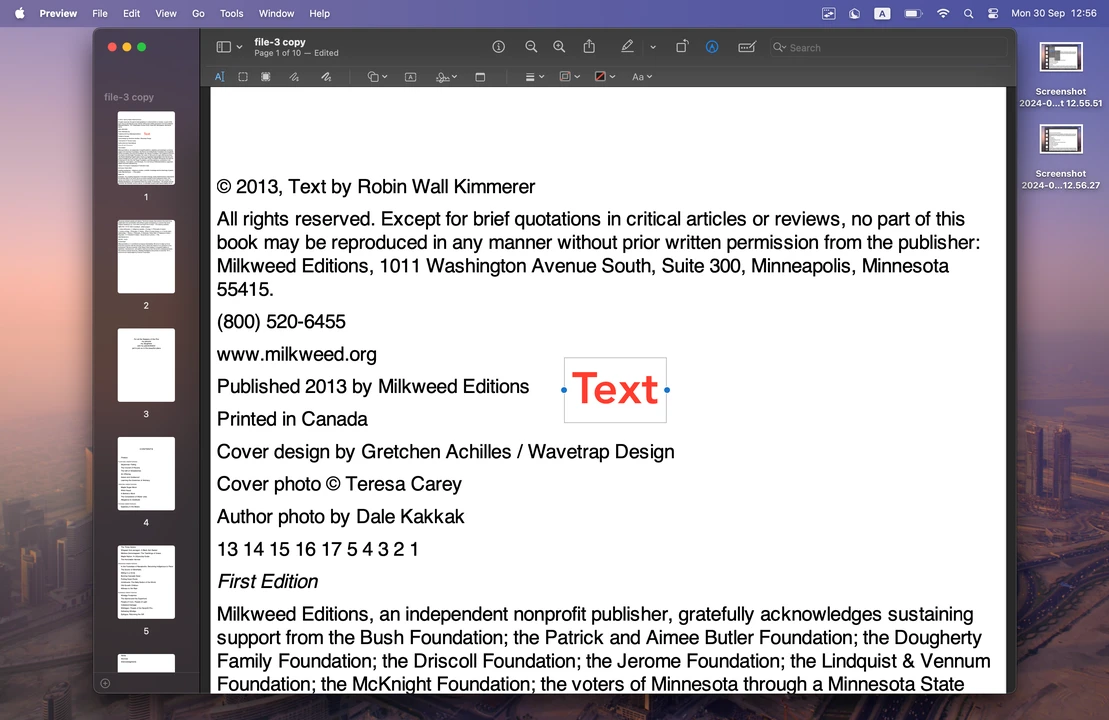
- Enter Your Text: Once the text box appears, type in the text you want to add. Then you can use the cursor to reposition the text box by dragging it.
- Customize the Text: To alter the appearance of your text, click on the Text Style button in the toolbar. Here, you can change the font, size, color, alignment, and even underline your text or insert some emojis. Please note that you’ll need to select all the text, then start making changes to its style. Otherwise, they won’t be applied. You can select the text with the cursor.
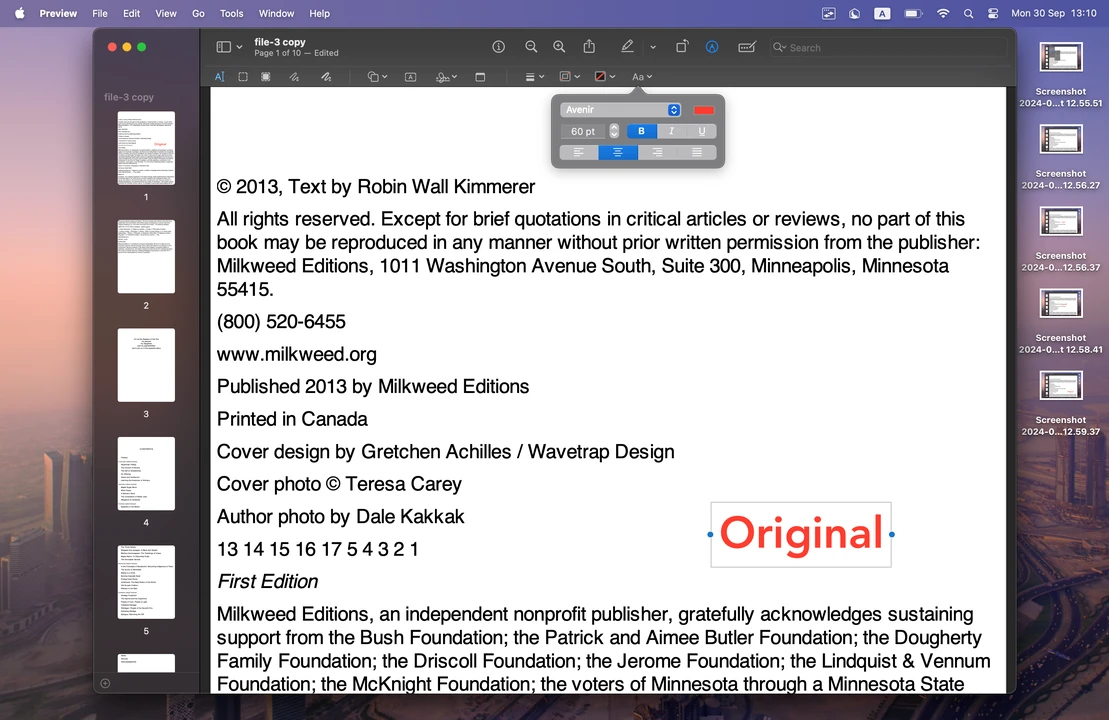
By following these steps, you can add any text you want to your PDF: notes, comments, etc. Thanks to Preview’s intuitive interface, making any basic edits will be pretty quick and straightforward.
Adding Text to a PDF Using Watermarkly (Online App)
Unlike Preview, Watermarkly is an online app, which means it cannot function without the Internet connection. It is primarely used to watermark PDFs for free, but you can easily utilize it to add some text to your documents, as well. Naturally, Watermarkly’s interface is different from the Preview’s. What’s more, you’ll have access to some additional tools and features. For instance, you’ll be able to make your text more eye-catching by adding various effects, which cannot be done in Preview. Now, let’s see how to add text to a PDF using Watermarkly:
- Open Watermarkly: Go to Watermarkly’s website, then find the Watermark PDF app in the Tools menu and click on it to open.
- Upload Your PDF: Next, click on “Select PDF” or simply drag and drop your file into the app if you are on a PC or a laptop. Once the document is imported, click on Next Step.
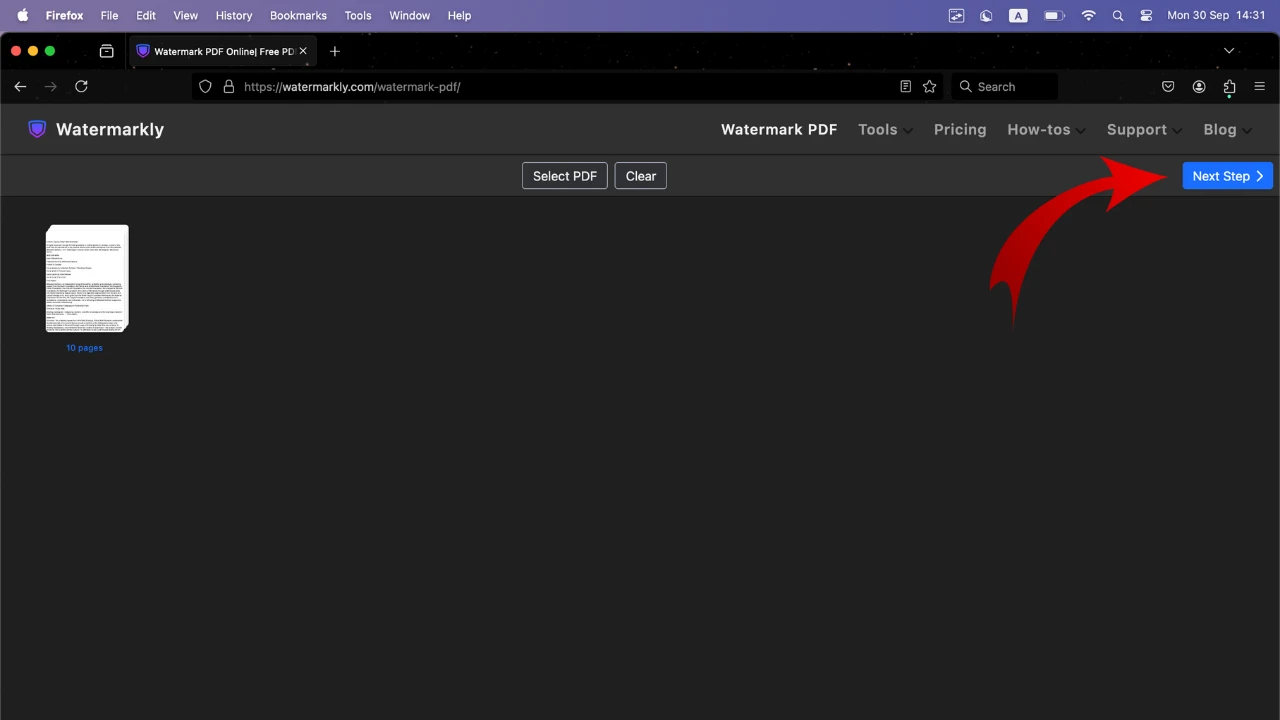
- Add Text: Click on the “Add Text” button and enter your text into the text input area. It’s perfectly possible to add multi-lined text as well as set the necessary line height.

- Adjust the Style of Your Text: Watermarkly offers an amazing set of tools for text editing. The choice here is much broader than in the Preview. You can drag the text anywhere within the page you want as well as pick a font, set the level of transparency, change the size and color – there are both solid colors and gradients.
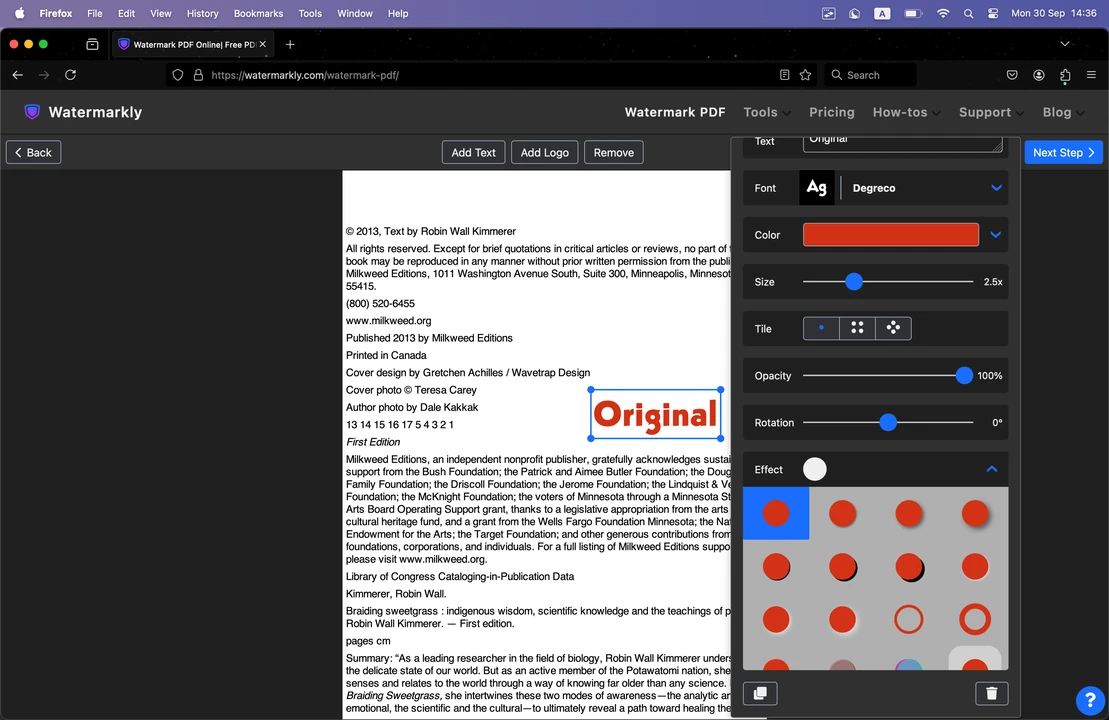
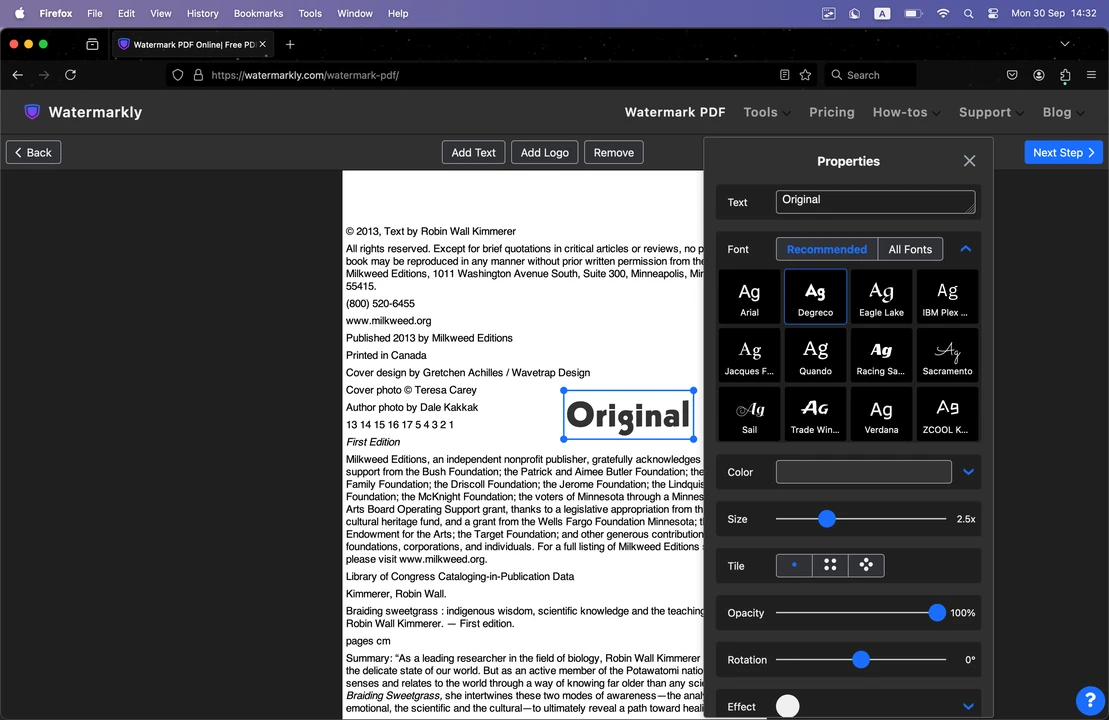 Please note that unlike Preview, you won’t find formatting options like bold, italics or underline here. But you can add various effects in Watermarkly! For example, you can add a shadow, a white glow, or even make your text look 3D-like. Finally, you can rotate your text to 360 degrees and add multiple text boxes. Which means that you can use Watermarkly to add some text as well as watermark your PDF to secure it.
Key Difference Between Preview and Watermarkly
If you want to edit a PDF on a Mac to add text, you need to be aware of the key difference between Watermarkly and Preview. Since Watermarkly is essentially a batch-watermarking app, your newly added text will be automatically applied to all pages of a PDF. If you need to add one and the same text – for instance, a watermark or a header – to multiple or even all pages of your document, this feature can save you a considerable amount of time.
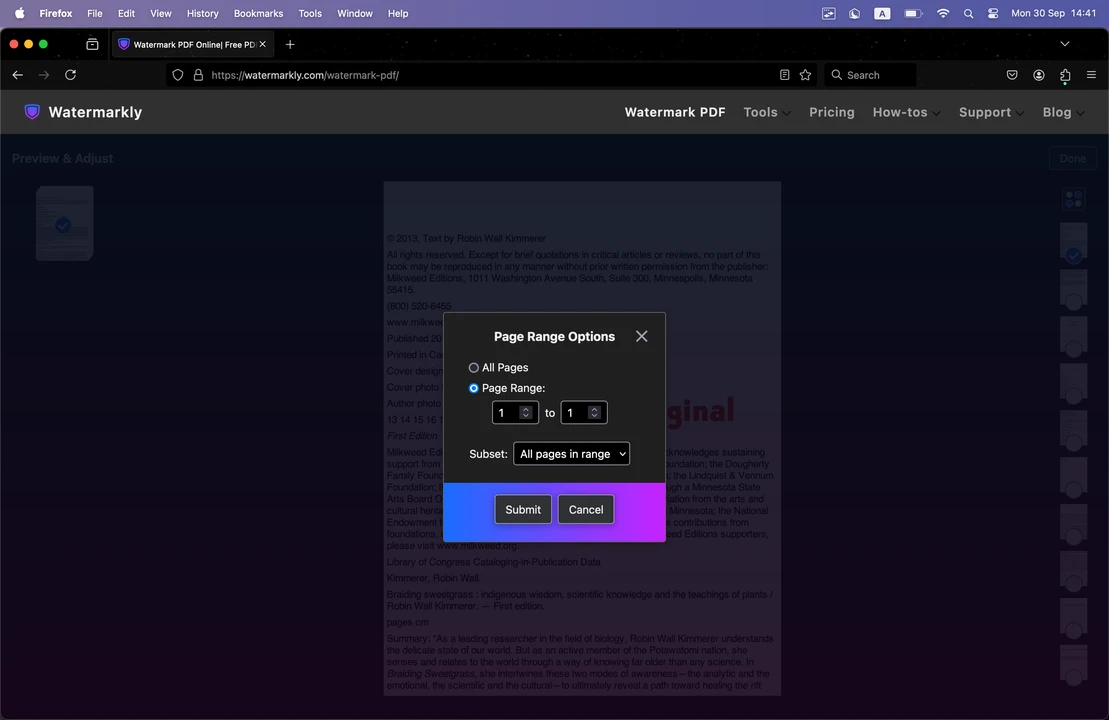
But what if that’s not your goal? Don’t worry! This isn’t the only option that Watermarkly offers. Once you add and customize your text, you’ll need to go to the Export Settings. There, click on the “Preview & Adjust” button. In the Preview Section, you can uncheck the pages that you don’t want to add the text to. It’s possible to makes some tweaks to the appearance of the text here, as well.
Preview, on the other hand, doesn’t offer this batch-processing feature. In other words, you can add text only to one page at a time. If you need to leave a couple of notes here and there and the PDF itself doesn’t have many pages, then you can easily use Preview for this task. But using this app for batch-editing will be time-consuming and overall inefficient.
How to Edit a PDF on Mac: Adding Signature
It might be necessary for you to sign a PDF for a number of reasons. It’s a great way to secure a PDF document, verify the signer’s identity, give consent, and ensure the legality of agreements and transactions. Usually, people print out documents, sign them by hand, then scan or fax them back. Of course, this method works, but it’s rather time-consuming and inefficient. What’s more, nowadays, there’s a better alternative in a form of a digital signature. Yes, you can easily sign PDFs on your Mac! It will take you only a couple of minutes.
You won’t need any special apps for that, either. It’s perfectly possible to use Mac’s Preview app to add a digital signature to a PDF. This is how you can avoid all the hassle of printing, signing by hand, and scanning paper documents. It’s an efficient way to streamline the process of signing contracts, agreements, or forms. Here’s a step-by-step guide on how to sign a PDF in Preview.
How to Add a Signature in Preview:
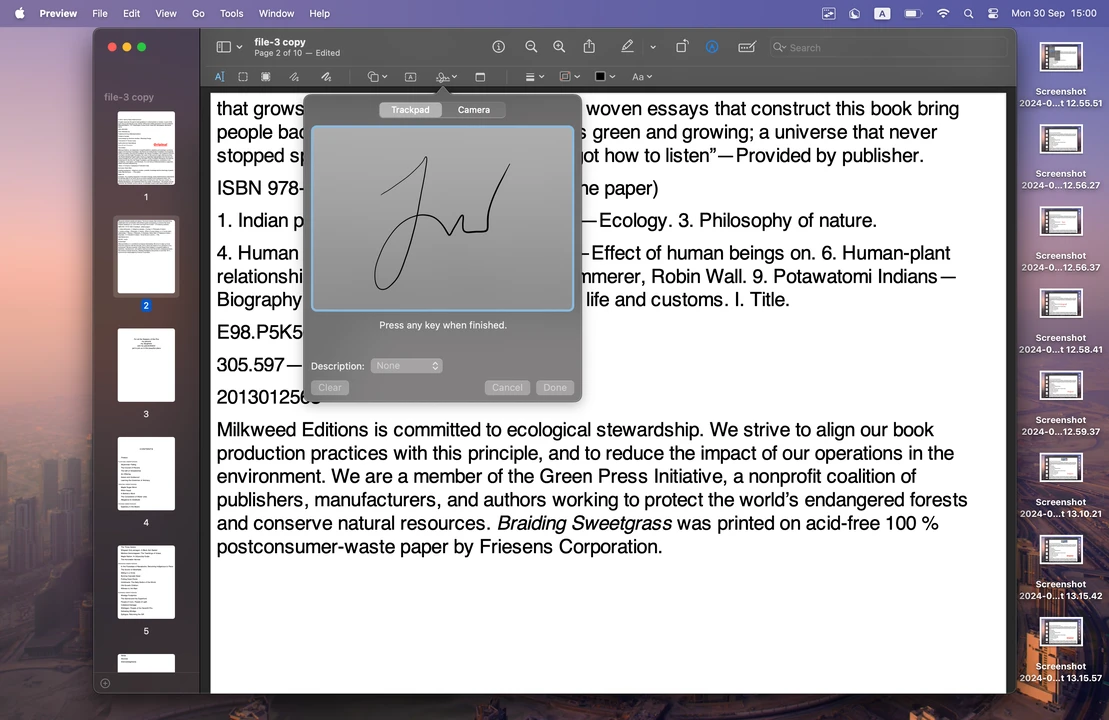
- Create Your Signature: Open your PDF in Preview, then go to the Sign option in the toolbar and select Trackpad. You will see a blue frame which will allow you to create your signature using your trackpad. Simply sign your name with your finger (or Apple Pencil, if using an iPad with Sidecar). Press any key when you’re done and click Done to save the signature.
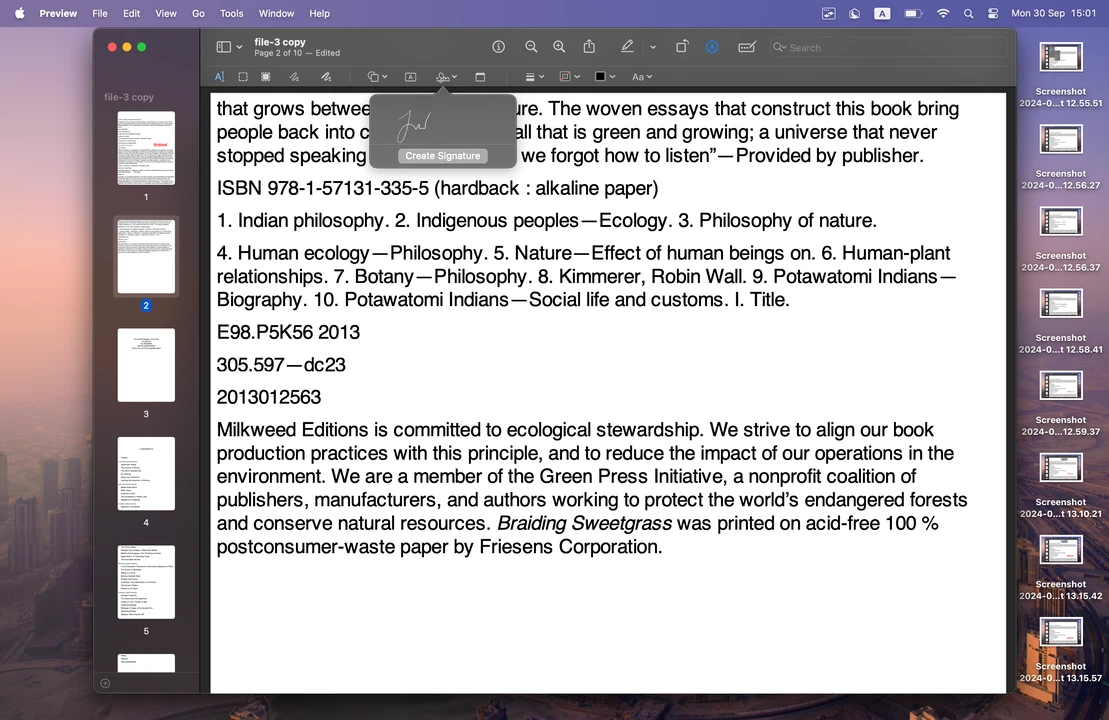
- Insert the Signature: Once the signature is created, click on it in Preview’s toolbar. This will turn your signature into an element that can be added to your document.
- Reposition the Signature: With the cursor drag your signature to the desired location on your PDF page. For instance, in can be slightly above the signature line in a contract or a form.
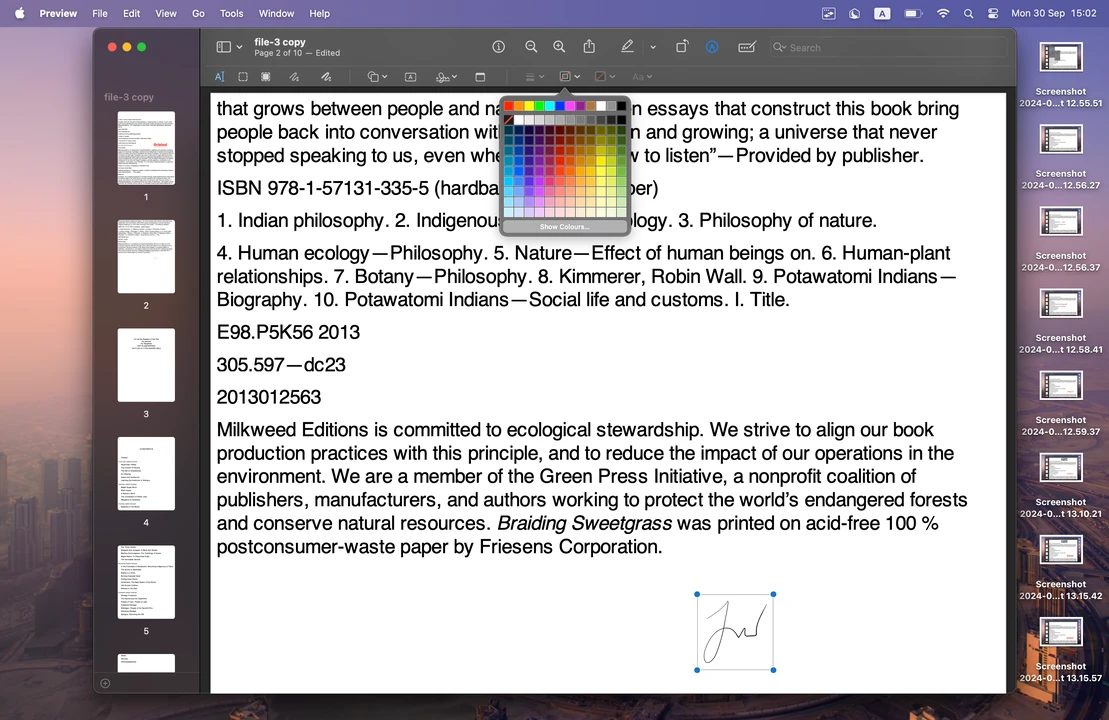
As you can see adding a signature to PDF is not that complicated. But despite that, you won’t find many options for editing your signature in Preview. It’s possible to adjust its size, so you could fit it into your document properly. You can also change its color. But you won’t be able to adjust its level of opacity or add a shadow-effect, for example.
How to Add a Signature in Watermarkly:
It’s worth noting right away that, unlike Preview, you won’t be able to create a signature from scratch in Watermarkly. You’ll need to create it in another app and save it. Needless to say, this option will be perfect for you if you already have a file with your digital signature.
In Watermarkly you can sign a PDF quickly and easily by adding your signature as an image! Plus, this app offers some customization features that Preview doesn’t have. Here’s what you need to do:
- Import your PDF: First, open the app and drag and drop your PDF file into Watermarkly’s editor. Next, click on the “Add Logo” button and select the image with your digital signature. Watermarkly supports PNG, JPG and some other image formats.

- Remove Background (if necessary): Say, your digital signature is on a white or monochrome background, but you’d like to remove it to leave only the signature is visible. This way it can fit into the document more seamlessly. Well, you can click on the “Remove Background” button in Watermarkly’s toolbar. And the monochrome background will be removed in the blink of an eye!
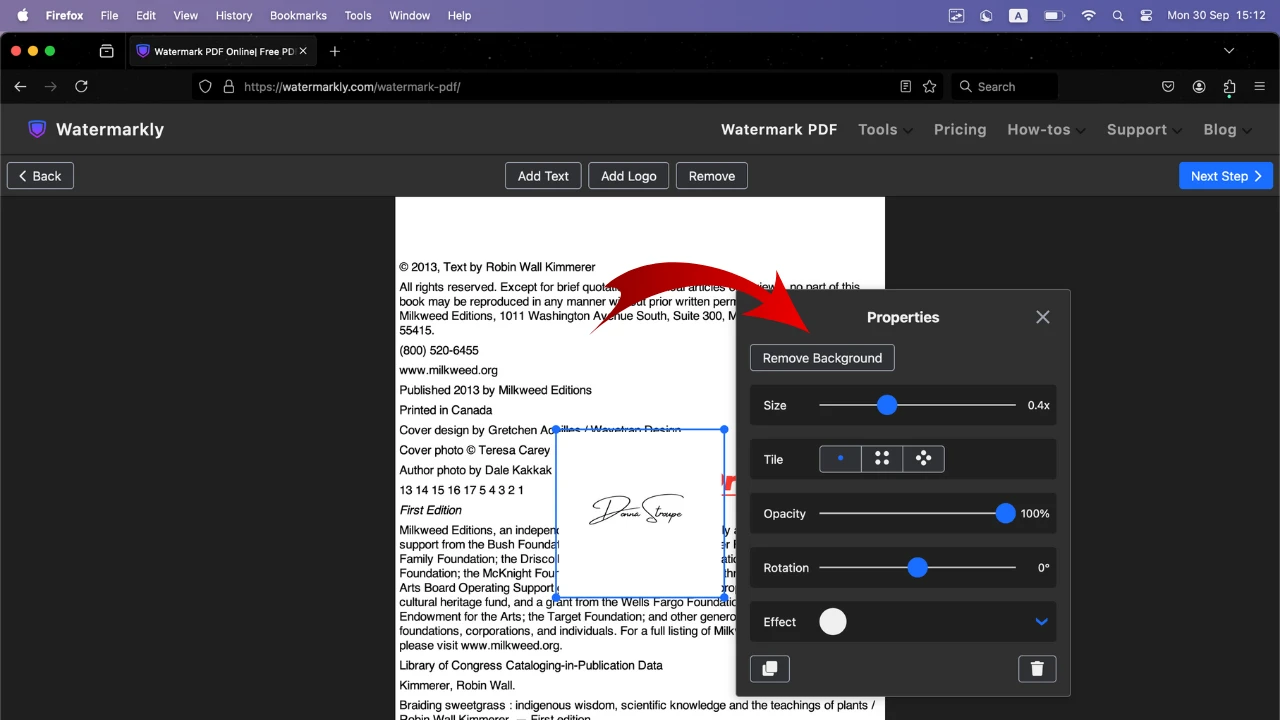
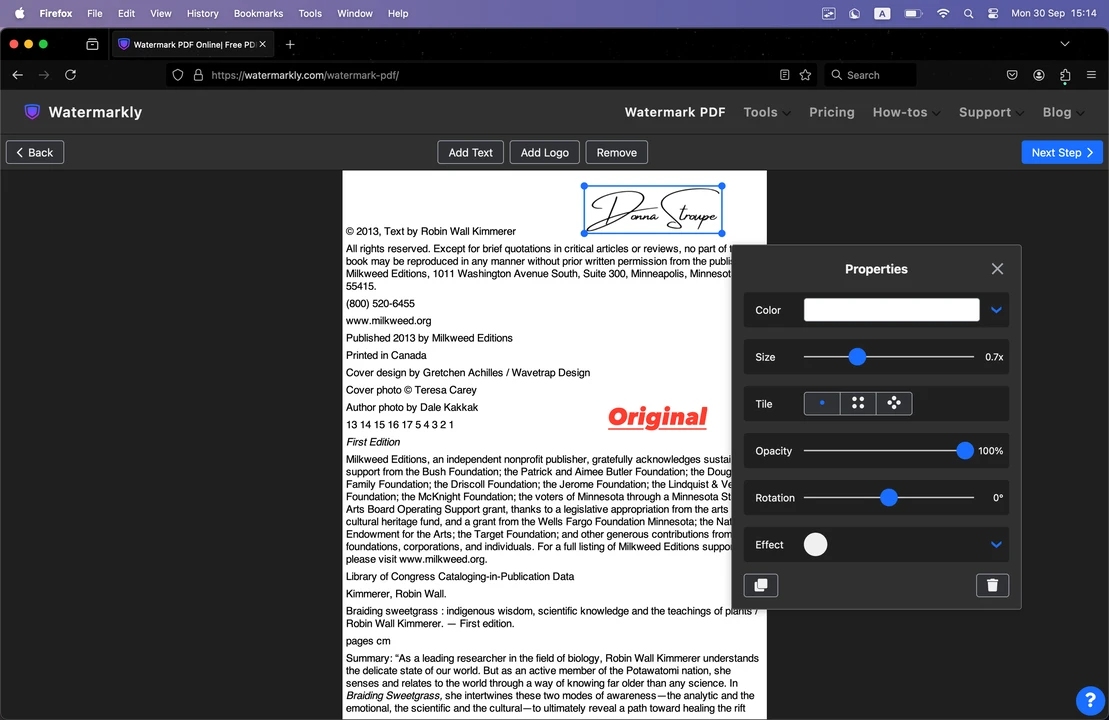
- Edit the Signature: Removing background isn’t the only thing that you can do. Watermarkly allows you to reposition and resize your signature, change its color and the level of opacity. You will be able to customize your signature so that it’ll fit perfectly into any document.
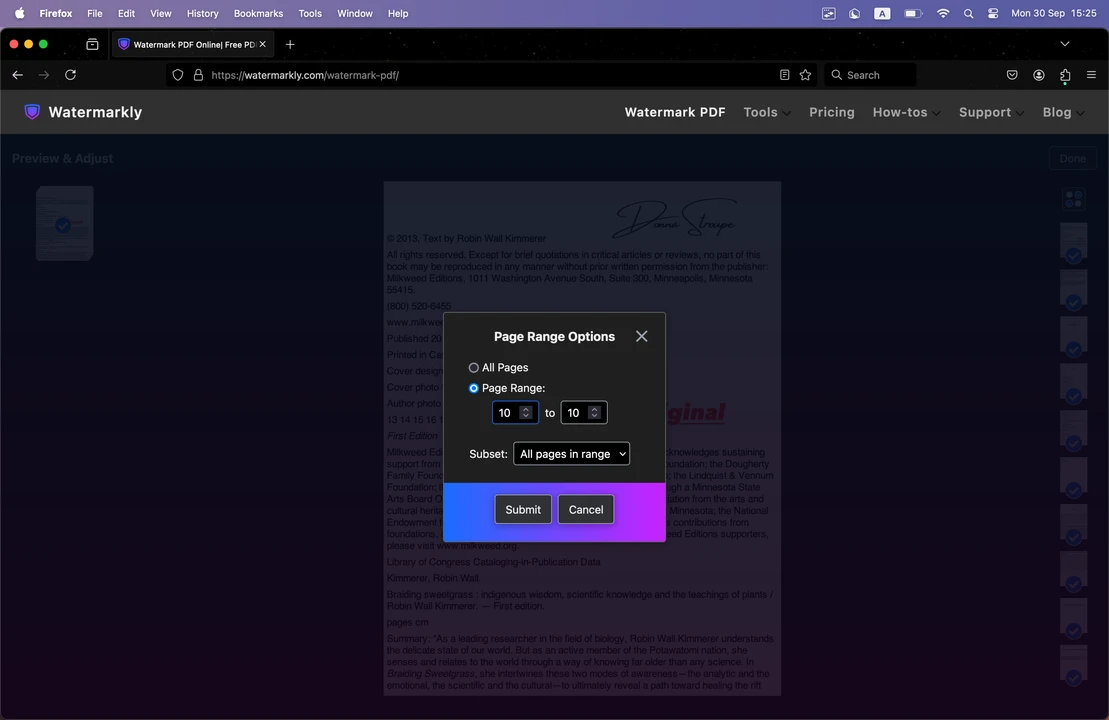
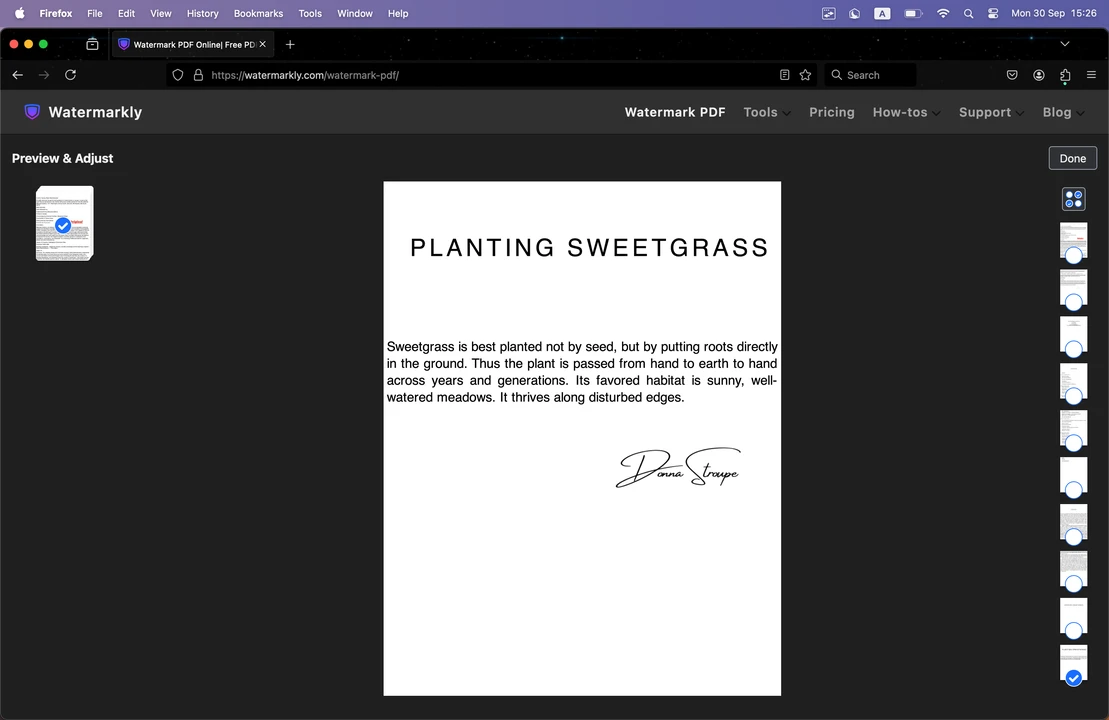
- Select the Necessary Page Range: If your PDF has multiple pages and you only need to sign one specific page (e.g., the last page of a contract), go to the Preview & Adjust section which can be found in the Export Settings. Here you can select only the specific page or pages that your signature should be applied to. It’s important to do this, otherwise Watermarkly will automatically add your signature to all pages.
One of Watermarkly’s main advantages is that it’s perfect for batch signing. You can upload several PDF documents with multiple pages and add your digital signature to them in one go. This can be extremely useful for legal or corporate documents which usually require a signature on each page.
Key Differences Between Preview and Watermarkly:
- Signature Creation: Preview allows you to create a digital signature from scratch using your trackpad, whereas you will need to have an already existing image with your digital signature to upload it to Watermarkly.
- Customization Options: Watermarkly offers more tools for editing your digital signature. For instance, it allows you to adjust transparency, rotate your signature as well as resize it. Meanwhile, in Preview you can make only some basic adjustments like repositioning and changing size and color.
- Batch Signing: With Watermarkly you can add the same signature to every page of a document within mere seconds since it will batch sign your document automatically. This feature will save you a considerable amount of time if you need to process documents with multiple pages. On the other hand, you won’t find a batch signing feature in Preview. Thus, you should choose this app only if you need to sign one or two pages in a document. Otherwise, it won’t be time-efficient.
How to Edit a PDF on Mac: Highlighting Text
This is the type of PDF editing where Mac’s Preview app undoubtedly outshines Watermarkly. Preview allows you to highlight specific bits of text in a PDF document. In contrast, Watermarkly doesn’t offer this feature at all. It can only be used for adding new text, images or watermarks.
You might need to highlight text when reviewing documents, studying, or preparing reports because it’s a great way to draw attention to the infromation that’s particularly important. In the Preview you can highlight, underline or strike through your text. These three tools can help you organize information in your PDF, show what’s crucial and what needs to be removed. The actual content of a PDF will remain unchanged.
How to Highlight Text in Preview:
- Select the Text: Open your PDF in Preview, and select the fragment of text that you want to highlight. To do this, click and drag the cursor over the necessary text.
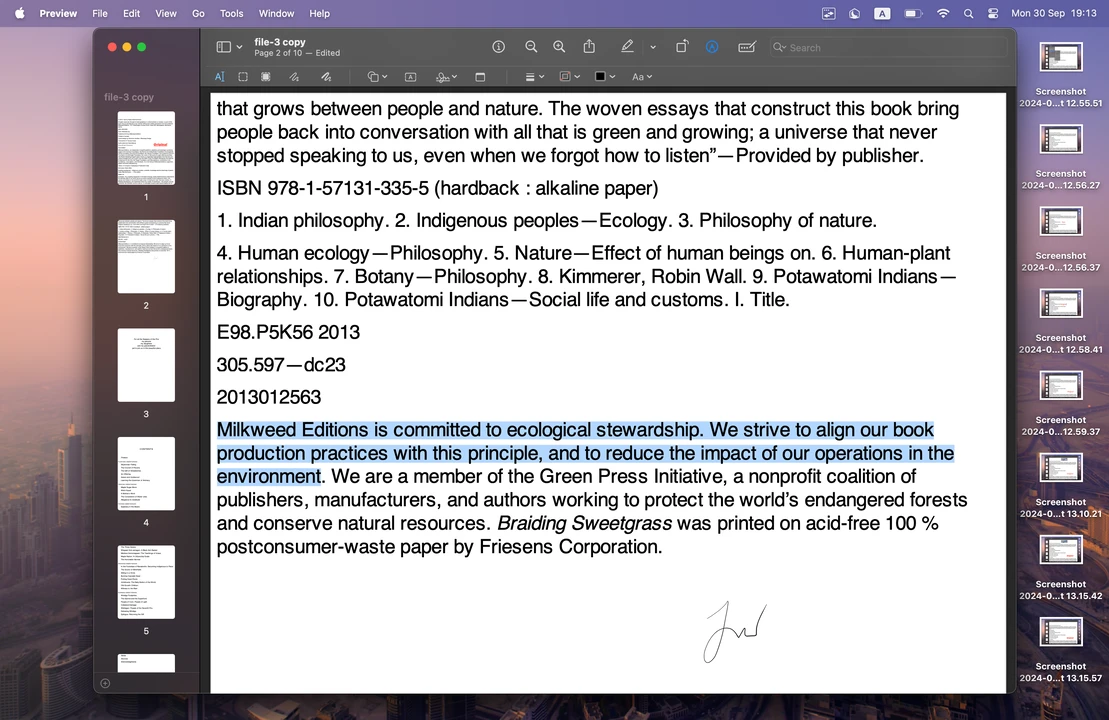
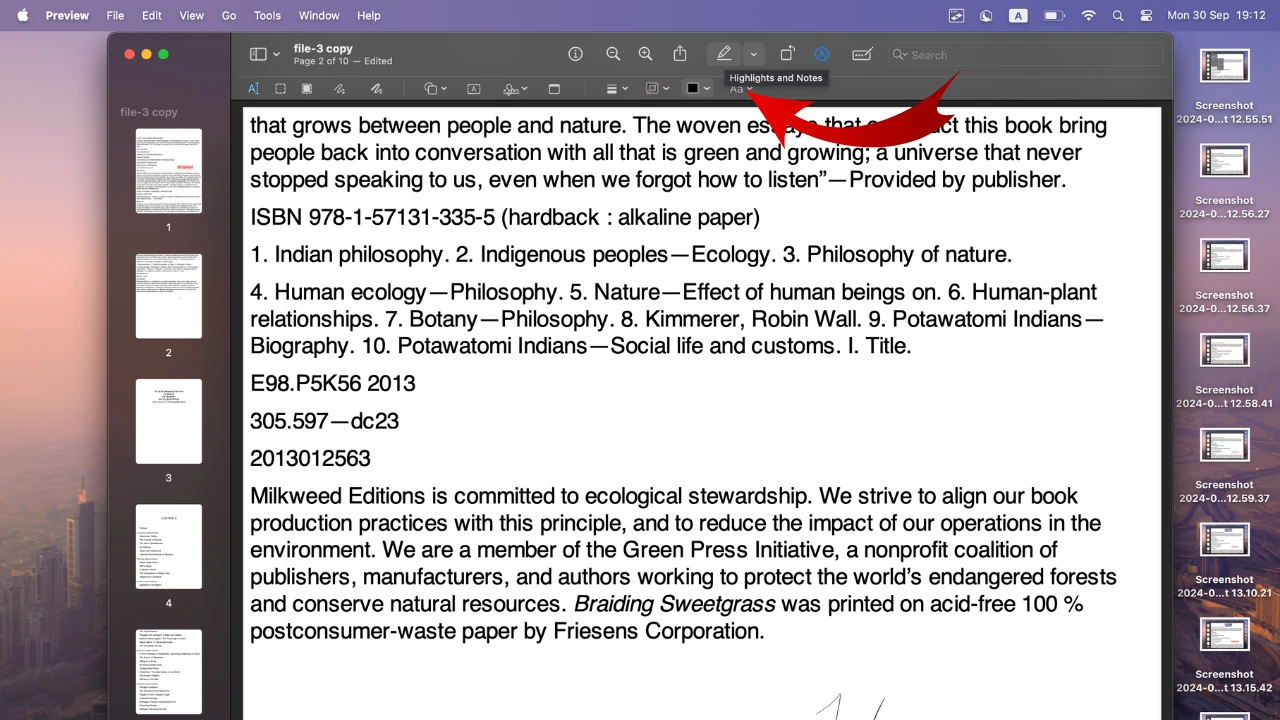
- Choose the Color for Highlighting: Once the text is selected, click on the Highlights and Notes button which can be found in the toolbar at the top. In the selection of colors choose the one you want to use for highlighting.
 After you do this, the selected text will be highlighted and thus, stand out from the rest of the document.
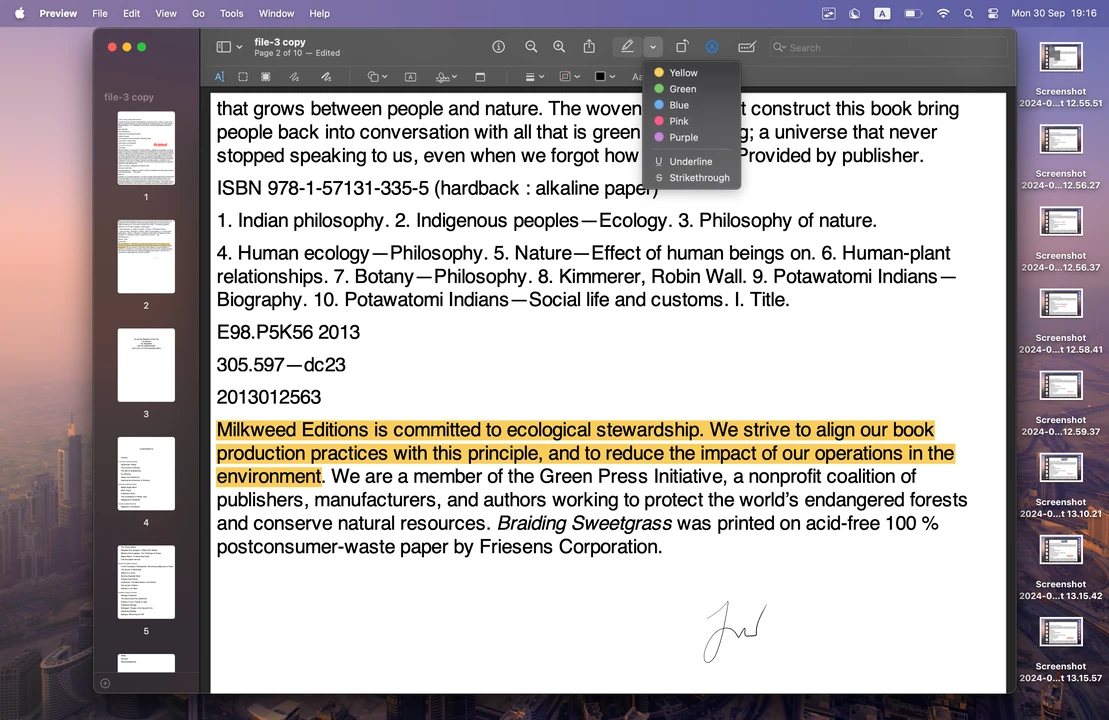
- Underline or Strikethrough: If highlighting isn’t what you need, Preview also allows you to underline or strike through text. After selecting the text, click on the Underline or Strikethrough option in the toolbar, depending on what you need. Underlining tends to be used for emphasizing important information. It’s an alternative to highlighting since color can be distracting for some people. Meanwhile, striking through is usually used to show that a particular part of text needs to be removed or revised.
How to Undo Changes:
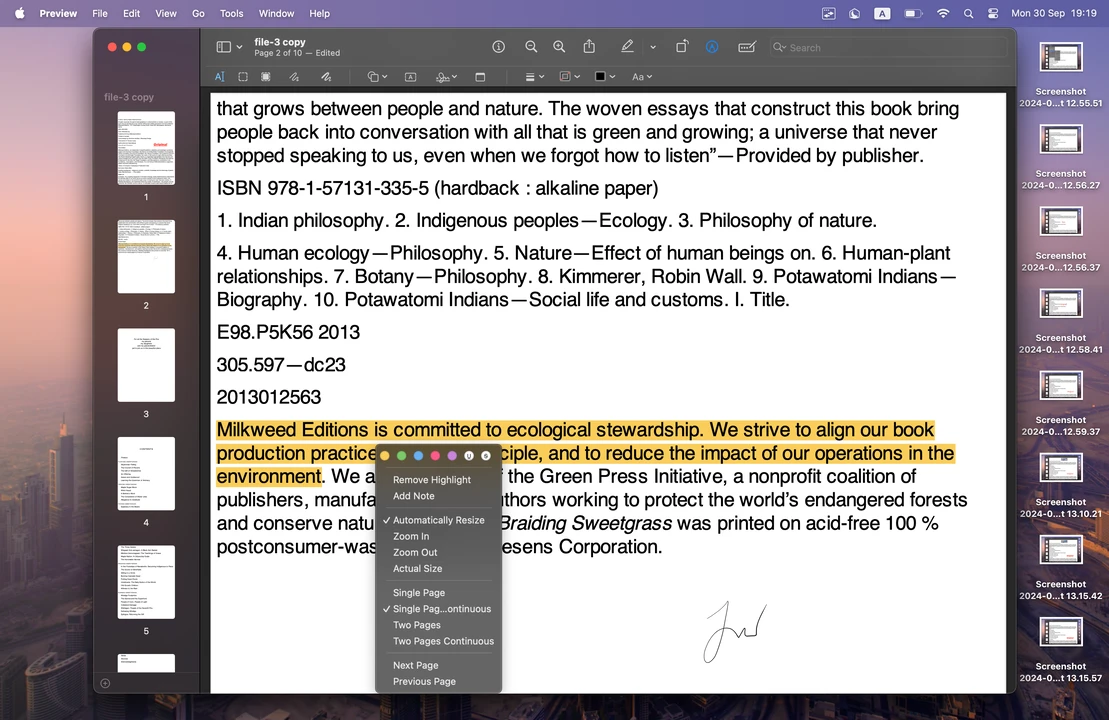
Let’s say you realized that you selected and highlighted some extra bits of text. Or maybe you just want to undo all the changes. That’s pretty easy! What you need to do is place your cursor over the highlighted, underlined, or struck-through text, then press Control + click (or simply right-click using your mouse or trackpad). Then you will see a menu where you can remove highlight or undo other changes you’ve made to the selected text. That’s it!
Conclusion
You can edit PDFs on Mac without spending much time, effort or money. You can add text and sign documents with the help of the built-in app, Preview, or the free online app, Watermarkly. They are incredibly user-friendly, so you won’t have to scratch your head over mastering either of these apps.
There are some differences between them, though. Preview is great if you need to add text or a signature to a single page in a PDF. Watermarkly, on the other hand, offers batch-processing and an amazing selection of tools to customize your text or signature. It might be a good idea to give both apps a try and see which one suits your needs best and makes your workflow more efficient.
More About Editing PDF
How to Write on a PDF Document
More About Editing on Mac
How to Crop a Screenshot on Mac