How To Add Watermark To Your Photos on iPhone
Upload your images
Upload your photos, tap on “Add Images” in the bottom left corner. If there is a photo that you don’t need, select it and tap on the cross that will appear. Click on “Clear Images” to remove all the photos from the app.
The “Next Step” button will take you to the editing stage.
Add logo
If you need to add a logo, tap on “Add logo” and choose one of the following options: “From Gallery” or “From My Phone”. The first option will open our gallery of all-purpose icons, while with the second one you can upload your own logo.
If your logo is against a monochrome background, which you don’t like, our app to watermark photos on iPhone can remove it. Once your logo is uploaded, you will see the “Remove Background” button. Tap on it. And just like that, the background will be gone.
Add text
If you want to put text on image, click on “Add text”, then tap inside the “Text” input area, erase the word “Sample” and enter something new. In case you add multi-line text, it can be aligned left, right, or center. Plus, it is possible to adjust the space between the lines by moving the “Line Height” slider.
Add a copyright symbol, image number, or both. Tap on “+©” to add a copyright symbol. Click on “+IMAGE NUMBER” to add your image number.
Please note, that the image number is going to be automatically altered for each photo, in case you are batch-watermarking on iPhone.
Design your watermark on iPhone
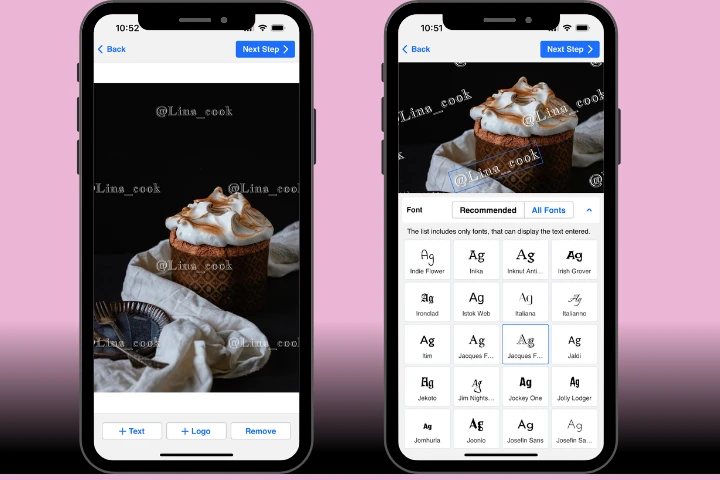
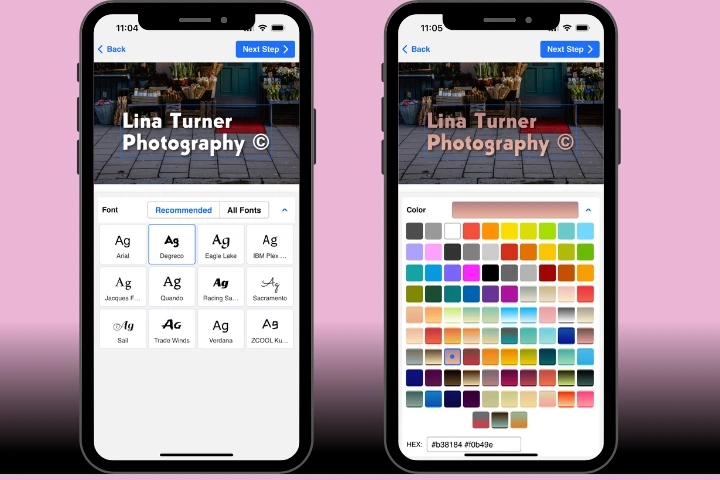
In the “Font” drop-down menu, you can find our vast library of different fonts. If you know the name of the font that you need, type it into the “Font search”.
In the “Color” section, choose one of the solid colors or gradient options.
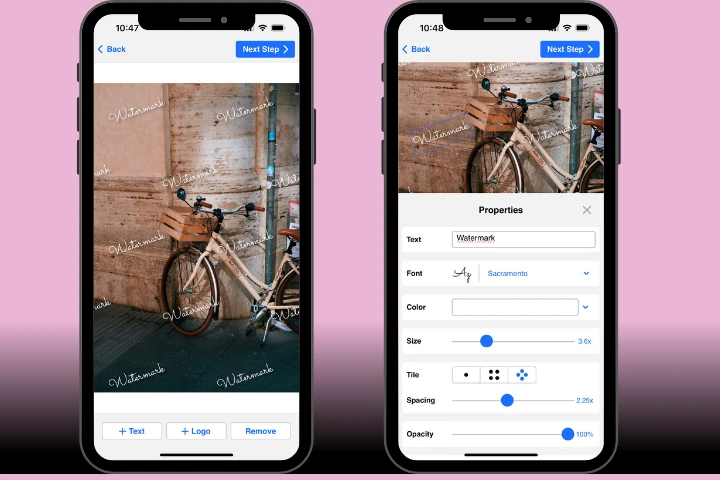
Rotate your watermark, change its size, and set the level of transparency by adjusting the “Size”, “Opacity” and “Rotation” sliders.
If you are worried that a small watermark in the corner isn’t going to be enough, fill up your image with repeated watermarks by enabling the “Tile” feature. Watermarkly offers two types of tile: parallel or checkerwise. By adjusting the “Span” slider make the space between your watermarks on iPhone photos smaller or bigger. Changing the size of your watermark will affect how many repeated versions of it are going to be on your photo.
Choose one of 33 varied effects in the “Effects” section. For example, you can go for the popular dropped shadow or apply the glitchy holographic effect to make your watermark a bit more eye-catching.
Choose the file format
Once you are happy with your watermark on iPhone, go to the Output settings by clicking on “Watermark images”. To disable auto-scaling of watermarks, remove the blue tick.
In the “File format” drop-down menu, choose one of 3 options: “Original format”, “Convert to JPEG” or “Convert to JPEG and compress”. The last one will produce watermarked copies of smaller size, yet excellent quality.
Resize your photos
Tap on the bar next to “Resize images” and select how you want your copies to be resized: No, Exact width, Exact height, Exact width & height, or Percentage.
Check your images look before watermarking
Open the preview section by tapping on the “Preview Watermark” button. Click through your iPhone photos and see how your watermark looks on each of them. If necessary, select and drag your watermark to a different position.
The “Size” and “Opacity” sliders allow you to adjust its opacity and size. Watermarks on other images in the batch won’t be affected. When you’re happy with the results, exit the Preview section. To start the watermarking process on your iPhone, click on “Watermark Images”.
Share your photos
Your watermarked copies will be saved to your iPhone gallery automatically. If you want to share them to your social media platforms or messengers, tap on “Share Images”.
And that’s it!
Adding your name, website address, or logo to your images will kill two birds with one stone: deter thieves from stealing your artwork and lead your potential customers right to you, no matter in what part of the internet your visual content will end up. And with our mobile app to watermark photos on iPhone, Watermarkly, you can easily create a watermark and add watermark to PDF or your image; anywhere and anytime you want!
Watermark Photos For Free
