How to Resize an Image on Android

It's no secret that these days you don't need to buy an expensive digital camera to get amazing photos of high resolution. Most modern smartphones can easily provide the same results. For instance, the latest models of Android smartphones are equipped with advanced mobile cameras that are capable of capturing professional-looking images of great quality. They tend to have rather high megapixel sensors (e.g., 48 MP, 108 MP) as well as built-in image stabilization. Thanks to both of these features smartphone cameras can produce sharp and detailed photos.

You might not be aware of this, but a detailed image of excellent quality usually has a large file size and high pixel dimensions. The following table clearly shows this:

android camera resolution

It’s great that a smartphone camera can produce photos of excellent quality, of course. You won’t have to worry about not being able to capture an important moment with all the details.

However, there are some issues that you might need to deal with:

  • You can experience some troubles sending your high-quality photos via email or messengers because their file size will exceed the limit.
  • Most social media platforms have size requirements that images need to meet. You will be able to post them even if they don’t. However, they will probably look blurry and pixelated. And as you might have guessed, your smartphone photos won’t have the image size that meets these requirements.
  • There’s another downside to high-quality photos. They will take up a lot of space in your smartphone’s memory. So, if you keep running out of memory on your smartphone, tons of images in your gallery might be the reason for it.

What can you do? How can you avoid all the issues when sharing your photos online? How can you free up some space in your memory?

Well, there’s a way. You can change the size of your photos. That’s right. And you can do that without a significant loss of quality. In this article you will learn how to resize an image on Android.

Unlike iPhones, most Android smartphones don’t offer any built-in tools for resizing photos.

Well, technically, there’s one available option – you can crop a photo to reduce its size. Cropping can easily be done right in the editing section of the gallery app. However, by cropping a photo you will unavoidably lose some of its details. So, if that’s not what you want, you will need to opt for using a third-party app.

Samsung Galaxy smartphones are exceptions, though. They do have a built-in tool to resize images without cropping them.

This article will explore two free methods for resizing photos on Android. The first one will be useful exclusively for owners of Samsung Galaxy smartphones. The other one, however, is much more practical and efficient because it involves using an online app that can work on practically any device regardless of its model or brand.

Resize Photo Online
How to Resize an Image on Android using a Samsung Galaxy Smartphone

The entire process is very simple and consists of the following steps:

  1. Open the image you need to resize in the Gallery app.
  2. Tap the Edit button, which looks like a pencil.
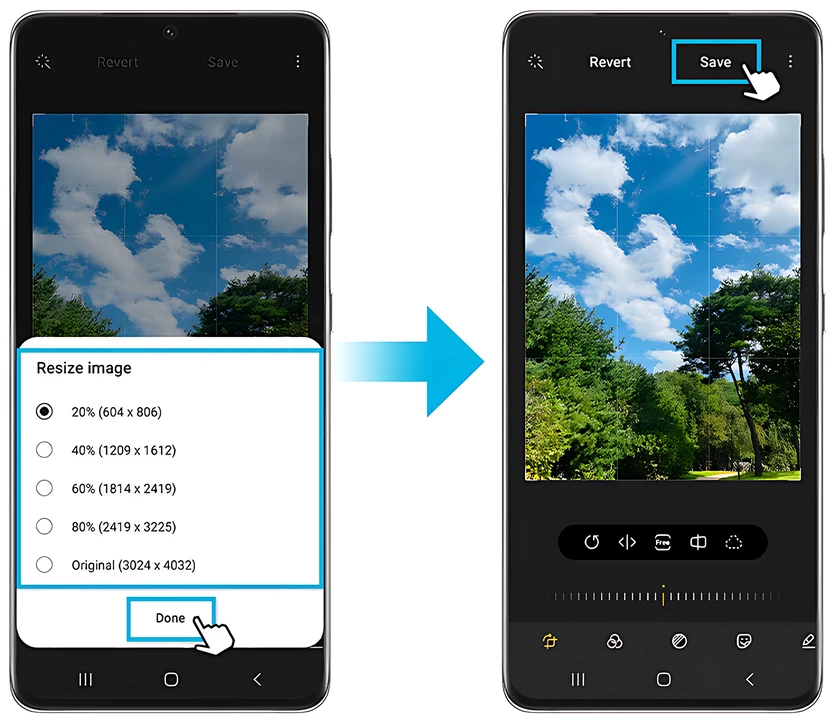
  3. Then go to More Options (the three vertical dots) at the top right corner and select Resize. You will be able to choose from 4 options to resize an image on Android by percentage: 80% of the original, 60%, 40%, and 20%. Unfortunately, there’s no option to change the size in pixels. However, you will see a preview of the resulting image size. resize an image on samsung
  4. Choose the resizing option that suits you best, then tap Save to apply the changes and finish editing.

Please note that your original image will be overwritten.

Surely, this method is perfect for beginners due to its simplicity. It’s also pretty quick and incredibly convenient since you don’t need to install anything. However, there are, undoubtedly, some drawbacks.

First, in most cases resizing images is necessary to get specific pixel dimensions instead of just reducing the size of a photo. As it has already been mentioned, social media platforms and websites have their own size requirements. To meet them, your image needs to have specific pixel dimensions. For example, your Instagram square post has to be 1080x1080px. Hence, you will need to resize your photo to get this specific image size in pixels. But with this built-in tool, you can only resize by percentage. Thus, you won’t be able to get the results you need.

Second, here it’s possible to process only one image at a time. What if you need to resize several photos? Going through all the steps for each photo over and over again can be quite tedious and time-consuming. It would’ve been so much better to process all of them in one go, right?

Third, with this method you can only make your images smaller. There are no options to make them bigger. Meanwhile, the image resizer that you’re going to learn about in just a moment does offer the ability to upscale images. So, if you happen to have an image that’s too small, you can make it bigger.

Last but not least, all changes will be applied to your original photos without the option to undo them and revert back. So, if you want to keep the original image unchanged, you will need to duplicate it first, then resize it. And what if you need to resize the same image in several different ways? Well, in that case, you will need to create several copies, then repeat the entire resizing process with each of them. That’s not very convenient, is it?

Taking all of these disadvantages into account, it might be worth making use of a different way to resize photos on Android. For the next method that you’re going to learn about, you will only need a browser and internet connection. It’s just as simple and straightforward yet doesn’t have any of the aforementioned drawbacks. Are you intrigued? Keep reading!

Resize Photo Online

How to Resize an Image on Android Using a Free Online Tool

First of all, this way of resizing images can be used on nearly all internet-connected devices regardless of their operating system, model or brand. You can use it on a Samsung smartphone or a Huawei smartphone. You can even use it on iPhone!

Using an online image resizer might be the best way to reduce the file size of your images on your Android smartphone. There’s no need to install anything, which means no new app will take up any space in your memory storage.

You also don’t need to worry about the safety and privacy of your photos, because the entire processing will happen in the browser on your device. Your files won’t be sent to any servers, no one will ever get access to them.

Let’s take a closer look at how you can resize an image on Android using Watermarkly, which is a website that offers an online image resizer:

  1. Go to watermarkly.com > Tools > Resize Photos.
  2. Tap the red button on the webpage to open the app.
  3. Tap on the Select Images button, then pick one or several images from your gallery. You can choose photos from the Camera roll or other albums.
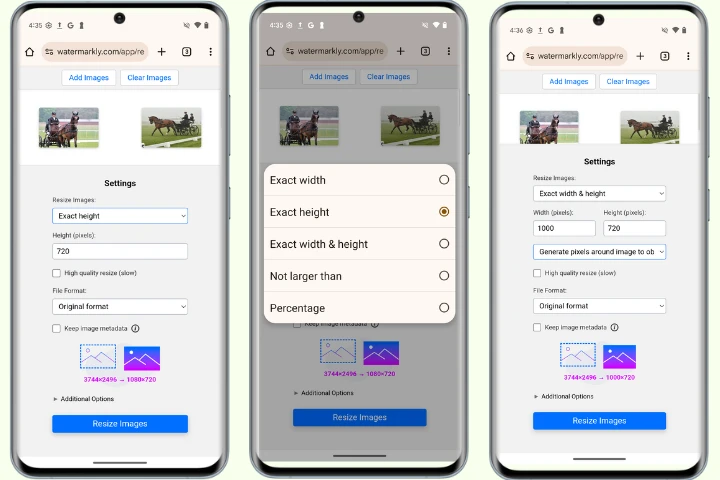
  4. Choose the necessary resizing option. If you need to keep the original aspect ratio, you should go either for Exact width or Exact height. If you don’t need your image to be scaled proportionally, you can give the Exact width & height option a try. If you go for this option, the aspect ratio of your photo will be changed either by automatic cropping or by adding new pixels around the original image. It’s possible to change the size of an image by percentage here, as well. resize an image using watermarkly
  5. Enter new values. Please note that here you can make an image bigger or smaller. The preview of the resulting image size can be found on the right.
  6. When you’re ready, tap Resize Images, then download your resized copies. That’s right, Watermarkly will apply all the changes to automatically created copies. Note: the resized copies will be exported to Files > Downloads on your Android phone.

All done! The whole process is super simple and takes just a couple of minutes!

So, what do the built-in tool and Watermarkly’s online app have in common? Let’s see:
  • Both are free.
  • Both are easily accessible.
  • The resizing process is pretty quick in both cases.
  • Both can resize an image by percentage.
  • You can preview the resulting image size in both.
And here are the key differences:
  • Watermarkly allows you to resize a batch of multiple photos on Android in one go.
  • Watermarkly never overwrites the originals. You won’t need to create any copies, either – it will create them automatically for you.
  • Here you have a broader choice of resizing options. With Watermarkly you can change the image size in pixels, if necessary.
  • You can use Watermarkly on practically any smartphone that’s connected to the internet.
Resize Photo Online

In Conclusion

The choice is yours to make. If you happen to have a Samsung Galaxy smartphone, then it’s better to give both of the methods featured in this article a try. This way you’ll be able to determine the most suitable and convenient one for you. In fact, it’s definitely worth trying out different options if you need to resize images on Android pretty frequently. Changing the size of your photos can be necessary in a variety of cases. Fortunately, these days, you can do that directly on your smartphone. There’s no need to master any complex photo editors to perform such a simple task. Whatever your goals are, it’s perfectly possible to achieve them in a straightforward, quick and effortless way.