How to Crop a Screenshot on Windows

Maybe you need to use some screenshots in a project that you’re working on. Maybe you want to share something funny with your followers or provide instructions to show how a problem can be solved. Screenshots can be useful in a number of cases. But sometimes they might contain some unnecessary or even sensitive information. That’s why you might need to crop a screenshot on Windows.

Cropping a screenshot doesn’t take much time or effort. In fact, you can do it with the help of built-in apps that are already on your Windows computer.

Which means you can use them for free and without the need to download and install anything. These pre-installed apps are pretty easy to use yet have all the necessary editing tools. You will be able to change the aspect ratio or even tilt your screenshot. They are perfect for some quick and simple cropping.

This article features detailed instructions on how to take a screenshot and how to crop a screenshot on Windows in several different ways. You will also learn about an online photo cropping app, Watermarkly.

There are some similarities and differences between the built-in apps and this online image cropper. For instance, both the built-in apps and Watermarkly allow you to save your screenshot as a JPEG or a PNG file. However, you can actually use Watermarkly to crop multiple screenshots in one go, which isn’t possible in the built-in apps. What all of these methods of cropping a screenshot on Windows have in common is that they are super-easy and quick.

Are you interested? Let’s get started!

Crop Image Online

How to Take a Screenshot on Windows

What if you’re not all that familiar with Windows? So, before we move on to cropping, let’s see how you can take a screenshot on Windows. This can actually be done in a couple of different ways.

Windows Key + Print Screen key

Let’s start with the simplest and quickest way to take a screenshot of the entire screen. Open the window that you need to capture, then press the Windows Key and the Print Screen key at the same time. The entire screen will dim for a moment. Now, go to the Pictures folder on your Windows computer. You’ll see that there’s a new folder called “Screenshots”. All the screenshots that you take using the Print Screen key + the Windows key shortcut will be saved to this folder.

Print Screen key

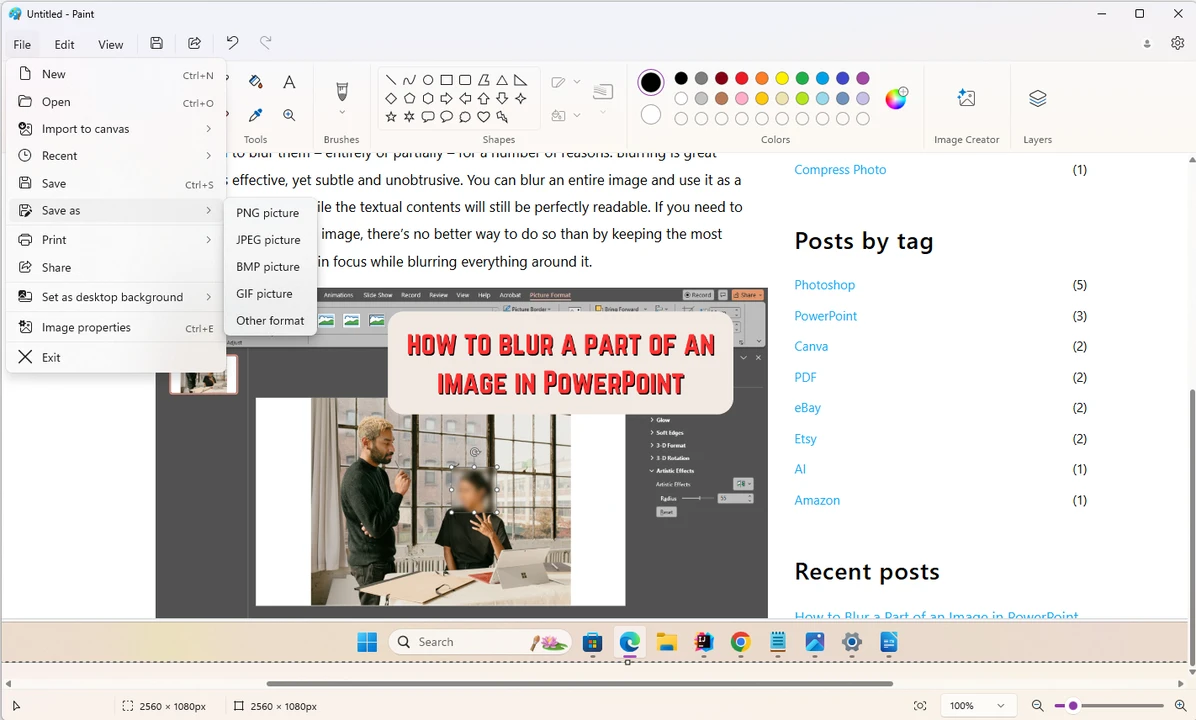
One of the most common ways to take a screenshot is to use the Print Screen key. Simply open the necessary window and press the Print Screen key on your keyboard. What you need to do next is open an image editor. For example, it can be Paint or Paint 3D, which should already be on your Windows computer. Then use the “Paste” button in the top bar or simply use the CTRL + V shortcut to paste your screenshot. Finally, go to File > Save or Save As. Choose the export folder and save your screenshot as a file.
how to crop screenshot on windows

Snipping Tool

Finally, you can use the Snipping Tool to take a screenshot on Windows. This is how you can do this on Windows 10:

  1. In the taskbar open the search box by clicking on its icon which should be in the bottom left corner.
  2. In the search bar enter “Snipping Tool”, then click on the Snipping Tool icon.
  3. When the Snipping Tool opens, click on Mode to select what shape your snip should have or whether you want to snip an entire screen or only a part of it. how to crop a screenshot on windows
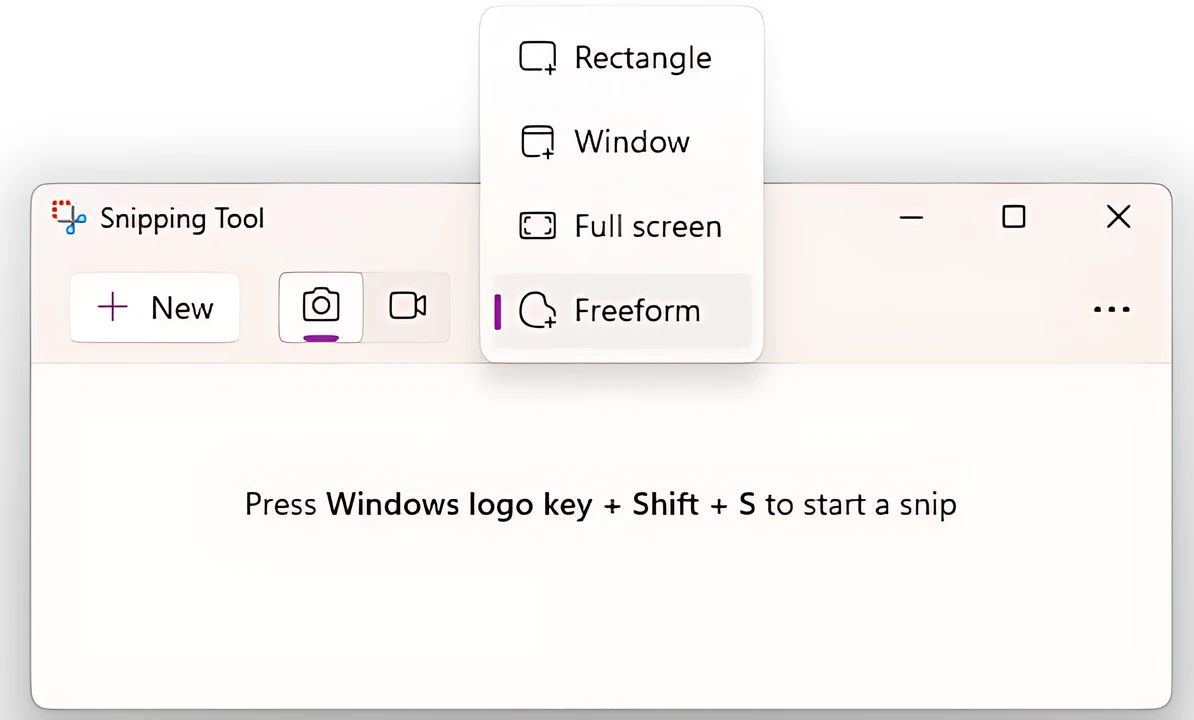
  4. After you pick the necessary mode, click on the New button and select the area that you want to capture.
  5. A new screenshot will appear in the app. how to screenshot crop on windows
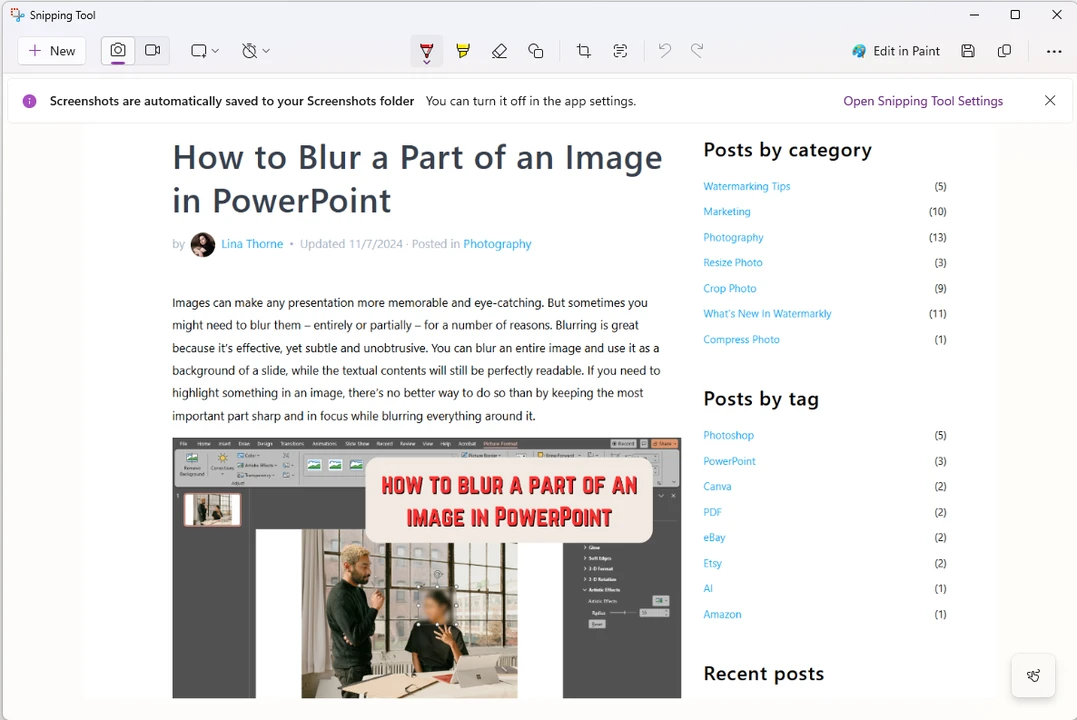
  6. Go to File > Save As. Alternatively, you can click on the floppy disk icon which is the Save button or use the CTRL + S shortcut.

If you are on Windows 11, then the process is slightly different:

  1. To take a snip you can use the Shift + Windows logo key + S shortcut. Your cursor will turn into a cross. Use it to select the necessary area. When you are done, your screenshot will be automatically saved to the “Screenshots” folder and also copied to the clipboard.
  2. Say, you don’t want to look for this Screenshot folder. To save your screenshot to a different folder that’s more convenient for you, click on the window that appears in the bottom right corner. This way, you will open the Snipping Tool. how to screenshot and crop on windows
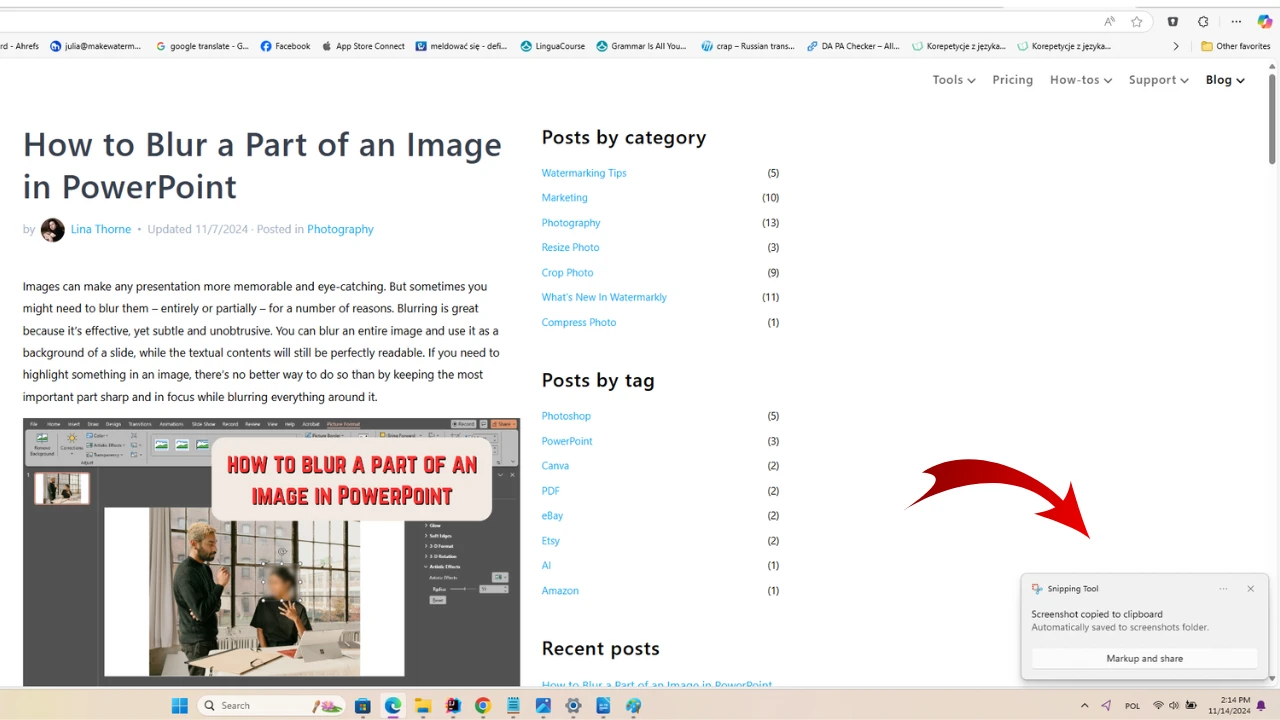
  3. If for some reason, no window popped up, go to the task bar and then enter Snipping Tool in the search bar. Once you open the app, you will see the screenshot you’ve taken.
  4. Now, all you have to do is save your screenshot! Click on the floppy disk icon which is the Save button or use the CTRL + S shortcut.

If you are a Windows 11 user, it’s possible that the PrtScn button is set to open the Snipping Tool by default. If you have a different version of Windows, you can set this setting manually. Go to Settings > Accessibility > Keyboard. Then enable Use the Print screen key to open screen capture.

The main benefit of using the Snipping Tool is that here you can actually select the exact area that you want to screenshot. In other words, if you use the Snipping Tool, you might not even need to crop your screenshot on Windows.

Crop Image Online
How to Crop a Screenshot on Windows Using Built-In Apps

Now that you know how to take a screenshot, let’s see how you can crop it with the help of the built-in apps. Cropping a screenshot is pretty easy and quick.

Crop a Screenshot on Windows using Paint 3D

Paint 3D is an efficient and easy-to-use image editor that’s available for free. If you have Windows 10, it should already be pre-installed.

Please note that Paint 3D was removed from the Microsoft Store on November 4, 2024. So, if you don’t have it on your computer, you might need to try a different method of cropping.

Here’s what you need to do:

  1. Take your screenshot using the Print Screen key, then open Paint 3D.
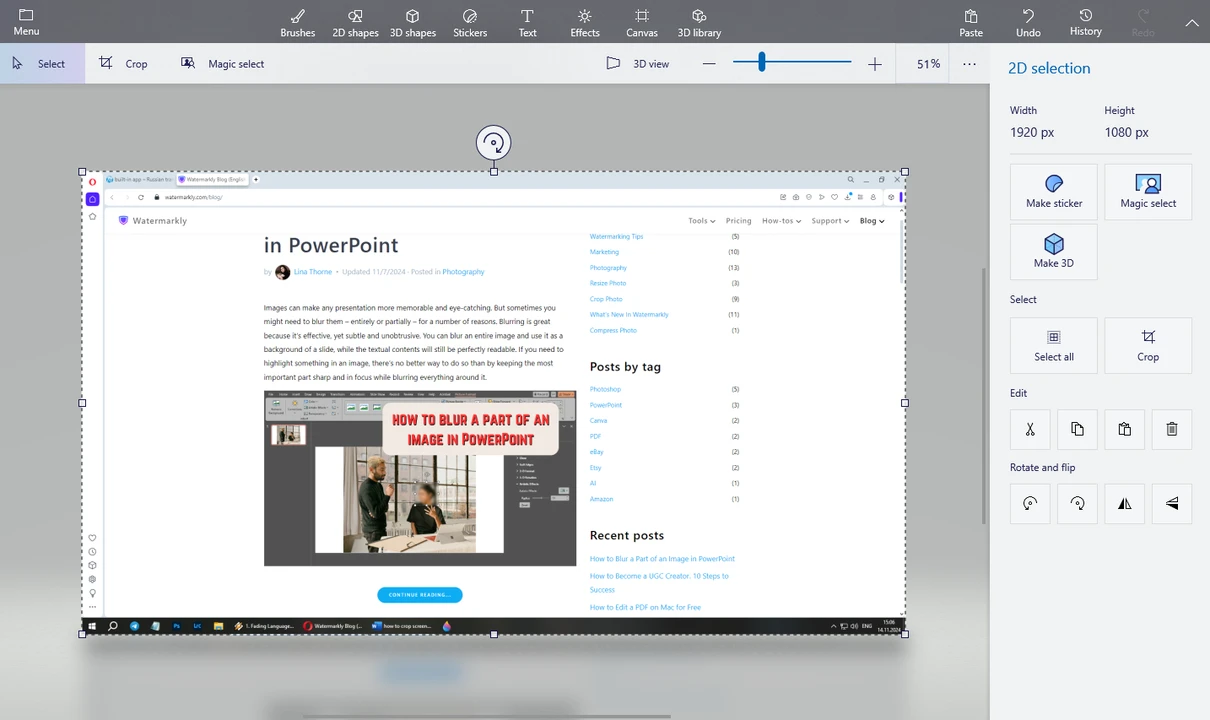
  2. Once Paint 3D is open click on the “Paste” button or use the CTRL+V shortcut. Your screenshot will appear on the empty canvas. how to screenshot on windows and crop Here’s a tip. If you took a screenshot using the Snipping Tool and you need to crop it, don’t export it just yet. Instead, click on the Edit in Paint 3D button. Your screenshot will be opened in Paint 3D and you will be able to crop it as well as make some other changes.
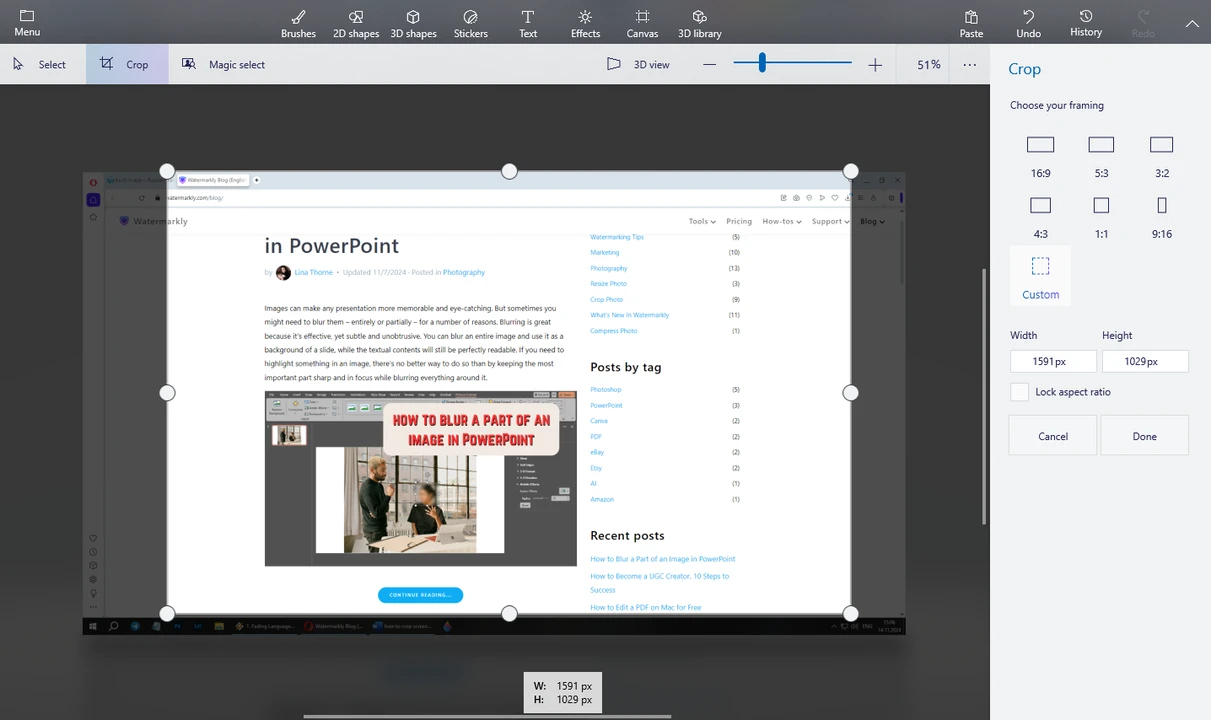
  3. In the top bar click on the Crop button.
  4. Adjust the cropping area with the cursor. how to crop screenshot on windows It’s possible to adjust the cropping area however you want. You can also use one of the cropping presets with commonly-used aspect ratios. Additionally, you can enter the necessary pixel dimensions into the input bars under the aspect ratio presets. how to crop a screenshot on windows However, please note that you cannot enter values that are higher than the original ones. For example, if the original image size is 1920 x 1080px, you won’t be able to change it to 2000 x 1100px. To put it simply, you can only reduce the image size in Paint 3D, not increase it. how to screenshot and crop on windows If you want to keep the original aspect ratio, tick Lock Aspect Ratio.
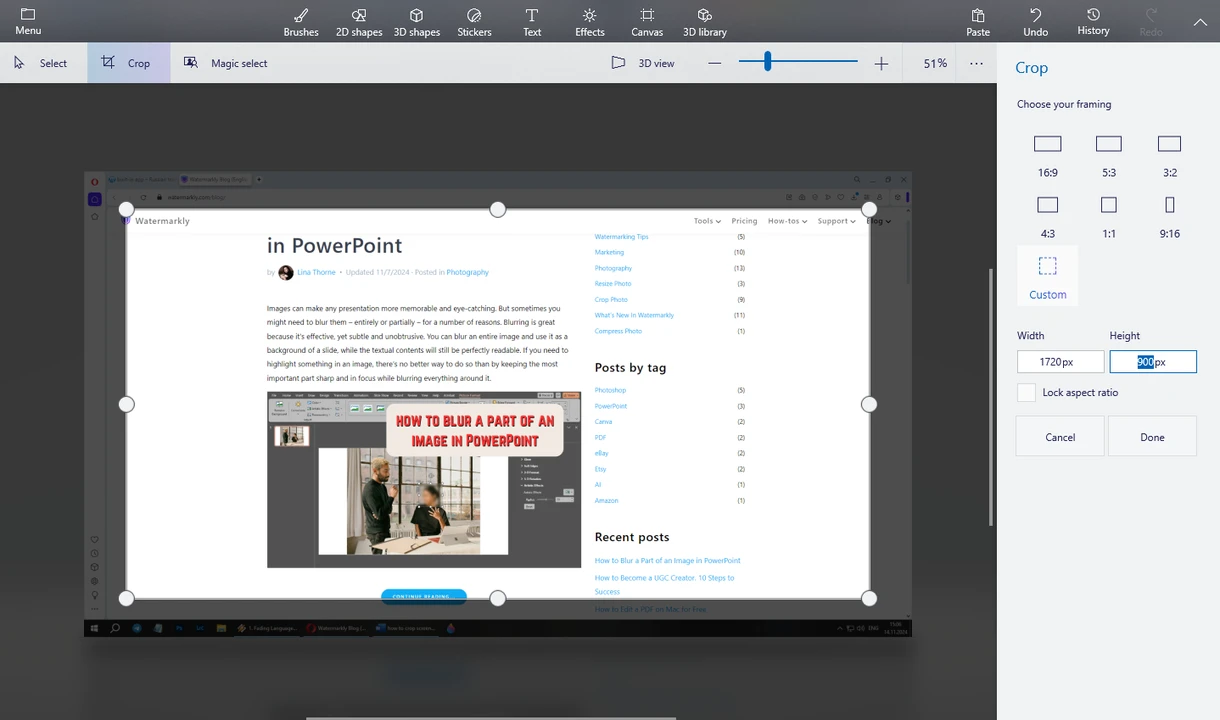
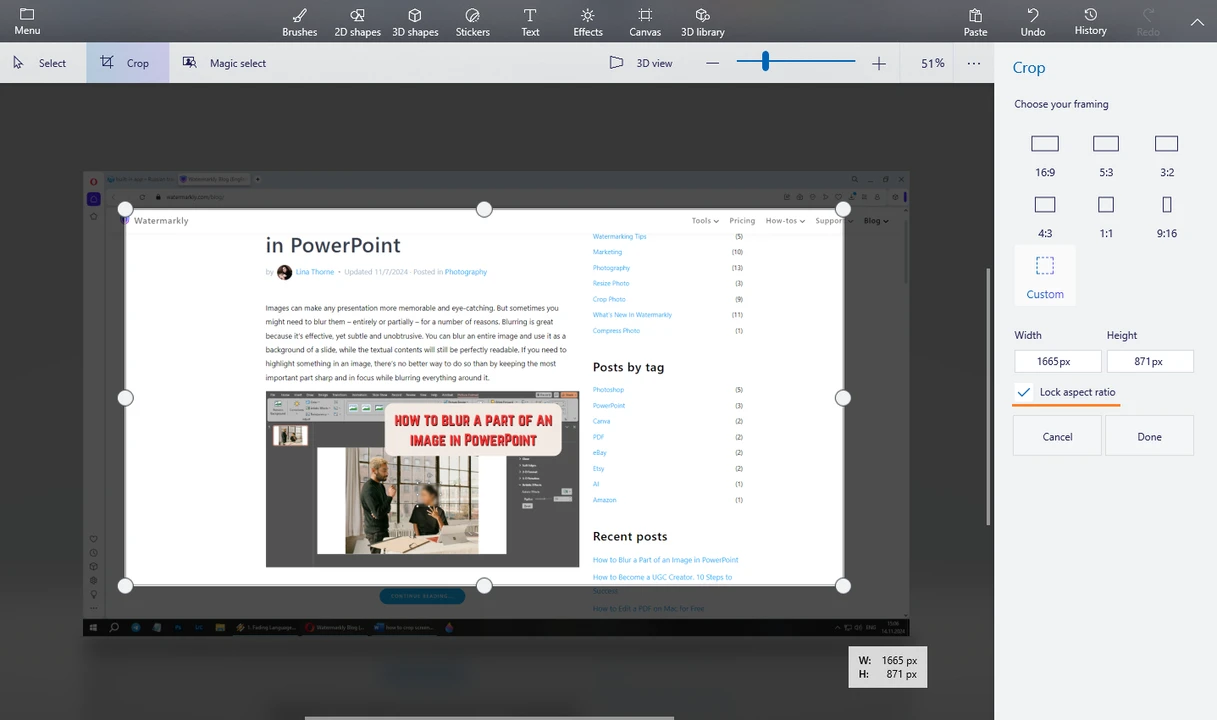
  5. Press Enter or click on Done to apply the changes.
  6. You can click the Undo button or use the CTRL + Z shortcut to undo the cropping if you want to re-crop your screenshot in a different way.
  7. Use the CTRL + S shortcut or go to Menu > Save or Save As, then choose the export folder and save your cropped screenshot as a file. Paint 3D will offer you to save your screenshot as a PNG image, but it is possible to choose a different format and save your screenshot as a JPEG.

That’s it! Your screenshot is cropped now. Pretty quick and easy, right? What’s great about this method is that Paint 3D has a surprisingly versatile selection of editing tools. For instance, you can add some text to your image or doodle on it.


Crop a Screenshot on Windows Using Paint

If you have an older version of Windows, then you probably don’t have Paint 3D. Fortunately, Paint is available on all Windows computers. Paint’s toolkit is more limited than Paint 3D’s because Paint is a rather simple and basic image editor. Nevertheless, it’s still possible to use it to crop a screenshot on Windows:

  1. Similarly to the previous option, take a screenshot using the Print Screen key, then open Paint and paste your screenshot into the empty canvas.
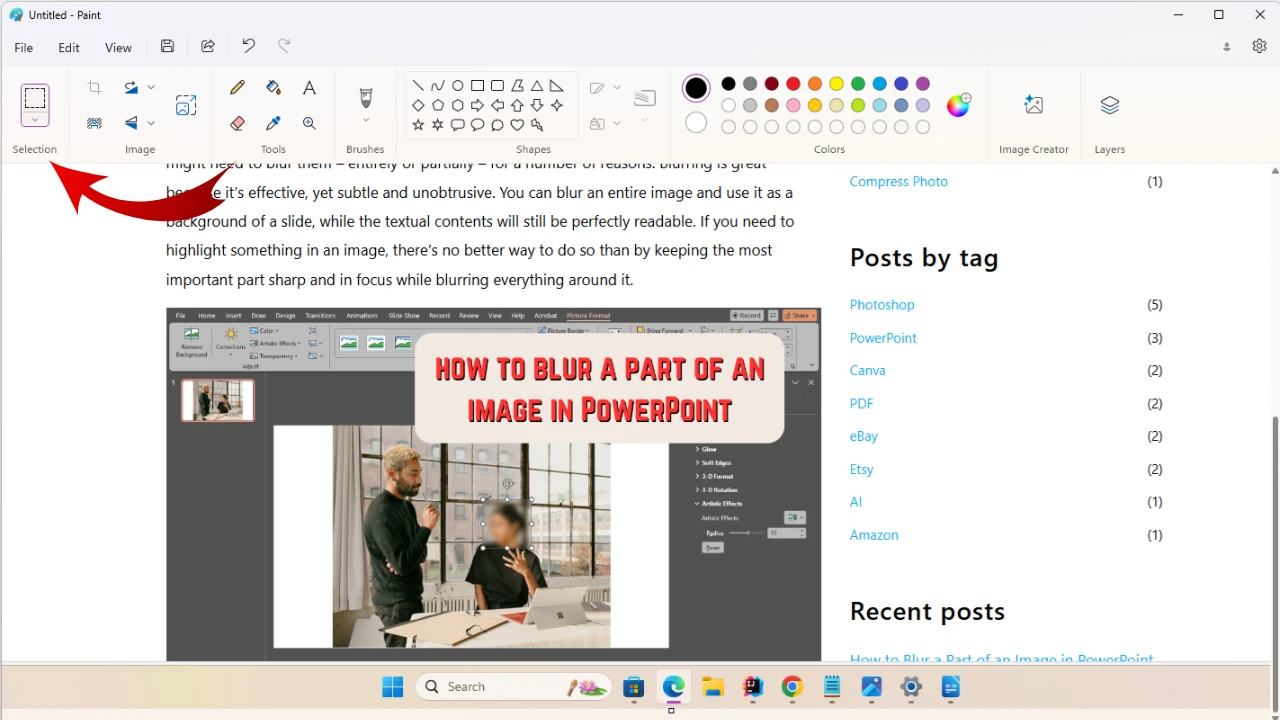
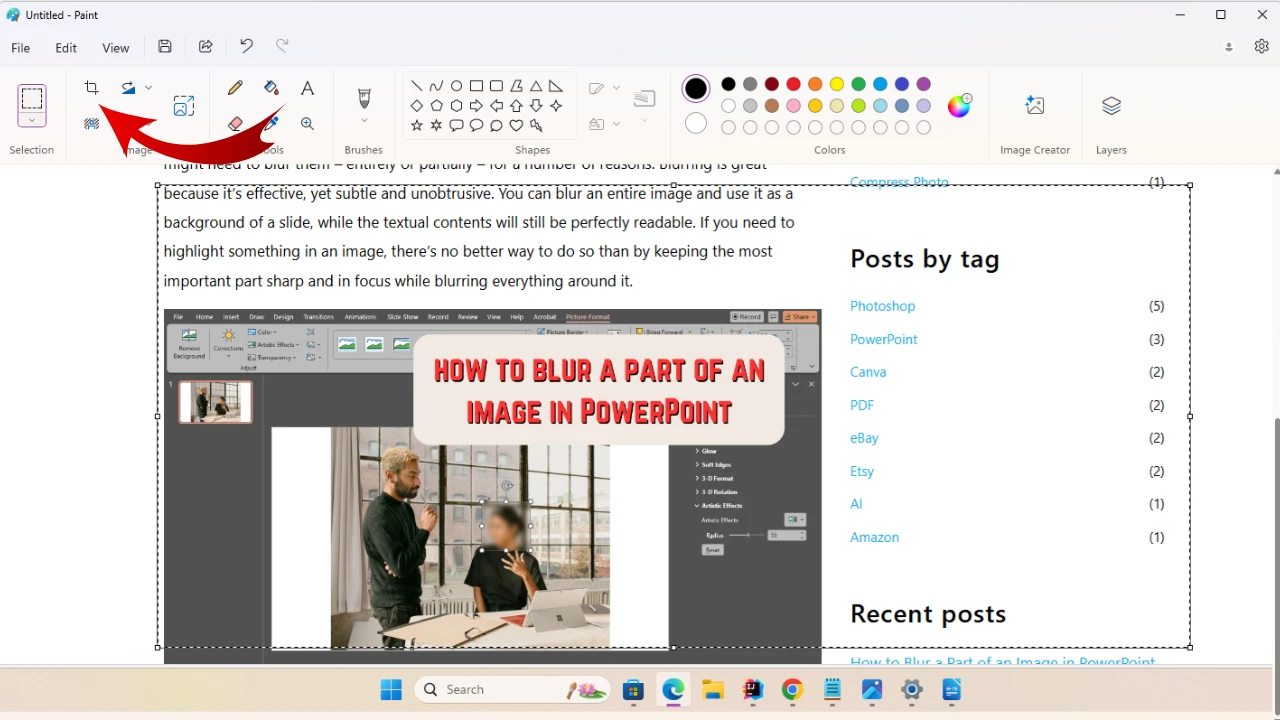
  2. Click on the icon of the Selection tool. You can click on the arrow to pick the shape of the selection. The rectangular shape is set by default. how to screenshot crop on windows
  3. Draw the selection with the cursor. In other words, select the area that you want to keep.
  4. Once the selection is created, click on the Crop button in the top bar. how to screenshot on windows and crop
  5. Voila, you screenshot is cropped now! You can move on to saving it by clicking on the Save button or using the CTRL + S shortcut.

The downside of using Paint is that there are no presets with popular aspect ratios, and you won’t be able to enter the exact pixel dimensions either. Thus, you won’t be able to crop multiple screenshots to the same aspect ratio, if that’s what you need. But Paint is perfect for cropping out all the unnecessary bits of a screenshot quickly.


Crop a Screenshot on Windows Using the Photos App

Finally, you can use the Photos app for cropping, which is a built-in image viewer. Follow these steps:

  1. Find the necessary screenshot on your computer, then open it in the Photos app. That’s right, your screenshot should already be saved as a file.
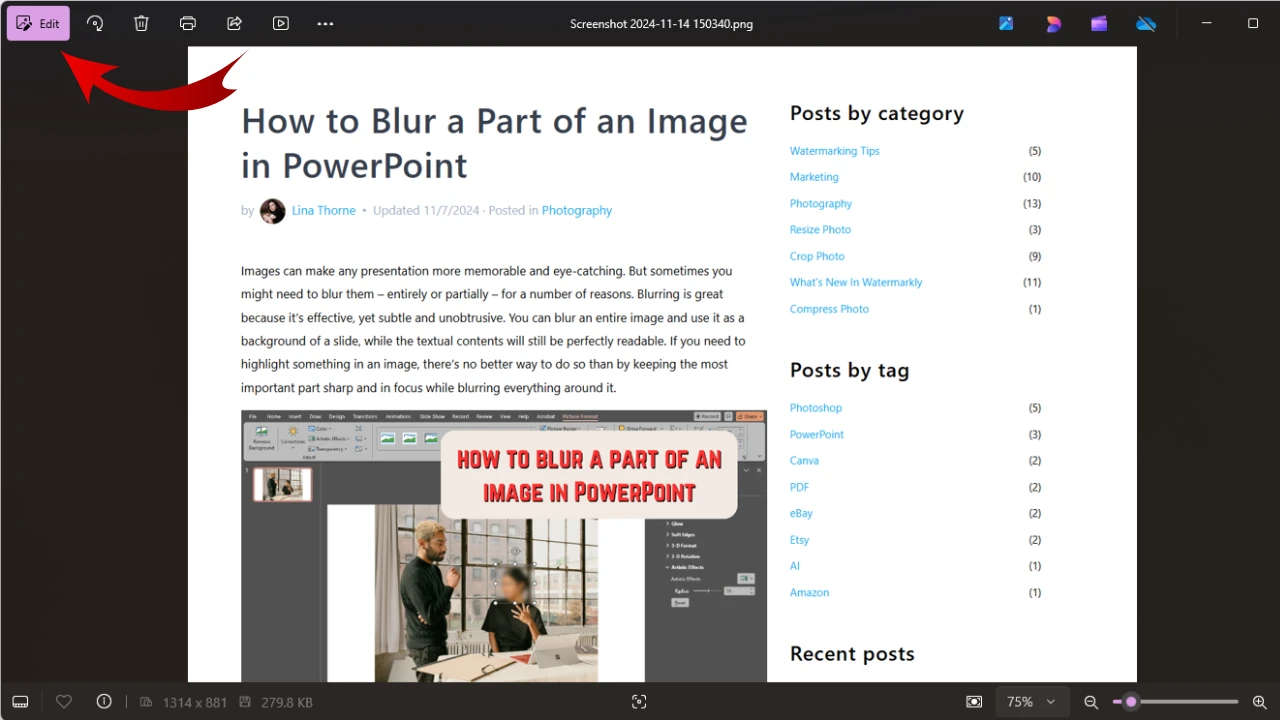
  2. Click on the Edit button or use the CTRL + E shortcut to open the image editing section. how to crop screenshot on windows
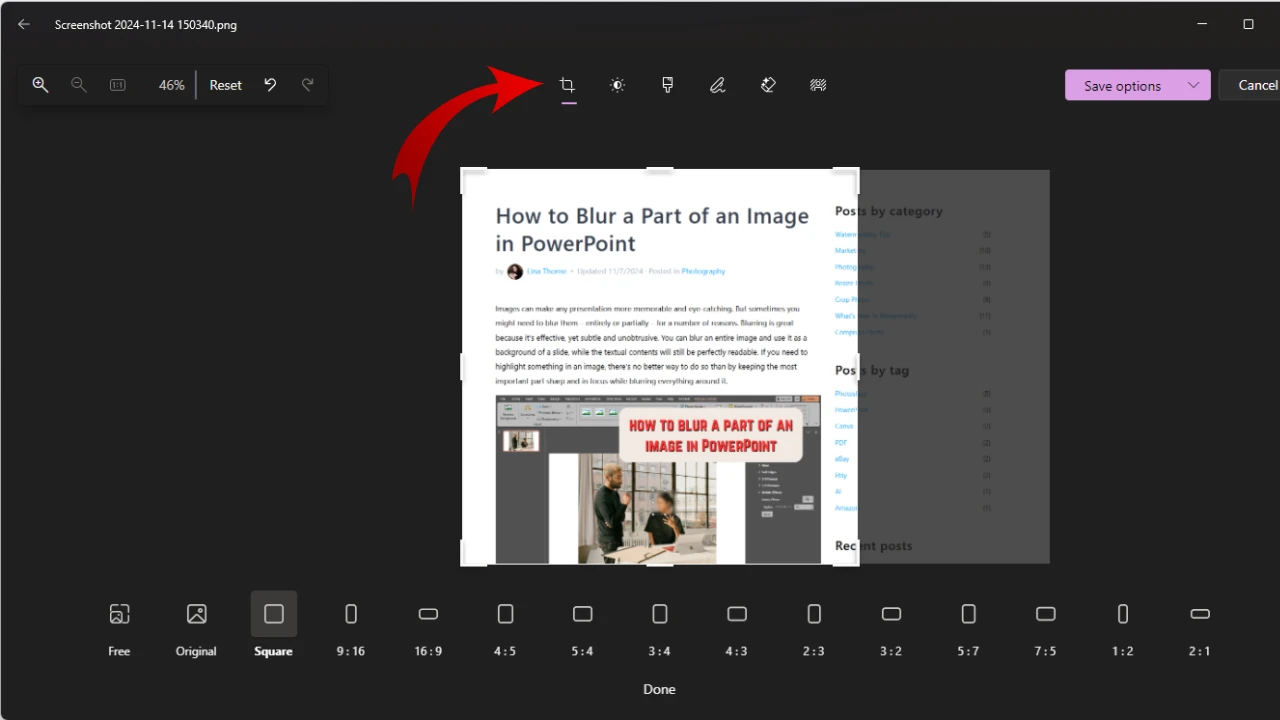
  3. Click on the Crop button at the top.
  4. Adjust the cropping area with the cursor. You can hold SHIFT, while resizing and repositioning the cropping area – this way the original aspect ratio will be locked. how to crop a screenshot on windows
  5. The Rotation slider can be found at the bottom. You can use it to rotate the image if necessary.
  6. You can also crop to a certain aspect ratio. To do this, click on the Freeform word at the bottom. This will open the Options menu with different aspect ratios. Select the necessary aspect ratio, click on Done, then adjust the cropping area.
  7. When you’re ready, click on Save or Save a Copy. If you click on Save, the cropped version will overwrite the original. By clicking on the Save a Copy, you will save the cropped image as a copy, while the original will remain unchanged.

All done! This was also pretty easy and quick, right?

Crop Image Online

How to Crop a Screenshot on Windows Using Watermarkly

Undoubtedly, the pre-installed apps – Paint, Paint 3D, Photos and Snipping Tool – are convenient and easy-to-use. The selection of tools that you can find in Paint 3D and Photos is actually astonishingly versatile. These apps have nearly everything you need to crop your screenshots and do some other edits to them.

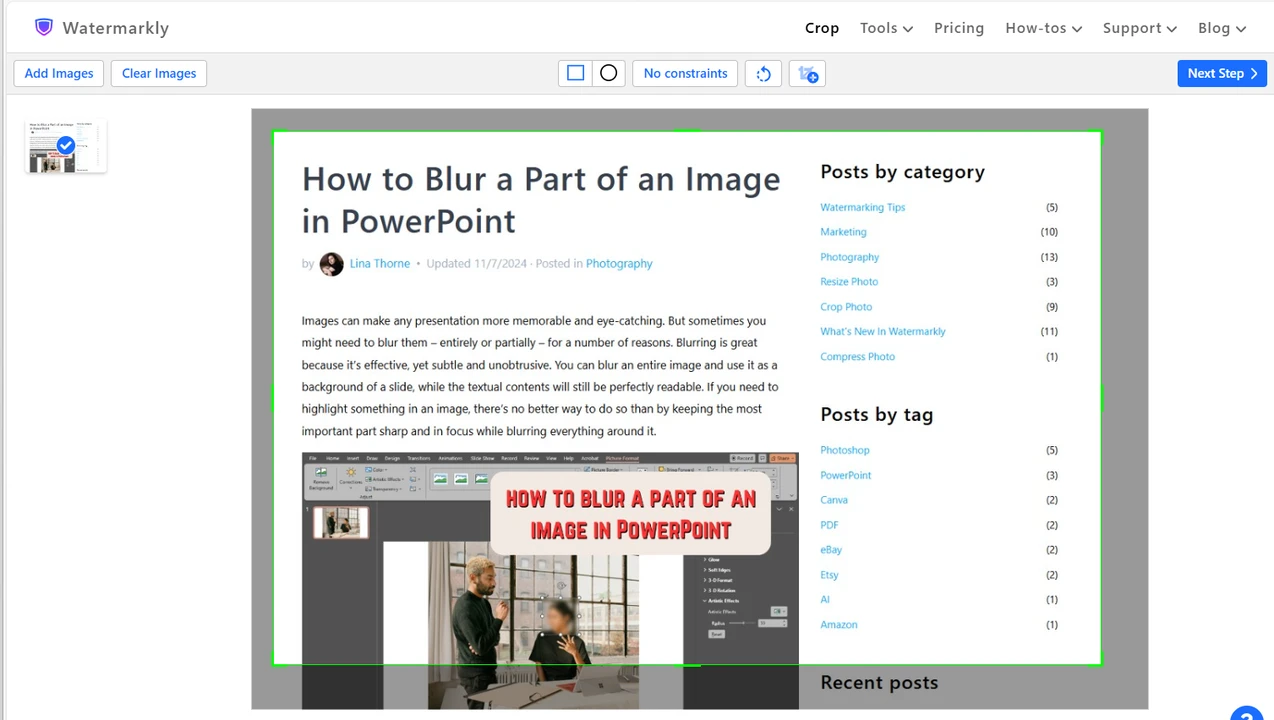
However, you can also crop a screenshot with the help of Watermarkly. It’s a website that offers various apps for basic image editing, including an online image cropper that has an intuitive and user-friendly interface. Even if you are a complete beginner you will be able to crop a screenshot on Windows within just a couple of minutes. All you need to do is to upload a screenshot or several screenshots into the app, resize and reposition the cropping area, change the aspect ratio, if necessary, then export your images. That’s it!

Since Watermarkly is browser-based you can use it on any internet-connected device and on any operating system, including Windows.

This image cropper has some similarities with Windows’s built-in apps. For instance, you can crop a screenshot however you want or select a preset with a popular aspect ratio. Also, Watermarkly never changes originals, so you will download cropped copies onto your device.

Here, you will also find the Rotation slider – similarly to the Photos app – with the help of which you can tilt the image itself if you need to straighten the horizon, for instance. In the export settings you will be able to keep the original format or convert your screenshot to JPEG or WEBP.

how to crop a screenshot on windows

What’s the point of using an online, third-party app, you may ask? Well, Watermarkly has some advantages over the built-in apps. Here they are:

  1. Crop multiple screenshots on Windows. Watermarkly’s biggest advantage is that it supports batch-processing. In Paint, Paint 3D and the Photos app you can work with only one image at a time. So, it will definitely take you quite a while to crop multiple screenshots. If you want to save yourself some time, what you can do is take all the screenshots using the Windows key + Print Screen key shortcut, then drag and drop all of them from the Pictures folder right into Watermarkly. You can crop them using one and the same preset or using different presets. It will be much faster than cropping each screenshot one by one.
  2. Pick a different shape. Watermarkly allows you to crop images into a circle or a rectangle that can be turned into a square. To change the shape, you simply need to click on the rectangle or circle icon at the top. Meanwhile, you won’t be able to crop into a circle in any of the built-in apps.
  3. Enter new pixel dimensions or use presets. As it has already been mentioned, Watermarkly has a set of built-in presets with commonly-used aspect ratios, like 16:9 or 1:1. However, here you will also find presets for popular social media platforms. These presets are perfect if you want to publish your screenshots online. Additionally, you can enter your own aspect ratio or pixel dimensions. In Paint 3D you can enter new pixel dimensions, too, except that they shouldn’t exceed the original ones. Well, you can do that in Watermarkly. In other words, you will be able to upscale the image or decrease the image size.
  4. Crop the same image differently. In Watermarkly it’s also possible to duplicate an imported image during editing. It’s pretty simple. Just select the screenshot, then click on the Duplicate button. Your image will be copied. You will be able to select a different preset or a different shape, then adjust the cropping area in a different way on this duplicated image. As a result, you will get two cropped versions of the same image after the export.

Naturally, there are some cons to using Watermarkly. First of all, its main disadvantage is that the free version allows you to crop only up to 10 images per day. If you want to get rid of this limitation, you’ll need to purchase a license that’s valid for a year or for a lifetime. No matter which of the two options you choose, the paid version allows you to crop as many images as you want.

Watermarkly is an online app that works in browser. So, it cannot operate without the Internet connection. Some people might consider this as a disadvantage since the built-in tools can easily be used offline.

Finally, there’s another downside. Paint 3D and the Photos app offer selections of tools that you can get quite creative with. But you won’t be able to enjoy the same amount of creative freedom in Watermarkly. Now, Watermakrly’s website does offer several online tools for basic image editing. It’s not just for cropping. There’s an app that you can use to add text to your screenshot. In fact, it is possible to add a watermark in the export settings of the Crop Tool, which means that you can add some text or logo or both to your cropped screenshot without switching between apps. You can also use Watermarkly to blur objects or convert your PNG screenshots to JPG. However, you won’t be able to doodle here or add some 3D shapes like in Paint 3D. This may be a disadvantage for you.

Crop Image Online

Conclusion

Cropping a screenshot on Windows isn’t as hard and complicated as you thought, is it? If you need to crop a couple of screenshots quickly, then you should probably go for either of the built-in apps. But if you need to crop multiple screenshots on a daily basis, then there’s no better choice than Watermarkly.

Thanks to the instructions provided in this article, you’ll be able to give each method a try. It might actually be a good idea since that’s exactly how you’ll figure out which method is the best and the most convenient for you.