
Why Instagram Ruins Photo & Video Quality and How to Fix It
by ![]() Lina Thorne • Updated · Posted in Photo Editing
Lina Thorne • Updated · Posted in Photo Editing
You’ve spent time capturing that beautiful shot and editing it to perfection. You upload it to Instagram with excitement, then check the post… and it looks a bit blurry and pixelated. What happened?
You see, hundreds of thousands of people upload visual content to Instagram on a daily basis. All of it needs to be stored on their servers, be displayed across a wide variety of devices, load fast, and consume less bandwidth. So, to achieve these goals, Instagram processes your content in different ways after you upload it. And that has a certain effect on the quality of your images and videos.
Now, it doesn’t mean that there’s nothing you can do. You can. You simply need to take some extra steps to prep your content for publishing online. In this guide, we’ll tell you how exactly you can do that and what settings you’ll need to use when exporting your visual content.
Why does Instagram Ruin Quality?
Let’s take a closer look at what exactly ruins the quality of your visual content.
1. Automated compression and re-encoding
With over 3 billion active users, the amount of visual data uploaded every minute is mind-blowing. If everyone uploaded full-resolution, uncompressed files straight from their high-end cameras and smartphones, the platform would probably crash. There wouldn’t be enough space on the servers to store all of the data, loading times would be excruciatingly slow, and users would burn through their mobile internet data in a matter of days, if not hours.
Compression helps with solving these issues. When a file is compressed, redundant information is removed from it, and thus the file size gets smaller. Instagram uses lossy compression, meaning that it permanently discards data deemed “less important” to human perception. Algorithms analyze your image or video and strip away subtle color variations, fine details, and complex textures. Reducing a file size is a good thing. But compression can lead to blurriness, pixelation, and color banding.
The platform also re-encodes your visual content. It means that your content is processed and converted into Instagram’s own formats for display on the platform. This is done to optimize performance, ensure compatibility across devices, and create multiple versions of a video for different bandwidths.
2. Wrong resolution or format
Instagram has specific size requirements. For instance, the smaller side needs to be at 1080px for both images and videos. When you upload a file with different pixel dimensions, Instagram will resize it automatically, which also affects quality in a negative way.
If you try to upload a file format that’s not supported by Instagram, the platform will either fail to upload your file or it will automatically convert it to JPEG. The latter might lead to quality loss, too, since Instagram’s converter isn’t particularly good.
3. In-app editing
This is perhaps the biggest mistake users make. When you import a video and then add text, stickers, filters, or even just trim clips within the Instagram Reels or Story editor, the app won’t simply layer these elements on top. It’ll re-render and re-compress the entire video.
That’s right, your content is compressed during the uploading, then, if you use the in-app editor, it gets compressed again, often with a lower bitrate (the amount of data processed per second), which leads to a significantly worse quality. So, don’t add things inside Instagram if you want the best quality.
4. The “Upload at Highest Quality” isn’t turned on
Many users assume this setting is on by default. It’s not. When it’s off, Instagram may apply a higher level of compression to save on your data usage during upload, even if your device is connected to Wi-Fi.
5. Internet connection matters
Make sure that the “Use Less Data” mode is turned off. Also, it’s not a good idea to upload any content when your internet connection is bad or weak. Otherwise, Instagram might choose a lower resolution/bitrate version.
Another thing to keep in mind is that if your internet connection is weak, Instagram can display your content and any other content at a lower resolution or bitrate. So, if all the content on Instagram looks blurry, check your internet connection.
6. Wrong color profile or space
Your exported photo or video may use a color profile or space that Instagram doesn’t support. For example, log footage, wide gamut, high dynamic-range. If you upload this kind of content, its highlights might be blown or the colors might look dull.
7. Low engagement or views
This might come as a surprise, but Instagram’s behavior after you uploaded your content can affect the final quality, as well. In October 2024, the news website The Verge reported that Instagram’s head, Adam Mosseri, stated that video quality for Stories and Reels may be reduced or increased depending on how many views/engagement the clip gets:
“If something isn’t watched for a long time … we will move to a lower quality video. … The most popular creators tend to have the best-looking videos.”
So, even if you’ve resized and compressed your video, its quality will be decreased if it’s not popular enough.
What Can You Do to Avoid Quality Loss?
It’s important to state right away that zero quality loss is impossible. Your goal is to avoid visible loss of quality. In other words, you need to make sure that your images and videos look good and relatively sharp on Instagram.
1. The quality needs to be excellent even before you get to editing:
- Shoot in the Highest Possible Quality. Always use your camera’s or phone’s highest resolution and frame rate settings. It’s easier to downsize a high-quality image or video than to try to upscale a low-quality one.
- Stabilize Your Footage. Shaky video is harder to compress in a nice and clean way. Use a gimbal or your phone’s built-in stabilization for smoother motion. Some video editors (e.g., Adobe Premier Pro and CapCut for desktop) allow you to stabilize footage digitally, but this option might not always work.
2. Enable the “Upload at Highest Quality” option.
Here’s how you can do this:
- Open Instagram app on your phone.
- Go to your profile.
- Tap the three-line menu (top-right) to get to the settings.
- Look for Mobile data use or Data usage and media quality. Tap on it.
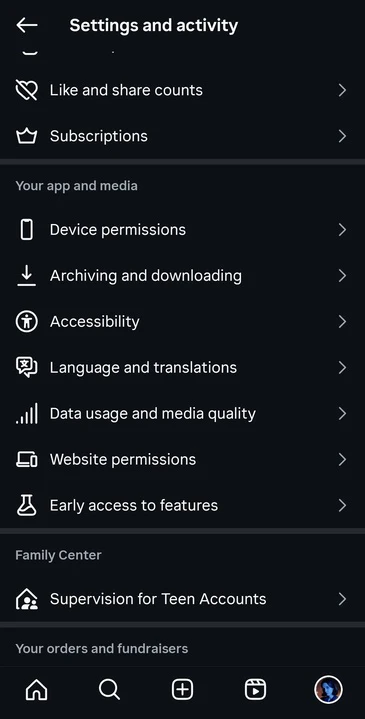
- Toggle Upload at highest quality or set Media quality to High. Make sure the Use Less Data (Data Saver) is OFF.

- Restart the app.
Please note that Instagram UI text varies by version.
Also, keep in mind that it’s actually better if you upload your content while you’re connected to Wi-Fi and the internet connection is stable.
3. Avoid using Instagram’s in-app editor.
- For photos, use apps like Adobe Lightroom Mobile, VSCO, or Snapseed for color grading and adjustments. If you are on desktop, use image editing software like Adobe Lightroom, Photoshop, or GIMP. You can add text or graphics in online apps like Canva or Watermarkly.
- For videos, use mobile video editors like CapCut, InShot, VN, or Adobe Premiere Rush. For desktop users, Adobe Premiere Pro, Final Cut Pro, or DaVinci Resolve are industry standards. If you want to add text to your video, do it in the video editing app. The text needs to be baked into the video.
These professional tools will allow you to get the most out of your visual content. More to that, they allow you to specify export settings, which is exactly what you want.
Here’s a tip
If you don’t want to do lots of editing to your video, but you do need to add some text or overlay an image, you can easily do it in Watermarkly’s mobile app that’s available for iOS and Android.
- Open the app and import your videos.
- Tap on Add Text if you want to add text. If you want to overlay an image, tap on Add Logo, then upload the image.
- Customize the text or image to your liking. Reposition and resize it if necessary.
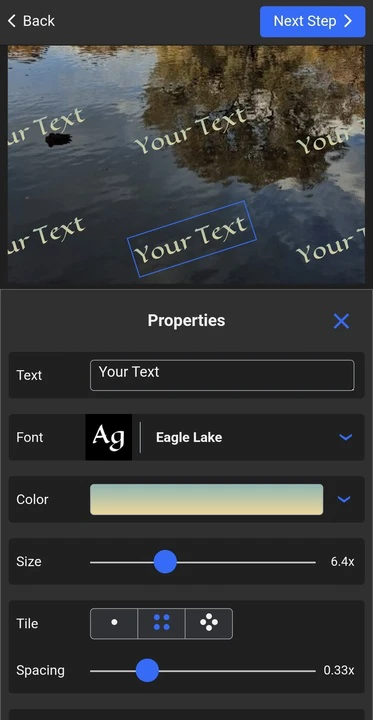
- Click on Next and specify the export settings. Then start the watermarking process.
Once the app is done processing your files, they will be saved to your gallery as copies, which you can then upload to Instagram.
4. Optimize content for Instagram
You’ll need to upload a file that is optimized for Instagram’s ecosystem. If you do that, the platform will have little processing to do, and therefore won’t ruin the quality all that much.
You can check the specs of your photo or video in the file’s properties on your smartphone or desktop.
Photo Specs:
- Resolution: 1080 pixels wide. Regardless of the aspect ratio that you choose. Some users tested short-side at 1440 px. Results vary, though, so you can give a try to both and see which one works best for you.
- Aspect Ratio: 4:5 (portrait), 1:1 (square), or 1.91:1 (landscape) for posts. 9:16 is for Stories.
- File Format: Use JPEG saved at a “High” or “Maximum” quality setting (around 80-95%).
- Color profile: sRGB.
Video Specs:
- Resolution: 1080p (1920x1080 pixels). Never post videos in 4k! They will be heavily compressed.
- File Format: MP4.
- Codec: H.264 is universally accepted.
- Frame rate: 30 fps.
- Color space: Rec.709.
- Audio: AAC 48kHz ~256 kbps.
- Bitrate: 6-12 Mbps VBR (variable bitrate). Many recommend a bitrate of around 15 Mbps for the ideal balance of quality and manageable file size. But it’s better for you to experiment with bitrates and see which one works best.
It goes without saying, but all the changes should be made to a copy of your final file. In other words, do all the color-grading, editing, retouching, and save the high-resolution file. Then, when you get to optimizing your content for IG, create a copy or save the modified version as a copy.
Here’s a tip
Watermarkly makes resizing images super quick and easy since it offers cropping presets specifically for Instagram. It means that within a few clicks, your images will have the right pixel dimensions and aspect ratio.
Here’s what you need to do:
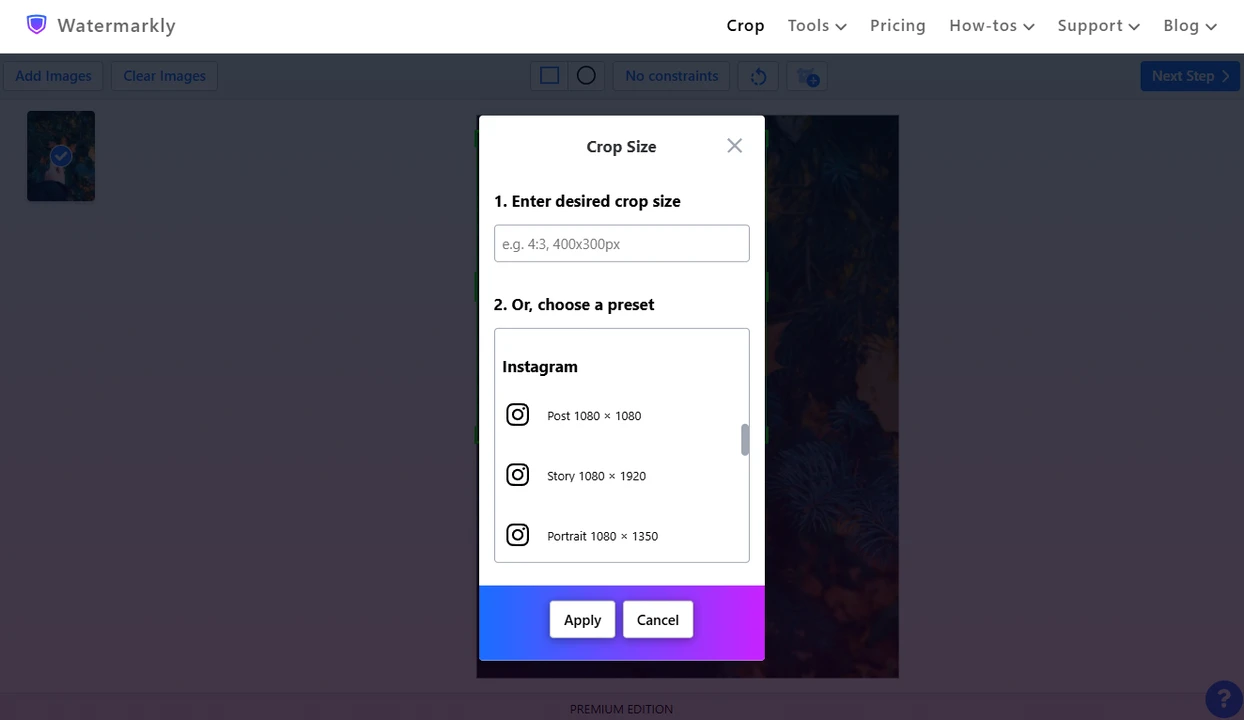
- Open Watermarkly’s online Image Cropper and upload your images.
- Open the menu with cropping presets by clicking on No Constraints, then scroll down and choose one of the presets for Instagram.
- Adjust the cropping area on every image in the batch.
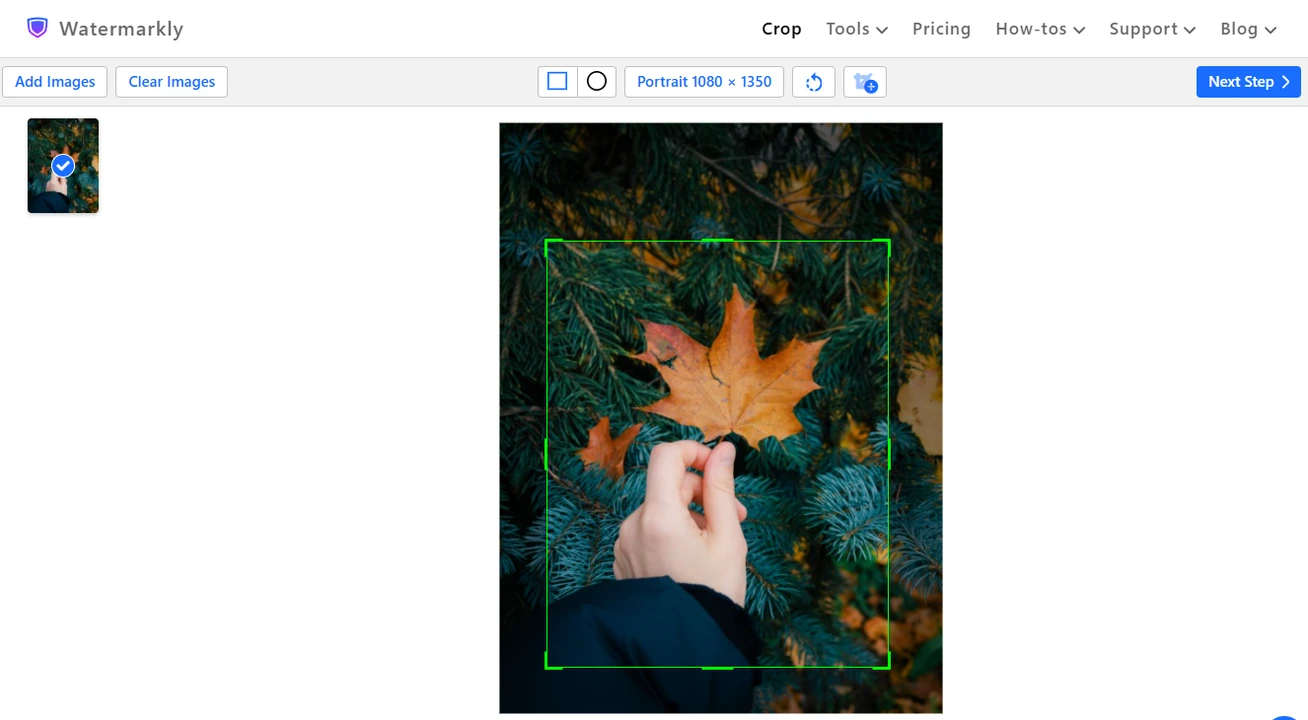
- Click on Next and specify the export settings.
- Process and download your images.
And that’s it! You can move on to uploading your images to Instagram.
5. Ready to upload to Instagram?
There are a couple more things that need to be done.
- If you edited your photo or video on desktop, transfer the exported file to your mobile device (via AirDrop, Dropbox, etc).
- Open Instagram and select the optimized image or video from your camera roll.
- If you are making a Reel, you will be taken to the editor. DO NOTHING HERE. Do not add text, stickers, or filters. Do not adjust the clip length.
- It’s worth mentioning that adding audio can also affect video quality, but at the same time audio can help with engagement. So, you can add audio every now and then.
- If you’re uploading images, avoid adding filters or making any changes in Instagram’s in-app image editor.
- Write your caption, add hashtags, and hit Share. Once your content is posted, take a look at it. Does it look good now?
Additional Tips
- If your footage or photo has visible noise (especially in shadows or low light), apply mild denoise before export. Because Instagram compression targets high-frequency detail, noise can make it worse (blockiness, artifacts).
- A touch of extra sharpening or contrast can help details survive compression. But don’t overdo it.
- The file size of your optimized image should be under ~2-8 MB. A 30-60 s clip should be under ~100 MB.
- If you have a desktop version of Instagram (via web), you might try uploading from desktop. Some users say desktop uploads sometimes have slightly better quality.
- If you are an iPhone user, don’t upload your HDR photos. They will probably look flat. Also, it’s better to convert your HEIC images to JPEG before uploading them to IG.
Conclusion
Now you know why Instagram ruins photo and video quality. You also know that to avoid visible quality loss, you have to optimize your content before uploading. It does require some extra time, but luckily, it’s not a particularly complicated task.
Make sure the Highest Quality Upload is enabled. Avoid using Instagram’s in-app editor as much as you can. Experiment with different export settings, then stick to using the ones that work best for your account. All of these should help you maintain good image and video quality after you post on Instagram.