What Is the Standard Photo Size? The Ultimate Guide for Prints & Social Media
by  Lina Thorne • Updated · Posted in Photography
Have you ever uploaded a picture to social media only to find it awkwardly cropped, or ordered a beautiful print that came back pixelated and blurry?
In most cases, this is due to the fact that you got the photo size wrong.
If you think that understanding standard photo sizes is vital only for professional photographers, think again. No matter if you want to print holiday cards or create a post for Instagram, getting the image size right is critical if you want to maintain good quality.
But it can also be quite confusing and frustrating.
A standard photo size doesn’t mean that there’s one size fits all.
The standard image size for social media is very different from the standard image size for printing. Don’t worry, though. By the end of this guide, you’ll be equipped with all the crucial info.
We’ll tell you everything you need to know about aspect ratio and resolution, and walk you through common standard sizes for printing and social media platforms.
Finally, we’ll also provide instructions on how to resize and crop your image easily. Your photos will always be sized correctly, no matter what you want to use them for.
Why Getting the Photo Size Right Is Important
Quality & Sharpness
A properly sized image is sharp and clear. But if you get the size wrong, your image, no matter how beautiful it is, will either get oddly stretched or become blurry and pixelated. This can detract from its beauty as well as have a negative effect on your brand.
Aspect Ratio
If your digital image doesn’t match the required aspect ratio, you will need to crop part of the photo, or the print lab may add white borders to fill the space. That can completely change the composition or feel of your image. The same is true for social media platforms since a lot of them have specific requirements for aspect ratios.
Resolution
Sending a low-resolution, 72 PPI image from Facebook to print as a 16x20 poster will result in a blurry, blocky mess. There is no fix for this in the printing process. Understanding the importance of image resolution and getting it right can save money, time, and frustration.
Understanding Aspect Ratio & Resolution
To confidently navigate standard photo sizes, you need to understand what an aspect ratio and a resolution are, as well as why they matter.
What is Aspect Ratio?
The aspect ratio describes the proportional relationship between an image’s width and its height. It is expressed as two numbers separated by a colon – width:height.
If you want to change the aspect ratio of an image, you either need to crop it or add new pixels around it – e.g., white pixels.
It’s important to match the aspect ratio of your photo to the required aspect ratio because this will ensure that no parts are accidentally cropped or distorted.
Common Aspect Ratios:
- 3:2. It’s the aspect ratio of the 35mm film frame and the sensor of most DSLR and mirrorless cameras. It provides a slightly elongated rectangle that feels natural and balanced, perfect for a wide range of subjects.
- 4:3. This is a slightly more square-ish ratio, which is often used by Micro Four Thirds cameras (e.g., some Olympus cameras), many compact point-and-shoots, and most smartphone cameras (by default). It’s also the standard ratio for computer monitors and televisions of the past.
- 1:1. Made iconic by Instagram’s early days, this aspect ratio creates a perfect square that feels balanced and draws the eyes right to the center of the frame. It’s a great choice for symmetrical compositions.
- 16:9. This widescreen aspect ratio is used for HDTVs, modern computer monitors, and YouTube videos. It’s ideal for capturing sweeping landscapes and creating a cinematic feel.
- 5:4. This is a crucial ratio to know for printing, as it is the standard for classic 8x10 inch prints.
What is Resolution?
Resolution refers to how many pixels an image is composed of and how densely they are packed when printed or displayed. It defines clarity and detail.
- Pixels Per Inch (PPI): This term is used for digital displays. It indicates how many pixels are packed into one linear inch of your screen. A higher PPI means a sharper, more detailed image on that screen.
- Dots Per Inch (DPI): This term is used in printing. It refers to the number of dots of ink a printer can place within one inch. While often used interchangeably with PPI, they are technically different.
For Printing
For a high-quality print that looks sharp from a normal viewing distance, your digital file must have a resolution of 300 PPI. This way, there will be enough pixels in your file to be rendered as dense, tiny dots of ink without the printer having to “invent” data (a process called interpolation). If you try to print a low-resolution image at a large size, the print will probably end up grainy or pixelated.
Please note that simply converting a low-resolution image (e.g., 72 PPI) to 300 PPI by resampling won’t do any good. In other words, your image needs to have 300 PPI from the get-go if you want to print it.
For Web Use
The long-standing standard is 72 PPI. This is a great choice if you want to share your images on social media. If you want to use an image for a website background or a big website banner, it’s better to opt for higher PPI (e.g., 150).
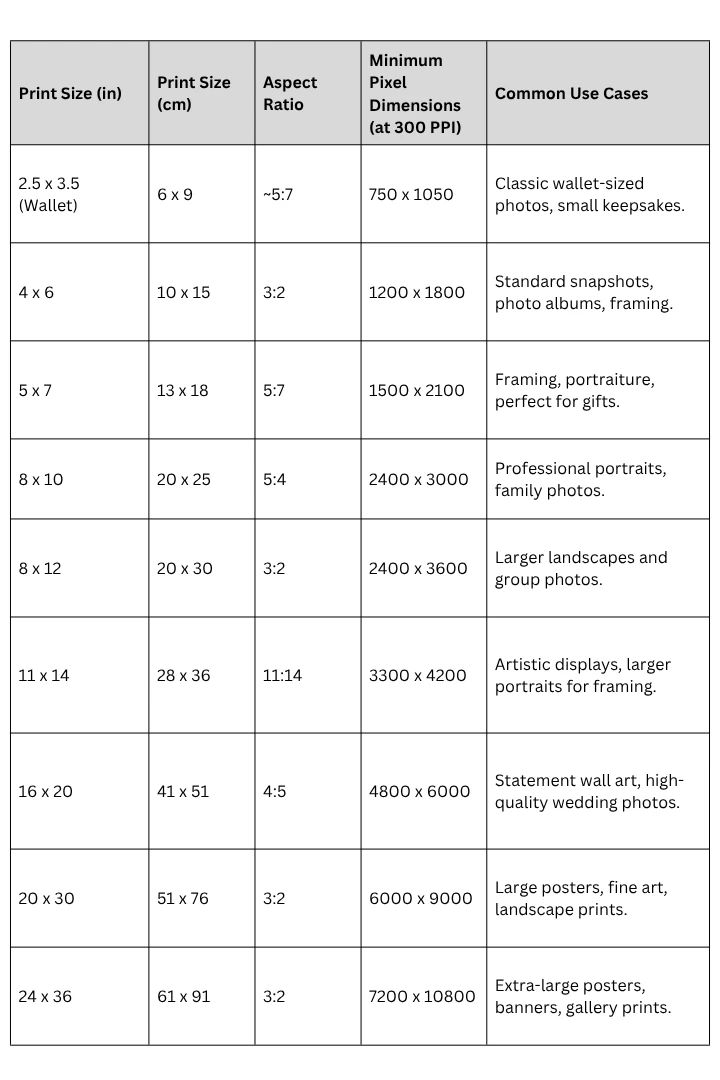
What Are the Standard Image Sizes for Print?
Here’s a breakdown of common photo sizes, less common photo sizes, and the recommended digital dimensions to pair with them.
Important Note
Different print services have different requirements. Always check their recommended resolution (PPI), file formats, and color profiles.
How to Choose the Right Photo Print Size
Here are some tips to guide your decision:
- Start with Resolution. The sharpness of your print depends entirely on your digital file. If you want a large, statement print, you must start with a high-resolution photo from a good digital camera. The more data you have, the bigger you can print without it becoming blurry.
- Match the Size to the Space. Imagine your print in its new home. A small, intimate print is perfect for a desk or bookshelf, where people can lean in to see the details. But for a blank wall in your living room, you’ll need a much larger print to fill the space and make an impact from across the room.
- Account for Matting and Frames. Before you order a print, determine what frame you’ll use. A frame’s “viewable area” is often smaller than its outside dimensions due to the mat board. A 16x20 frame might only show an 11x14 image, so plan accordingly.
- Plan for Grouped Displays. Do you want to hang several photos together? For a clean, symmetrical look, use two prints of the same size. To create a more dynamic gallery wall, use a variety of sizes. A popular approach is to choose one “hero” image to be the largest, and then surround it with smaller photos.
- Let the Subject Dictate the Size. A tight headshot portrait has more impact at a smaller size. Whereas a vast, detailed landscape needs room to breathe and deserves to be printed large to convey its grandeur.
What Are the Standard Image Sizes for Social Media?
When it comes to social media, “standard” sizes often refer to the optimal pixel dimensions and aspect ratios for different platforms. These standards help your images look great without weird cropping, stretching, or loss of quality.
Important Note
Platforms frequently update their recommended sizes, so always check their guidelines when preparing images for upload. Your best strategy is to always keep a high-resolution master file and create resized, optimized versions for each platform.
Here’s a guide to current standard image sizes for popular social media platforms.
Instagram:
- Feed Photo. The square post should have the 1:1 aspect ratio and 1080 x 1080 px. The portrait (4:5, 1080 x 1350 px) takes up a lot more screen space, often leading to higher engagement. The landscape (1.91:1, 1080 x 608 px) is less common but useful for panoramic shots.
- Stories. Designed for full-screen vertical viewing, the required size is 1080 x 1920 px with the 9:16 aspect ratio. Always compose critical elements away from the edges to account for UI elements.
Facebook:
- Cover Photo. This is the photo at the top of the page, behind your profile picture. It should be 1640 x 624 px with the 2.73:1 aspect ratio. Be aware that it displays differently on mobile, so keep important elements centered.
- Shared Image/Link Preview. A safe size is 1200 x 630 px with the 1.91:1 aspect ratio.
- Stories. Since Facebook stories are the same size as Instagram stories, your image needs to be of 1080 x 1920 px with the aspect ratio of 9:16.
Twitter (X):
- Cover Photo. Use a wide-format banner of 1500 x 500 px.
- Tweet Image. Here you actually have three options to choose from. If you’re including an image as part of a link, go for 1200 x 628 px. If you’re tweeting a single image, go for 1200 x 675 px. If you’re tweeting two images, each one should be 700 x 800 px.
LinkedIn:
- Cover Image. The profile banner should be 1584 x 396 px.
- Shared Post: For maximum visibility and engagement, use 1200 x 627 px.
Pinterest:
- Pin. The recommended pin size is 1000 x 1500 px (2:3 aspect ratio) as it takes up more vertical space in the feed, encouraging clicks.
How to Change Image Size with Watermarkly
Manually resizing and cropping images for every platform can be time-consuming. This is where online tools like Watermarkly come in handy.
First, let’s see how you can resize an image using Watermarkly. It means that you’ll simply change the pixel dimensions of your image. The aspect ratio will remain the same. This might be useful for printing or some social media platforms:
- Go to Watermarkly’s website and navigate to the Resize Photos tool.
- Click “Select Images” or drag-and-drop your photo(s) into the app. You can also import from cloud storage services.
- Specify the export settings. Quality - choose what image quality you need (e.g., Maximum, Superb, Good). Higher quality means a larger file size. Resize Method - choose from options like “fit width,” “fit height,” “exact height and width,” or by percentage. Dimensions -enter the width/height or both in pixels to match your print or social media needs.
- You can choose whether to keep metadata and convert to a different file format (JPEG, PNG). It’s also possible to rename your resized files.
- Click “Resize Images”, wait until the processing is done, then download the resized version. If you processed multiple images, you’ll download a ZIP file.
Keep in mind
The resizing app can change the aspect ratio. But it does so by adding new pixels – generated pixels or white pixels – or cropping the central part of the image.
In most cases, it would be better for you to change the aspect ratio by cropping your image using the Image Cropper. That’s due to the fact that here you’ll have more control over what gets cropped out and what doesn’t.
Here’s how you can do that in Watermarkly:
- Open your web browser, navigate to the Watermarkly website, and select the Crop Photo in the Tools menu.
- Import the image(s) you want to crop.
- Choose the shape. You can opt for a rectangle or a circle.
- If you choose rectangle, click on the No Constraints button. This will open the menu with cropping presets. Choose the preset with an aspect ratio (e.g., 4:5, 1:1). Or pick one of the social media presets (Instagram, Facebook, etc.). Here, you also have the option of entering the precise pixel dimension or custom aspect ratio.
- Once the aspect ratio is entered, adjust the size and position of the cropping area. If you imported multiple images, make the adjustments to the cropping area on each photo.
- Click on Next Step.
- In the export settings, you can click on the Preview button to preview your cropped images.
- Adjust the export settings if needed.
- Click on Crop Photos, wait for the app to process your files, then download your cropped copies.
Yep, this is also super quick and easy! And the best thing about Watermarkly is that it never changes the original files. So, you’ll download resized and cropped copies.
Wrapping Up
Ultimately, getting your photo sizes right maintains quality, saves money and time, as well as ensures that your photos look precisely how you want them.
Navigating the world of standard photo sizes might seem daunting at first, but it boils down to a few key principles:
- For print, always aim for 300 PPI and match the pixel dimensions and the aspect ratio to the required print size.
- For social media, prioritize the platform’s recommended aspect ratio and pixel dimensions to ensure your images display perfectly without being blurry or distorted.
By using the guidelines and tables provided here and leveraging simple, powerful tools like Watermarkly, you can confidently resize and crop your photos for any purpose.
Remember, in a world where everyone is taking pictures, those who understand how to present them properly are the ones who truly stand out.