
Resizing vs Cropping Images: What’s The Difference?
by ![]() Lina Thorne • Updated · Posted in Photo Editing
Lina Thorne • Updated · Posted in Photo Editing
It may be difficult to tell the difference between resizing and cropping. But both of these tools are necessary to master for pretty much anyone who shares images on social media or their website. Why? Because you will inevitably have to use them at some point or another. These two tools are key to preparing your visual content for publishing online or printing. If you don’t know the difference, you might end up with blurry printed out photos or images that have such a big file size that they barely load on your website; even if your visitors have a fast internet connection.
If you want to get better at image editing, you’ll need to learn what it means to resize an image and what it means to crop it. The better you understand this, the better results you’ll get.
After all, both of these tools can aide you greatly if you use them correctly. Let’s take a closer look at cropping and resizing as well as why they are so important.
Basic Terminology and Definitions
Let’s start with the basics.
Social media platforms and various websites tend to have their size requirements, and these size requirements can mean slightly different things. They may refer to a file size.
A file size is how much memory storage a file occupies or how much data it contains. File sizes are measured in bytes, kilobytes, megabytes and gigabytes.
These are the most common measurements. So, for example, a social media platform can state that you cannot post an image that is more than 10 MBs. This size requirement refers to the file size.
Size requirements may also refer to pixel dimensions of an image. Screens consist of tiny dots called pixels. Each pixel can display a single color, and an image is comprised of lots of pixels.
Dimensions are the height and the width of an image. Thus, pixel dimensions are how many pixels there are in the height and the width of an image.
One of the most popular social media platforms, Instagram, require images to have certain pixel dimensions. For example, if you want your story on IG to look good, it should be 1080px x 1920px – the first number is the width while the second one is the height.
What if you don’t follow these requirements?
Well, it depends on the platform. If you try to upload a file that is more than 10MB, you might get an error message and your file won’t be uploaded. If you try uploading an image with different pixel dimensions than required on IG, it’ll be uploaded anyway. But its quality will be affected in a negative way – it’ll probably look blurry and of a low quality.
To sum up, it’s better to follow size requirements, so your visual content will look as good as possible. For that, you’ll need crop and resize your images.
Cropping
Cropping an image basically means “cutting off” a part of it. Whether it’ll be a big part or just a teeny tiny bit – depends on you. Cropping is a very powerful tool since it can help you get rid of unnecessary or distracting elements. If you messed up the composition or barely even thought about it in the first place, this is how you can fix or improve it. Cropping can help you guide the viewers’ attention to all the important parts of your image.
What else can you use cropping for?
Changing the aspect ratio. This is important for those who share their visual content on social media; especially on Instagram. Instagram doesn’t allow posting images with the aspect ratio that most digital cameras and smartphones shoot with. You will have no other choice but to crop your images if you want to post them on IG.
What’s also great about cropping is that by definition when you crop an image, you reduce its total number of pixels. Therefore, you reduce its image file size, too.
What are the Reasons to Crop an Image?
Cropping is a tool that you’ll surely have to master since it’s incredibly powerful and useful. Let’s take a look at why you might need to crop your images.
Changing the Aspect Ratio
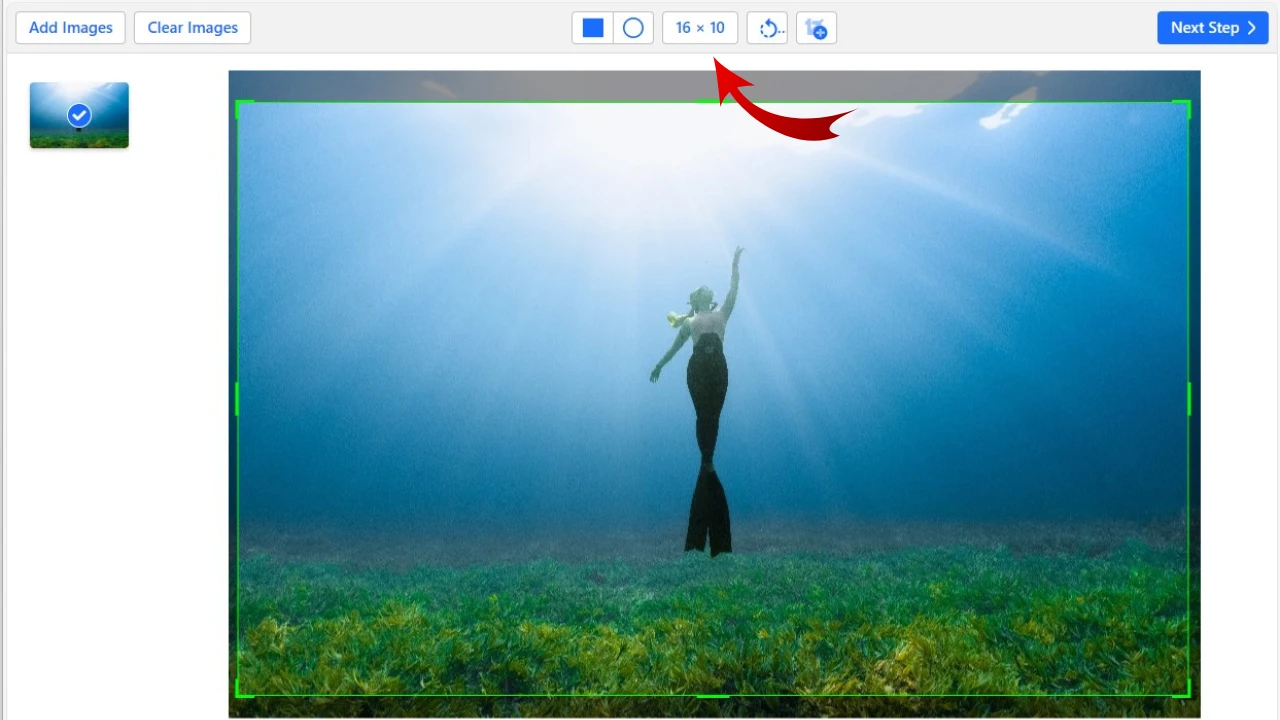
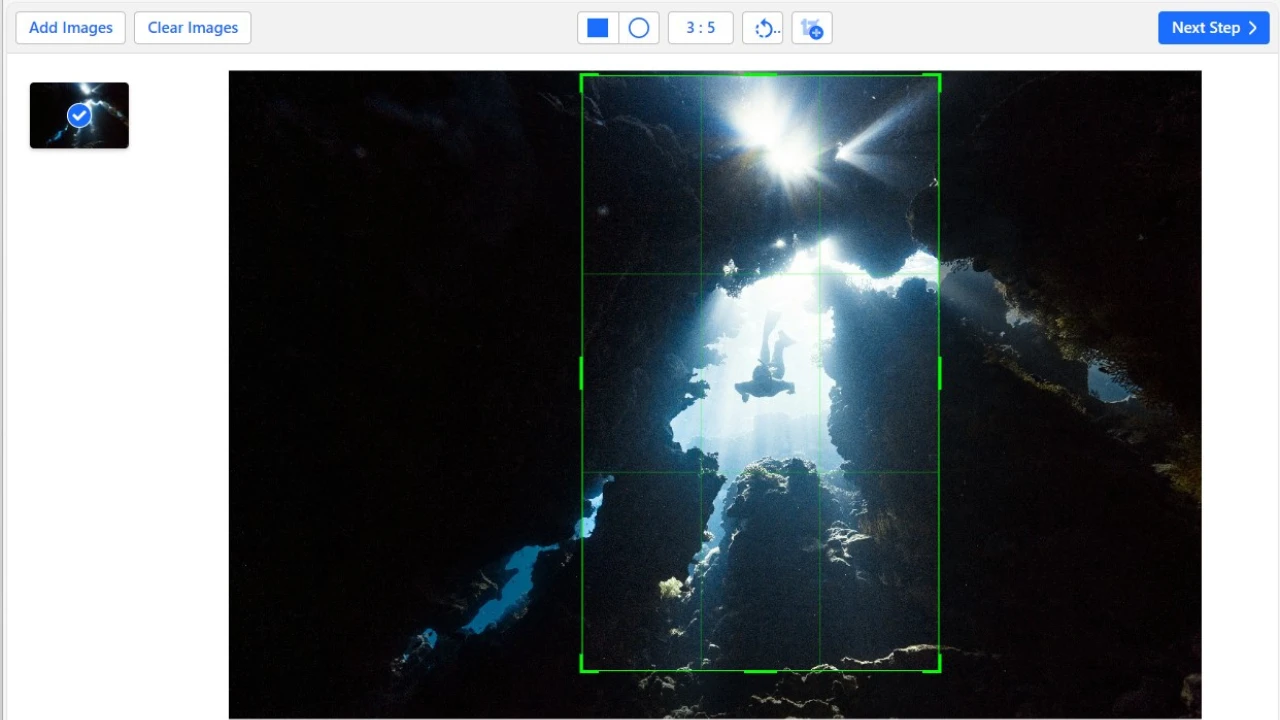
There are various reasons why you might want to change the aspect ratio of a photo. For example, it can be done for printing. Watermarkly’s online photo cropper can be exceptionally convenient for that. It offers a set of ready-made cropping templates with commonly used aspect ratios. You’ll find the following templates:
- Square 1:1
- Landscape 3:2
- Slide 4:3
- Widescreen 16:9
- Portrait 2:3, 9:16
- Banner 3:1
- Tall 1:2
You might need to change the aspect ratio of your images not just for printing, but if you want to share them online, as well. Maybe you don’t have a website of your own, and you are using a platform like Etsy, E-bay, etc.
When it comes to ecommerce photography, it’s crucial not only to have images of good quality – so customers could zoom in, if necessary – but also make sure that all the attention is focused on the product. Aspect ratios can help you with that.
For instance, it might be a good idea to crop images of your products in a square, getting rid of as much empty space as possible; if you are photographing your products on a monochrome background, that is. Plus, some platforms may suggest that your product images should have a specific aspect ratio to sell better; check their guidelines to find out.
Preparing for Social Media
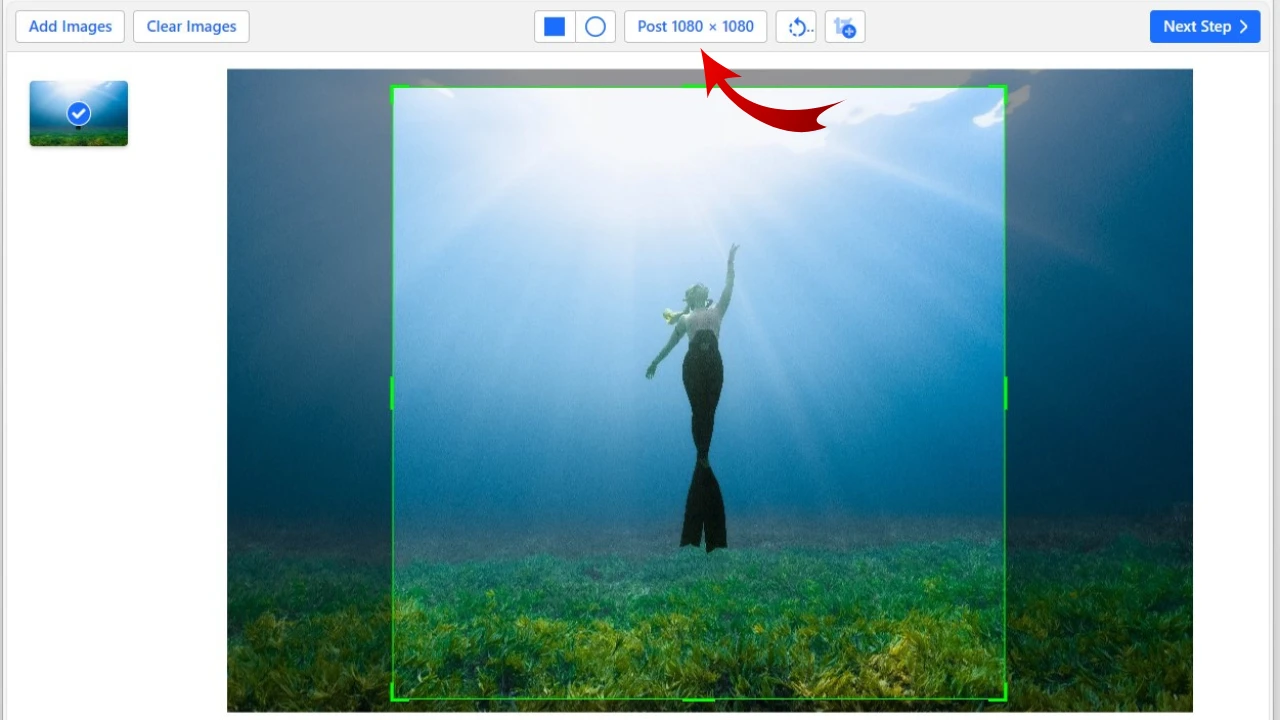
If you want to share your images on major social media platforms, you’ll need to meet their requirements for pixel dimensions. This way, you’ll make sure that your images will look crisp, sharp and of a good quality once you post them. Watermarkly’s photo cropper can make this process amazingly easy for you, too, since it also offers cropping templates for major social media platforms like Instagram, Facebook and some others. If you choose one of these templates, the cropping area won’t just have the necessary aspect ratio. Your cropped images will also be automatically resized to have the necessary pixel dimensions. So, you’ll kill two birds with one stone.
Are there going to be any clickable buttons – like “Subscribe” or “Follow” – or other elements will be placed on top of your image? If yes, pay attention to the areas where these elements will be. This will help you to avoid awkward composition or something crucial being accidentally covered by a button.
Focus on What’s Important
It’s not always possible to compose an image the way you want to in camera. Sometimes you are presented with a choice “Take a great shot right this second without compositing it ” or “Waste your time on composition and end up missing a great shot.” It’s always better to go for the first option because composition can easily be fixed with cropping later.
Digital cameras and even some smartphones produce photos of high resolution, which means you’ll still get an image of a decent enough quality even if you crop out a big chunk of it. But there’s nothing to fix if you don’t have a shot at all, right?
Cropping allows you to fix a messed up composition as well as make an average composition ten times better. By getting rid of distracting elements or merely the parts that don’t really add anything to the overall image, you can dramatically change the entire scene, making it more impactful.
Cropping can help you turn an average image into something that catches attention and evokes emotions. All you need to do for this is focus all the attention on the subject, making sure that nothing is distracting from it.
Other Reasons
There are a couple more instances when cropping might help you out. For example, cropping can help you “get closer” to the subject. Maybe you were out and about, taking pictures, and didn’t have a telephoto lens. Or maybe you don’t own a telephoto lens at all. Then you saw something that caught your attention – a bird, a beautiful façade of a building, or an interesting stranger. But you couldn’t get closer to your subject either with your lens or your own two feet. If you ever find yourself in this situation, what you can do is take a shot with whatever focal length that’s available to you. Then in editing, you can crop closer to the subject. Naturally, this isn’t a substitute for a telephoto lens. But this option can be a life-saver at times.
What else is cropping good for?
You can turn your landscape-oriented images into portrait-oriented ones and vice versa. This might be of great use to people who share their content on Instagram. As you may know, portrait-oriented images with 4:5 aspect ratio perform significantly better than landscape ones. This is due to the fact that this kind of images take up more space on a smartphone screen.
Thus, people won’t accidentally scroll past your image which can easily happen with a landscape photo. Therefore, if you want to grow on Instagram, you might want to employ some cropping techniques to succeed.
In addition to this, a lot of image editing apps allow you to slightly tilt the image itself. This feature is useful if you want to slightly change the angle of the entire photo or straighten the horizon.
Free online tools for cropping:
Resizing
Now, let’s move on to resizing.
It’s a different process, although there are some similarities. For example, the pixel dimensions of your image will be different after both cropping and resizing. Both of these processes can have an impact on image quality. The main difference, however, is that when you crop an image, you get rid of a part of it. It might be a tiny part or, on the contrary, a huge one. But your image will look different after you crop it.
When it comes to resizing, though, in most cases, there won’t be any visual differences. Resizing means changing the pixel dimensions of your image without getting rid of any part of it.
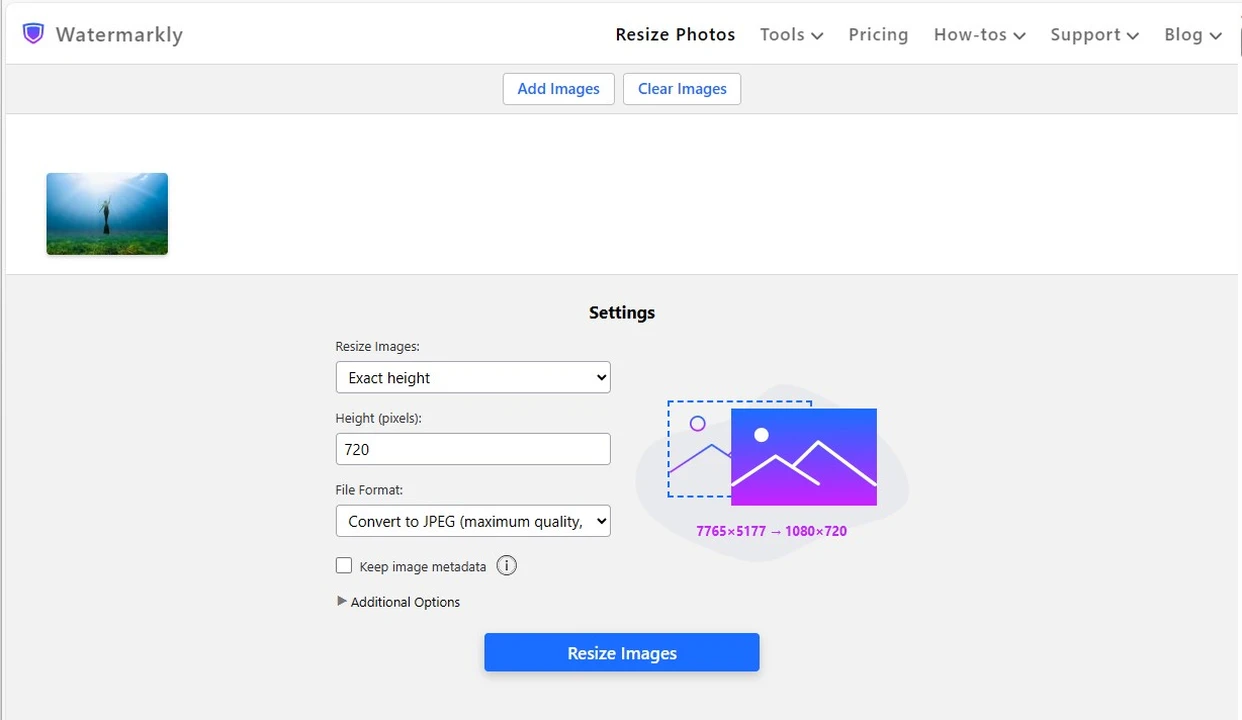 Resized with Watermarkly
The way resizing works is that an image editing app figures out which pixels can be redundant and gets rid of them or, alternatively, adds some pixels. This depends on whether you are increasing or decreasing the size of your image.
That’s right. If cropping allows you to only decrease the size of an image, because you’re getting rid of its part, resizing allows you to make your image bigger.
When an image is resized, it’s original aspect ratio will remain unchanged. You can change the aspect ratio only with the help of cropping.
Why You Might Want to Resize an Image
Generally speaking, there’s only one reason for resizing an image – to follow the size requirements.
As it has already been mentioned, a file size is how much space a file takes up in a memory storage. Therefore, by decreasing a file size, you can free up some space and store more files. This can be of great help for those, whose memory storage tend to fill up pretty quickly.
Resizing images can decrease their file size drastically, while their good image quality will be more or less maintained; it depends on the app you’re using.
Resizing can decrease the size of an image from 10 MB to 1MB or even 500 KBs. And you will barely notice the difference. This can also be great for posting on social media or websites.
If you want to send images over email, then you should be aware of the fact that most mail services have size limits. In most cases, that size limit is around 20-30 MBs. Considering that a single image of high quality tends to be from around 8 to 20 MBs, then you will be able to send only 1 or 2 images in a single letter. That’s not really good, is it? By resizing your images you will be able to send more files in one go.
If you want to send a file via some other service, which has a less strict size limit – for instance, a messenger – you will need to consider the fact that the bigger the file size is, the more time it’ll take for the recipient to download it. It might be inconvenient. Resizing can help you solve this issue as well.
It’s worth mentioning that some platforms and websites may not require you to change the aspect ratio of an image, but they might still have certain requirements for pixel dimensions. To meet them, you’ll need to resize your images, as well.
You Can Make Images Bigger
There’s another thing that you need to know about resizing. As it has already been mentioned, if cropping allows you to only make the image smaller – since you are cutting off a part of it – when it comes to resizing you can both make your photos smaller or bigger.
But there’s a caveat. It’s actually more common to decrease the size of your images when resizing them. This is due to the fact that enlarging an image affects its quality in a negative way. When you resize images to make them smaller, an app simply removes some pixels. But if you want to make it bigger, then the app has to generate and add new pixels to your image.
In other words, the app kind of guesses what color new pixels should have, creates and adds them. If you want to enlarge your image ever so slightly, then you will probably get a decent result and the image quality won’t be terribly butchered.
But in most cases, when you try to make an image bigger, you’ll end up with a photo that’s blurry and somewhat pixelated. It’s possible for the image to look a little distorted and the colors to be less saturated, too. It won’t look professional at all. This is why it’s better to use resizing only for decreasing the size of your images and not increasing it.
Free online tools for resizing:
When You Should Use Both
As you may have noticed, cropping has a lot more benefits and can be used in more instances than resizing. However, if you want images on a website to be well optimized, chances are you’ll probably need to do both, cropping and resizing.
The ready-made templates for social media that can be found in Watermarkly are a great example of this. When you choose one of the templates, the cropping area will have the necessary fixed aspect ratio. You can change the size of the cropping area however you want, adjust it however you want. The new pixel dimensions will be applied only after export. Your cropped images will have both the required aspect ratio and pixel dimensions.
If none of the offered templates suit your needs, you’ll still be able to do both cropping and resizing in the app. First, you adjust the cropping area to your liking to get rid of everything unnecessary. Then, in the export settings, you will find a couple of options for how you can resize your images.
You’ll need to do both cropping and resizing to optimize your images, because cropping will decrease the size of your images, but you won’t really have control over it. Plus, if you have an image of high quality to begin with, even if you get rid of 10-20% percent of it, you’ll probably still have a relatively big file that won’t be suitable for most popular social networks or for publishing on a website.
In fact, the smaller the file size of images on a website, the faster they will load for visitors. And that’s exactly what you want. This is why you have to use both cropping and resizing. Cropping is for getting rid of everything redundant and distracting, fixing the composition. Meanwhile, resizing is used for meeting size requirements and optimizing images for web, so they could load faster as well as look good and professional.
To Sum Up
In this day and age, if you use social media actively or have your own website, you will have no choice but to master some image editing tools. Cropping and resizing are the two crucial ones. If you want your visual content to look amazing – in the digital space or in printing – you will need to know what both of these tools can do. Mastering them will benefit you greately. Hopefully, this article showed you what the difference between cropping and resizing is, what you can use either or both of them for and what you should avoid to get the best results.
More Tips For Photographers:
What Are the Most Common Photography Mistakes