What Is a RAW Image?
by  Lina Thorne • Updated · Posted in Photography
Are you new to photography? Then you probably don’t know much about the RAW file format. After all, it’s primarily produced by digital cameras and has a rather limited use.
In comparison, the vast majority of images you see online are JPGs.
But once you have a better understanding of what a RAW image is, you’ll be able to unlock the full potential of your camera and your creative vision.
So, what exactly is this mysterious file format, and why is it so crucial for serious photography?
Our beginner-friendly guide will give you all the answers:
- What is a RAW file?
- RAW vs JPEG: understanding the key differences?
- Pros and cons of shooting in RAW?
- What RAW images are and aren’t good for?
RAW: Is It an Abbreviation?
Yes and no.
While it’s tempting to think of RAW as an acronym (like JPEG, which stands for Joint Photographic Experts Group), it’s not officially one. The name is purely descriptive of its nature. It’s the raw sensor data.
In a way, you can think of a RAW file as raw ingredients in a kitchen: fresh vegetables, uncooked pasta, and spices. A JPEG, on the other hand, is the fully cooked, plated, and seasoned meal. While the meal is ready to eat, you can’t easily uncook it, remove an ingredient you don’t like, or change the seasoning without starting over. With the raw ingredients, you have complete control over the final dish.
If this analogy is a bit confusing, don’t worry – things will get clearer in a moment.
What Is a RAW Image?
A RAW image is the uncompressed, unprocessed data captured by your camera’s sensor the moment you press the shutter button.
RAW files work like digital negatives.
They contain all the light and color information, preserving the fullest potential of a shot for you to “develop” later on a computer using specialized software.
What Happens When You Shoot in JPEG vs RAW?
As you may know, nearly all digital cameras allow you to shoot in RAW, JPEG, or both.
When you shoot in JPEG, your camera performs a series of steps. It:
- Captures. The sensor captures light through a Bayer filter (a grid of red, green, and blue filters over the pixels) and records the intensity.
- Demosaics. The camera’s processor interprets this mosaic of colored pixels to guess a full color image.
- Compresses. To create a manageable file size, it compresses the image using a “lossy” algorithm. This means it permanently discards data it deems redundant (e.g., subtle color and tonal variations).
As a result, you get a ready-to-use JPEG file.
But when you shoot in RAW, most of this processing is bypassed.
Here’s what it faithfully records:
- Raw sensor data. A raw file essentially consists of the uninterpreted data from each photosite on the sensor. It hasn’t been demosaiced yet; that crucial step is left for your more powerful computer software. This data is typically linear and monochromatic, holding a vast range of brightness values.
- Higher bit depth. Most RAW files are 12 or 14-bit, while JPEGs are 8-bit. Think of “bit depth” as the number of shades available for each primary color (Red, Green, Blue).
An 8-bit JPEG can record 256 shades per channel, resulting in 16.7 million possible colors (256 x 256 x 256).
A 14-bit RAW can record 16,384 colors per channel, resulting in over 4 trillion possible shades.
This immense color and tonal range is what gives RAW images their incredible editing flexibility.
Common RAW Formats
It may come as a surprise, but RAW is actually a group of formats. Just as there are many camera brands, there are many proprietary RAW formats.
Every camera brand has its own version:
- Canon: .CR2, .CR3
- Nikon: .NEF, .NRW
- Sony: .ARW, .SR2
- Fujifilm: .RAF
- Panasonic: .RW2
- Olympus: .ORF
- Adobe (open, non-proprietary format): .DNG
It’s worth taking a closer look at the .DNG (Digital Negative).
This format was introduced by Adobe as a standardized and backward-compatible universal file format.
Essentially, DNG is a great option for archiving. Some cameras from Leica and Pentax offer the option of shooting in DNG right in camera.
Also, you can easily convert your proprietary RAW files to DNG using Adobe’s free DNG Converter.
Advantages of Shooting in RAW
Incredible Flexibility in Post-Processing
The higher bit depth can help you achieve smooth gradients and make extreme adjustments to exposure, shadows, and highlights without banding or posterization.
You can easily fix an underexposed RAW image – it’ll look good and as if you nailed the exposure right in camera. But if you try to do the same with an underexposed JPEG, you’ll end up with lots of color artifacts and noise.
Also, you can completely change the white balance – make it much cooler or warmer, for instance. If you try to change the white balance in a JPEG, you’ll end up with an odd-looking image.
Non-Destructive Editing
When you edit a RAW image in programs like Lightroom or Capture One, your changes are saved in a separate sidecar file (.XMP). The original sensor data remains untouched.
You can always revert to the original “digital negative” and start over, years later.
Superior Sharpening And Noise Reduction
You have more control over how and where sharpening is applied, allowing for more natural-looking results.
Similarly, modern AI-powered noise reduction tools work much more effectively on the unprocessed data from a RAW file than on a processed JPEG.
These advantages are why many professionals and amateurs prefer to shoot in RAW.
Disadvantages of Shooting in RAW
Larger File Sizes
RAW files are 2-4 times larger than good-quality JPEGs.
This means they fill up memory cards and hard drives faster, requiring a more significant investment in storage.
For instance, a 64 GB memory card can hold approximately 2,000 RAW photos or 9,000 JPEGs.
Requires Editing
RAW files look flat, dull, and low-contrast straight out of the camera. So, in a lot of cases, you need to edit them or, at least, convert them to JPEG.
For instance, professional sports photographers shoot in JPEG because they need to send images to the news outlets as fast as possible.
Shooting in JPEG means no editing or conversion is required.
Software Is Necessary
You need specialized software like Lightroom, Capture One, RawTherapee, or Darktable to view and edit RAW images.
Not Easily Shareable
You cannot upload a RAW file directly to social media, send it via text message, or have a client quickly review it. It must be converted to a compatible format like JPEG first.
Slower Workflow
Large file sizes can slow down your camera’s continuous shooting speed, as the buffer fills up faster. This is another reason why professional sports photographers shoot in JPEG.
It also takes more time to transfer the files to your computer and for your editing software to render previews.
What RAW Images Are and Aren’t Good For?
Good for:
- Professional work where image quality matters (commercial, editorial, fine art prints).
- Extensive image editing and retouching.
- Scenes with wide dynamic range (e.g., sunrises or sunsets) where highlight/shadow recovery is often needed.
Essentially, if you want to have lots of control and flexibility in editing, you have to shoot in RAW.
But if you need to do some minor edits or no editing at all, you can easily shoot in JPEG.
Not ideal for:
- Fast turnarounds where you must hand over images immediately or upload directly to social media from camera.
- Very long bursts where buffer and card space are limiting factors.
- Casual photography where storage, speed, and convenience are prioritized.
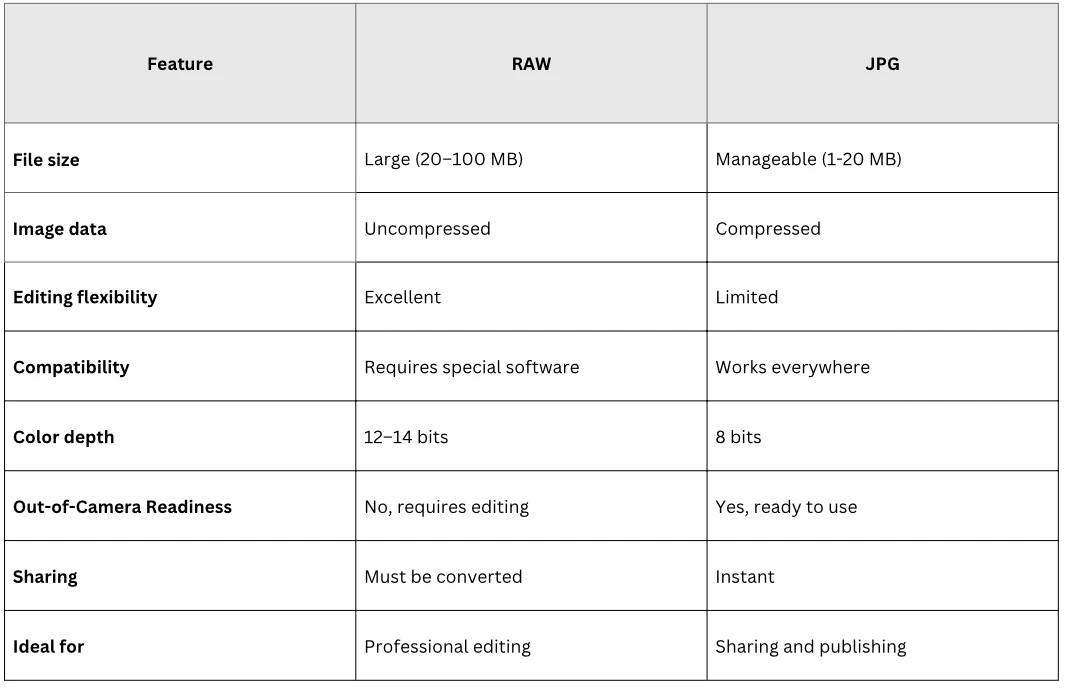
RAW vs JPG. What’s the Difference?
Why Convert RAW to JPG
Here are the key reasons why you might need to convert RAW to JPEG:
- Compatibility. JPG files are processed, compressed, and can be easily viewed without any special software and on nearly any device. They are universally compatible. If you try to upload a RAW file to a website or social media platform, you’ll get an error. To share your work on Instagram, your website, or via email, you must convert to JPEG.
- File size. JPEGs are much smaller and load faster on websites or mobile devices. Moreover, you can easily compress JPEGs, reducing their file size even more without visible loss of quality.
- Printing. Most online print labs and in-store kiosks require JPEG or TIFF files.
Photographer’s Common Workflow
So, you transferred your RAW images from your camera to a computer or laptop. What next?
The typical process starts with importing your RAW files into an image editor like Lightroom or Capture One. Then you cull photos and edit your top choices. You can adjust exposure, contrast, color, etc.
Once you are satisfied with the editing, you need to export your images. In the export settings, you need to choose:
- File Format: JPEG
- Quality: Usually between 80-100% for a good balance of size and quality.
- Color Space: sRGB for web use.
- Image Size: Enter the desired pixel dimensions or keep the original ones.
That’s right! Most photographers shoot in RAW, use special software to edit their photos, then export the edited versions as high-quality JPEGs. These high-quality JPEGs can then be cropped (using Crop JPG) and resized (using Resize JPG) if needed. For instance, this kind of image optimization is required before sharing images on social media.
If you need to send unedited previews to your clients, you’ll need to either shoot in RAW+JPEG or convert your unedited RAW images to JPEG. That’s because in most cases, your clients won’t have the necessary software to view RAWs.
To Sum Up
So, is shooting in RAW right for you? The answer depends on your goals as a photographer.
You should shoot in RAW if:
- You are serious about photography and want the highest image quality.
- You enjoy the creative process of editing and want complete control over the final look.
- You shoot in challenging lighting conditions (e.g., high contrast, mixed lighting).
- You make large prints where every bit of detail matters.
JPEG is a good choice if:
- You need speed above all else (sports, photojournalism, event photography).
- You are a casual shooter who doesn’t want to spend time editing.
- You are constrained by storage space and need to maximize the number of photos per memory card.
- You are delivering images straight from the camera to a client.
Basically, it’s the difference between allowing your camera to make decisions for you and you, the photographer, being in complete creative control.