
Remove and Change the Background of a Picture on iPhone: Step-by-Step Guide
by ![]() Lina Thorne • Updated · Posted in Photo Editing
Lina Thorne • Updated · Posted in Photo Editing
Changing the background of a picture on your iPhone can really transform an ordinary photo into something extraordinary. This can be extremely useful for removing distractions, creating stunning visuals for social media, or even making professional-looking promotional materials. Fortunately for iPhone users, this task can be pretty easy.
In iOS 16, Apple introduced an AI-powered feature called Photo Cutout or Lift Subject that allows you to remove the background of a picture within just a few taps. Pair it with a third-party app, and you no longer need a computer or complex image editing software to make a selection of your subject, cut it out, then replace the background seamlessly. The whole process will take you mere minutes! No image editing skills are needed.
This in-depth guide features:
- Why changing the background of a picture can be so beneficial
- How to remove the background
- How to save your cut out image with transparency
- How to replace the background with a new one
Let’s dive in!
Why You Should Change the Background of a Photo on iPhone
Here are the key reasons:
- Draw attention to the subject. Sometimes you take the perfect shot… except there’s a stranger walking in the background, or your kitchen counter is a mess. Not to mention that a busy background can easily take the focus away from the main subject. Luckily, there’s no need to re-shoot anything – just replace the background!
- Present your products properly. Are you an e-commerce seller who takes their product photos on their iPhone? As you may know, online marketplaces like eBay, Amazon, Etsy, and some others require your product photos to have a white background. This way, your product will be clearly visible and nothing will distract from it. So, one of the reasons to change the background is to comply with these requirements and make your images look clean.
- Make your photos stand out. Social media is oversaturated with all kinds of content. If you want to get noticed, you need to stand out. Adding a fun, bold, or creative background can make your images more eye-catching and allow your personality to shine. This is also how you can create memes. Have fun and experiment!
- Repurpose the same image for multiple platforms. Different platforms tend to require different styles of images. By changing the background, you can easily use one photo for several purposes. For instance, remove the background from your favorite headshot and replace it with: • a plain gray or blue backdrop for your professional LinkedIn profile. • a dreamy pastel background or something unique for your Instagram post or story. • a background with signature brand colors for your website. And there’s no need to take dozens of photos!
- Improve composition. Sometimes the original background throws off the balance of your photo. The colors may clash or there might be too much negative space. Replacing the background will allow you to emphasize the key elements, guide the viewer’s attention exactly where you want it to go as well as enhance the color harmony between your subject and the background.
- Create a different atmosphere. Backgrounds play a major role in setting the tone. A warm sunset can evoke nostalgia, while a minimalist white space feels modern and fresh. By changing the background, you can tell a better story and evoke the right emotions without altering the subject.
- Design promotional materials. Are you making flyers, thumbnails, or content for digital campaigns? Then having a clean background is absolutely essential! Remove the background from your product photo, then insert your product into a custom backdrop with your brand colors. Add text, logo and some other elements, and your beautiful advertising material is ready to wow everyone!
How to Remove the Background of a Picture on iPhone
The very first thing that you need to do is to get rid of the old background. It might seem like a tedious and complicated task. But if your iPhone is running on iOS 16 and later, then there’s a built-in feature for cutting out objects that will make this task astonishingly easy and quick. Please note that this feature is available only on supported models and can be used in Photos, Safari, and some other apps.
Here’s how it works:
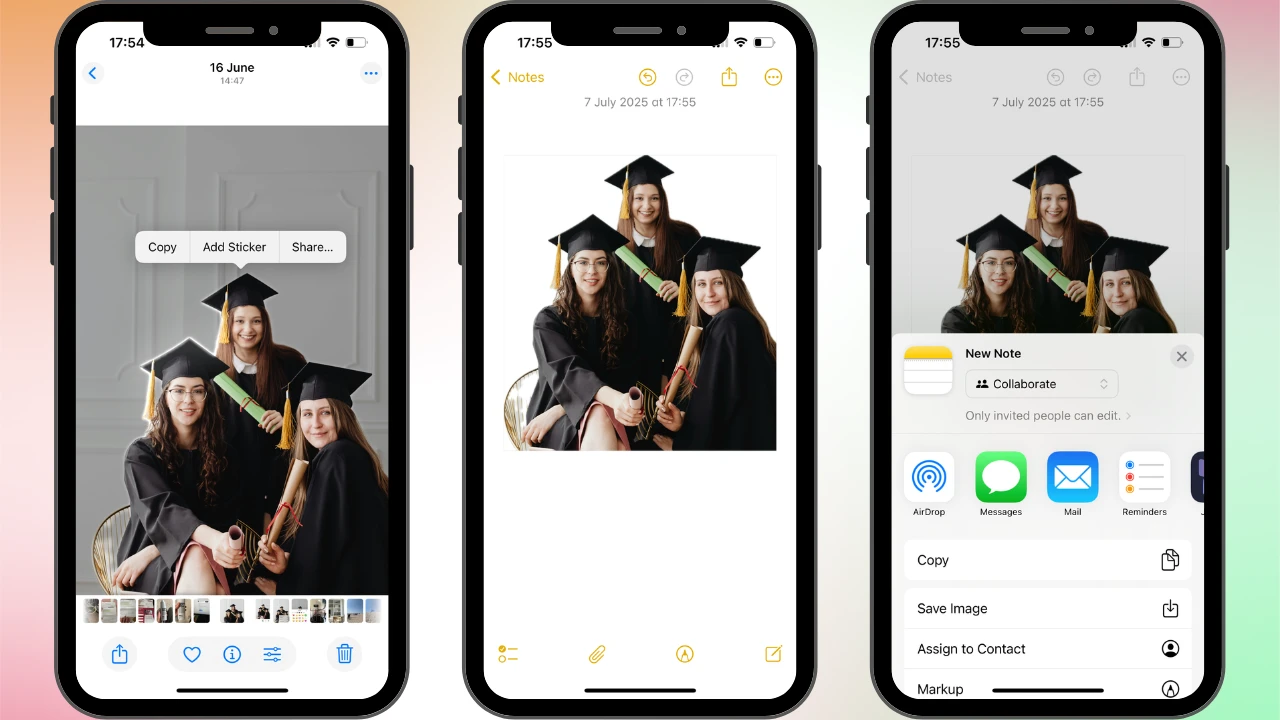
- Open the Photos app, then find and open the image where the background needs to be changed.
- Tap on the subject and hold your finger until a glowing outline appears.
- In the pop-up menu, tap on Copy or Copy Subject.
- Open any app that supports images with transparency. For instance, Notes, Files, or Pages. In Notes, create a new note and paste your cut-out image.
- Tap the Share icon > Save Image. Your modified image will be saved with the transparent background. If you’re asked to pick the format for your new image, choose PNG because it supports transparency. DO NOT choose JPEG. Otherwise, the background won’t be transparent.
That’s it! You’ve successfully removed the old background from your image! It’s not as difficult as you thought, right?
There are two things worth mentioning:
- Unfortunately, if your iPhone isn’t running on iOS 16 or later, you’ll need to opt for another way to remove the background.
- Also, this built-in cutout feature works best with clear, high-contrast subjects. It might not select your subject properly, if it’s complex and has fine edges like hair or fur.
Therefore, if you don’t have this built-in feature or your iPhone fails to select the subject, you should opt for using a third-party app to select your subject manually. Naturally, this will be a bit more difficult and time-consuming, but you’ll end up with more natural-looking results.
There’s a major downside, though. The background removal feature is usually available only in the Pro version, which you need to pay for. For example, both Adobe Photoshop Express and PicsArt can be great for removing the background, but both of them offer this feature only in the paid version. Canva is also great, but the background removal and the ability to export your image as a PNG with transparency are available only in Canva Pro.
Here’s a tip
If you want to remove the monochrome background to use an image as a watermark, you can actually do this right in Watermarkly. Simply upload the main image – the image that you want to watermark – into the app. Then click on Add Logo and import the image that you want to use as your watermark. Click on Remove Background and… Voila! The background will be removed. With just one click!
How to Change the Background of a Picture on iPhone using Photos
Once you remove the original background, you need to replace it with a new one. This may come as a surprise, but it’s possible to do this using iPhone’s native app, Photos.
Please note that your edited photo will replace the original one in your gallery. Thus, if you want to keep the original photo – the photo that you’ll use as the new background – unchanged, it’s better to make a copy of it and only then proceed to editing.
Here’s what you need to do:
- Cut out the subject as shown above, but don’t copy it. Instead, once your subject is selected, tap on Add Sticker. The selected subject will then be saved as a sticker to your sticker menu.
- If you want to apply an effect, tap on Add Effect.
- Once your sticker is ready, it’s time to place it onto the new background. Open the Photos app and select the photo you want you use as your new background.
- Tap the Edit icon at the bottom of the screen.
- Tap the Markup tool icon. It looks like a pen tip inside a circle.
- Tap the + button in the bottom right corner.
- Choose the Add Sticker option.
- Find your image with the removed background that you saved as a sticker, then tap on it.
- Once your image appears on your photo, use your finger to reposition it.
- Pinch and spread with two fingers to adjust its size.
- Rotate your sticker or make some other adjustments if necessary.
- Tap Done twice – first to save the changes, then to finish editing.
And that’s how you can replace the background on your iPhone using a built-in app!
How to Change the Background of a Picture on iPhone using Watermarkly
Needless to say, adding your cut out image as a sticker in Photos is really easy and doesn’t require installing any third-party apps. But you see, Watermarkly is a website that offers a selection of beginner-friendly tools for image editing. Which means you won’t have to install anything anyway! And yes, there’s a free tool that can help you change the background of a picture. Isn’t that great?
Please note that Watermarkly doesn’t provide a library of stock images. So, the image that you want to use as the background should already be on your device.
There are a couple of things to keep in mind before you get to changing the background:
- Lighting & Shadows: If you want your edited photo to look more natural, the light and the shadows of your subject and background match. For example, a brightly lit subject placed on a background with lots of shadows might look a bit odd and unrealistic.
- Color: If you want to add some text, it might be a good idea to use the same color palette that’s already present in the photo – just opt for a different shade. Alternatively, you can go for a complimentary color or, if you are designing an image for brand promotion, use one of the signature brand colors.
Here’s how you can change the background on iPhone in Watermarkly:
- Go to Watermarkly’s website > Tools > Add Text to Photo.
- Import the image that you want to use as your new background.
- Click on Add Logo, then upload your image with the removed background.
- Use your finger to position your image however you want.
- Resize your image with the help of the Size slider.
- Rotate your image to make it fit better into the new background.
- You can change its level of opacity and even add an effect. For instance, a shadow or a glow.
- Do you want to add some text? You can do this here, as well! Just click on Add Text and enter whatever text you need into the text input area.
- Pick the font and the color of your liking. Make any other adjustments until you are happy with how your text looks.
- Are you done with the editing? Click on Save Image and download your picture with the new background.
It really is incredibly simple and not time-consuming at all! Our app is beginner-friendly, so you shouldn’t have any difficulties, even if you’ve never edited an image before.
It’s also possible to do this using our mobile app for watermarking. The process is the same – you open the app, import the image you want to use as the background, click on Add Logo and upload the image with the removed background. Then you simply make all the necessary adjustments and export your edited image!
Final Thoughts
If you are an iPhone user and thought that you needed to master some complex image editing software to change the background of a picture, you’ll be glad to know that this isn’t the case! The built-in feature in iOS 16 and later makes it super easy to select a subject, then save it as an image with a transparent background.
If you save it as a sticker, you can insert it into another photo right in the Photos app. But if you want to get a little creative, you can replace the transparent background with something new using our online app, Watermarkly.
Even if you have no image editing skills, you’ll be able to get rid of distractions and imperfections, clean up your product photo, design stunning promotional materials or create showstopping posts for social media with just a few taps and in under 5 minutes!
Now that you know how to change the background of a photo on your iPhone, why not experiment with different styles? Try turning a boring sky into a picturesque one, adding creative backdrops, or designing layered compositions – your creativity is the only limit!