How to Resize an Image in Photoshop
by  Lina Thorne • Updated · Posted in Resize Photo
Knowing how to resize an image in Photoshop is a highly valuable skill if you have to work a lot with visual content.
Why is it important?

In most cases, you need to resize your images to share them online. Popular social media platforms have a ton of users that post a LOT of content on a daily basis. That is a humongous amount of information that needs to be stored somewhere. To make it easier, all the popular social media platforms have their own requirements for pixel dimensions and aspect ratios. If you try to post a high-resolution, large-sized photo that does not comply with the said requirements, you’ll have to crop it in the app first, then it will be automatically compressed to be of a smaller size. This may lead to your posted pictures looking blurry and pixelated. To avoid this, you need to resize your images.
There are several ways to resize an image in Photoshop.
Why do you need to know more than one way?
Some techniques are easier and take less time, others are a bit more complicated and thus require more time as well as precision. However, each of them produce different results. Therefore, learning more than one way to resize an image will give you an array of choices.
In this article, you’ll learn several different methods to resize an image in Photoshop – from basic cropping to using the Content-Aware Scale and Content-Aware Fill. Fret not! It’s much simpler than it may seem. Plus, you’ll be taken through each process step by step and there will be some visual aid in the form of screenshots, so you won’t get lost.
Before we start, however, let’s clarify a couple of things. Throughout this article, you’ll come across such things as aspect ratio and pixel dimensions. What are those?
Aspect ratio is the ratio of the height to width. Instagram allows posts with aspect ratios of 1:1; 4:5 and 1.91:1, for instance.
Pixel dimensions are how many pixels your height and width consist of. Instagram pixel dimensions, for instance, are 1080x1080px, 1080x1350px and 1080 x 565px.
If you take a closer look, you’ll realize that pixel dimensions and aspect ratios are interconnected. A square image has the pixel dimensions of 1080x1080px and the aspect ratio of 1:1.
Now, let’s take a look at how you can resize an image in Photoshop.
How to Resize an Image in Photoshop With the Image Size Tool
This is probably the easiest way to resize an image in Photoshop. But there’s something you need to keep in mind – with this tool, you can change only the pixel dimensions.
Let’s say that you have an image with the right aspect ratio and now you want to change its pixel dimensions. How can you do that?
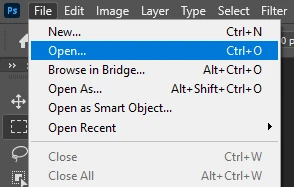
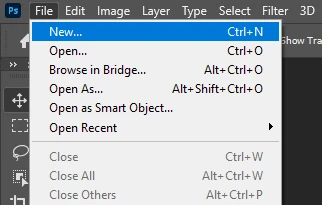
1.Go to “File” > “Open”, then find the necessary folder and select the image that you want to resize.
2.Once your image is open, go to “Image” > “Image Size”. You can also use the shortcut Alt + Ctrl + I for Windows or Option + Command + I for Mac. 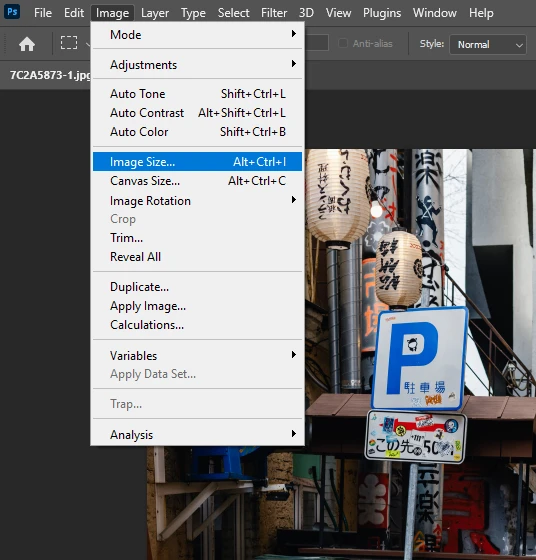
3.Make sure that the dimensions are set to Pixels. 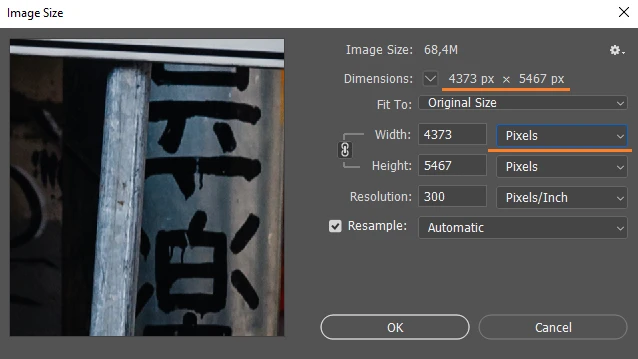
4.Also, make sure that the aspect ratio is constrained – you will see a line between the chain icon. This way the aspect ratio of your image will be maintained – if you change the height, the width will be altered automatically and vice versa. 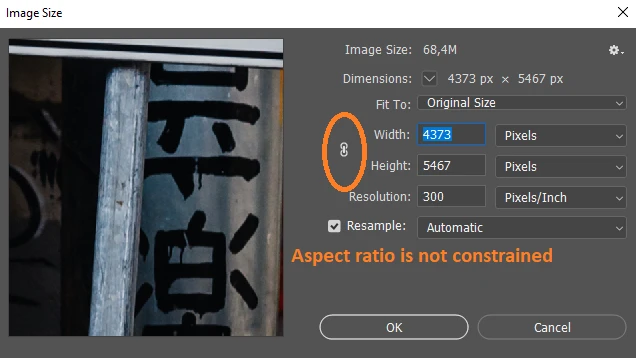
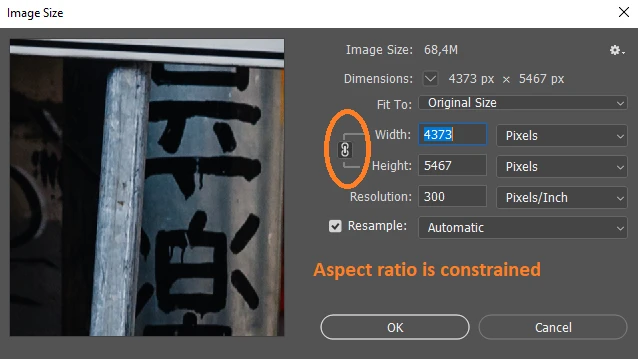
5.Enter the necessary value for height or width. For example, you can type in 1350. 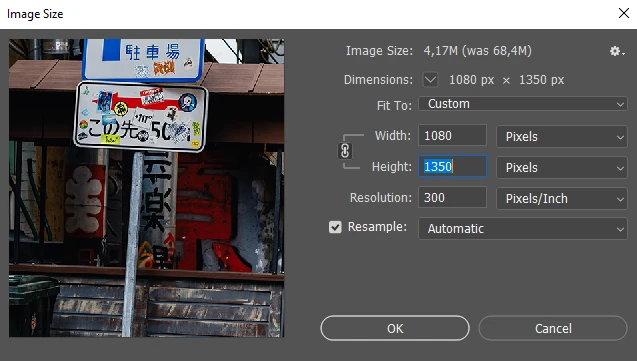
6.If you don’t want or need to work with pixels, you can also pick Inches, Centimeters, Millimeters or any other option in the menu, then enter new values. 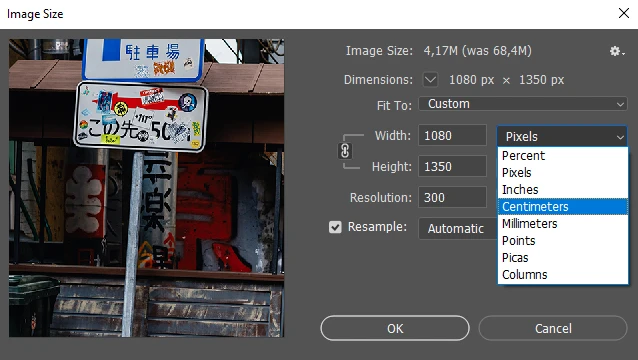
7.There’s also an option that’s called “Percent”. Your original image is 100%. You can decrease its size by 20% by entering 80, for example. This option is great if you need to reduce image size, but pixel dimensions have no importance to you. 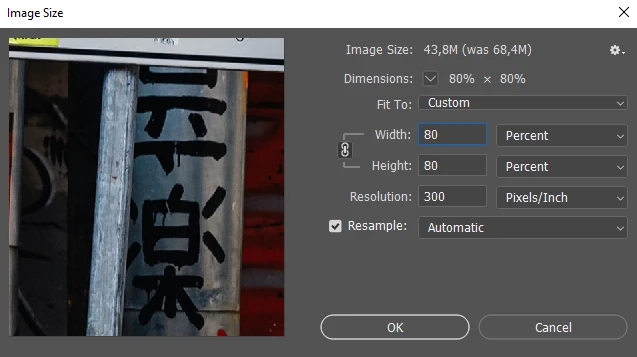
8.You can hold “Shift” to choose different units of measurement for your height and width. For example, you can set Pixels for height and Centimeters for width. However, please, be aware that this might produce some unpredictable results. 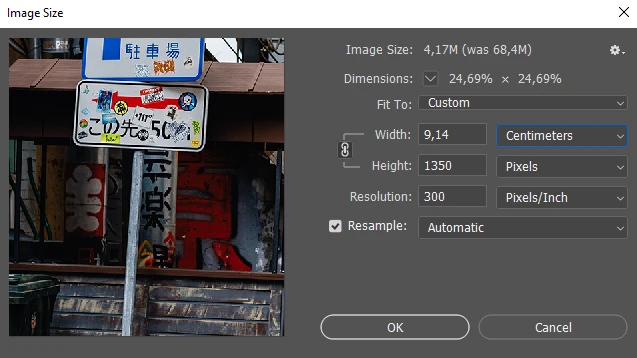
9.Enter the value for Resolution. This is how many pixels there will be per inch in your image. You may opt for 300 pixels per inch if you need to print your image or just want a better quality. 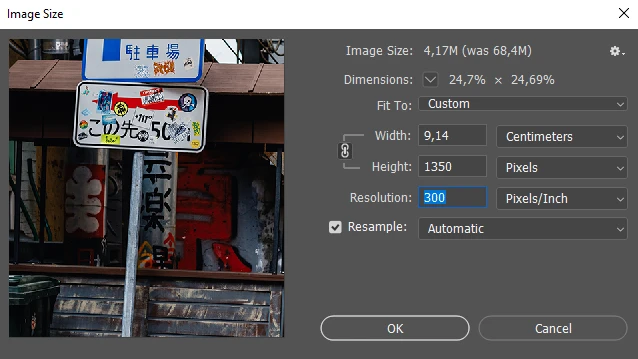
10.You can experiment with options in the Resample menu or keep them on Automatic. 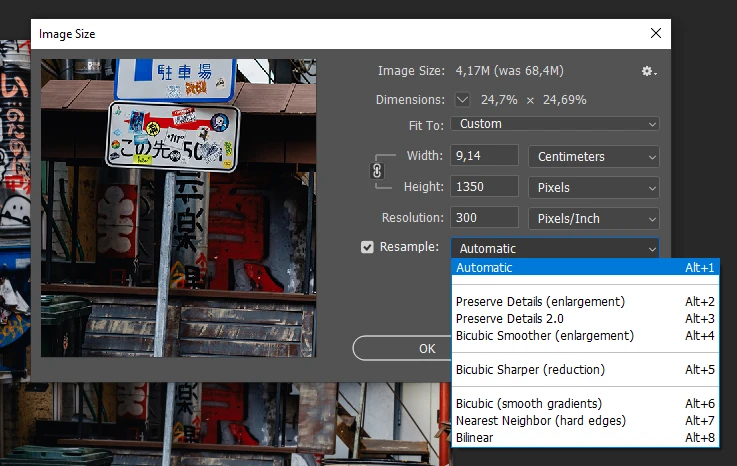
11.Hit “OK”. The pixel dimensions of your image will be changed.
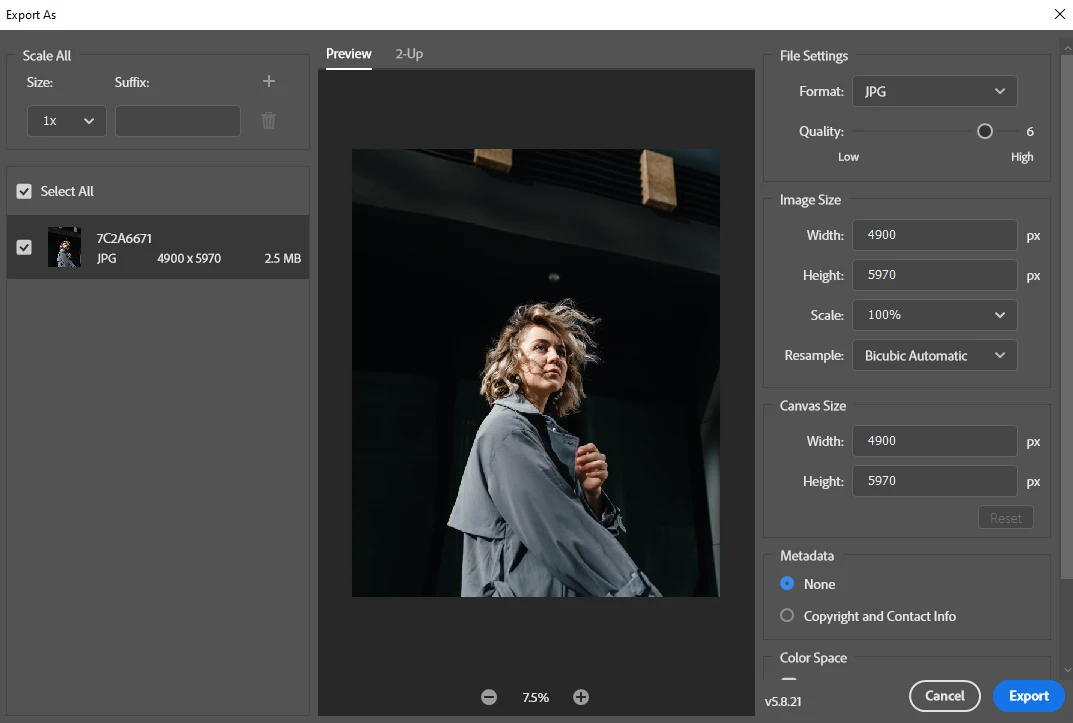
12.To export the image, go to File > Export > Export As. Check the settings and tweak them if necessary, then click on “Export”. 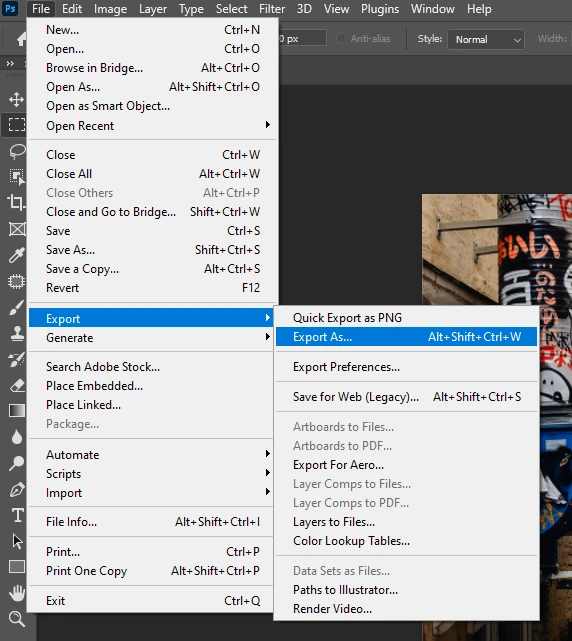
How to Resize an Image in Photoshop With the Crop Tool
With the Crop Tool you can make your image smaller by cropping out a part of it. This will decrease the size of your image as well as change its pixel dimensions. By cropping an image in Photoshop you will also be able to alter the aspect ratio.
Here’s how to use the Crop Tool:
1.Go to “File” > “Open”, then pick the image that you want to crop.
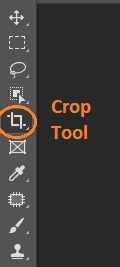
2.Select the Crop Tool in the toolkit or use the shortcut “C”.
3.Go to the Options drop down menu. You can choose “W x H x Resolution” to modify the cropping area however you want. There won’t be any locked aspect ratios.
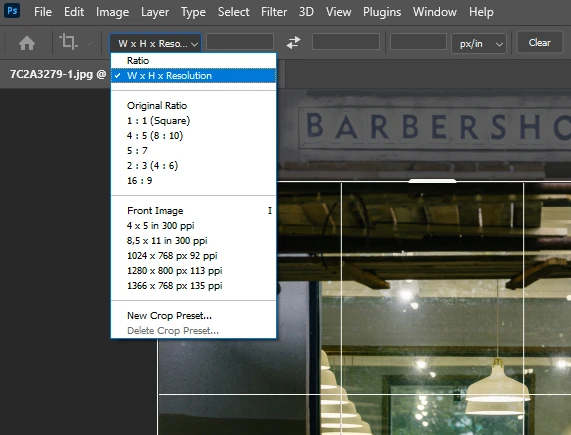
4.Another option is “Original ratio” – this will preserve the aspect ratio that your original image has. Photoshop offers a few popular aspect ratios that you can choose from. Alternatively, you can choose “Ratio” and enter the necessary ratio. You need to keep in mind that if you choose any of these options, your aspect ratio will be locked. You can make the area bigger or smaller, but the ratio of height to width will remain the same.
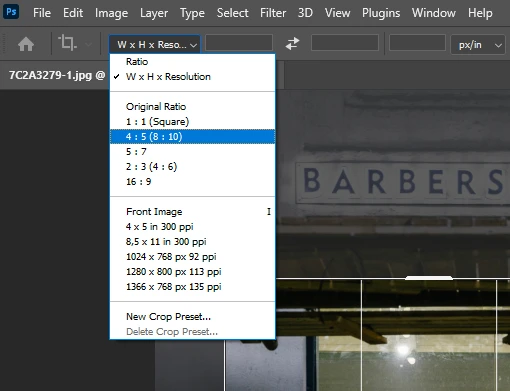
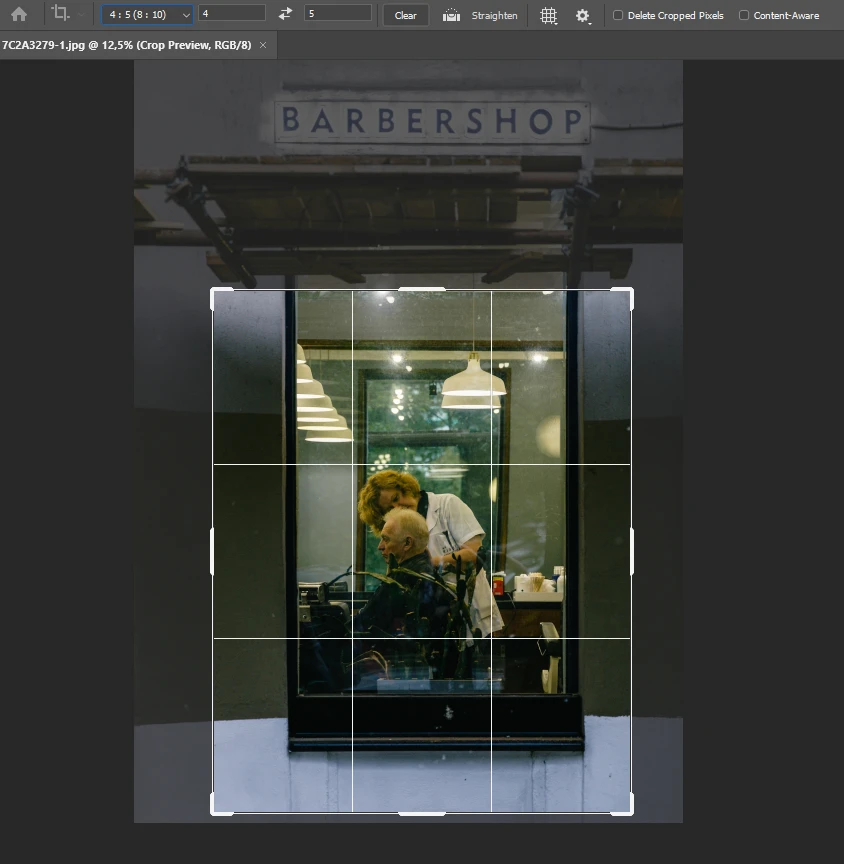
5.Let’s select 4:5 ratio as this is the ratio for an Instagram Portrait post.
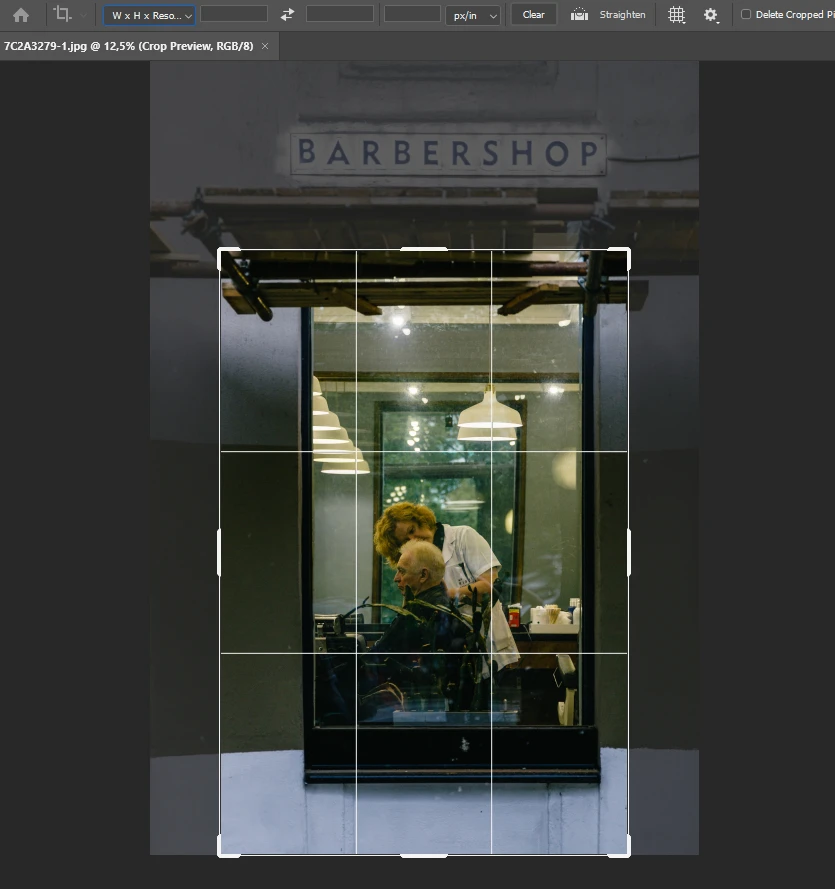
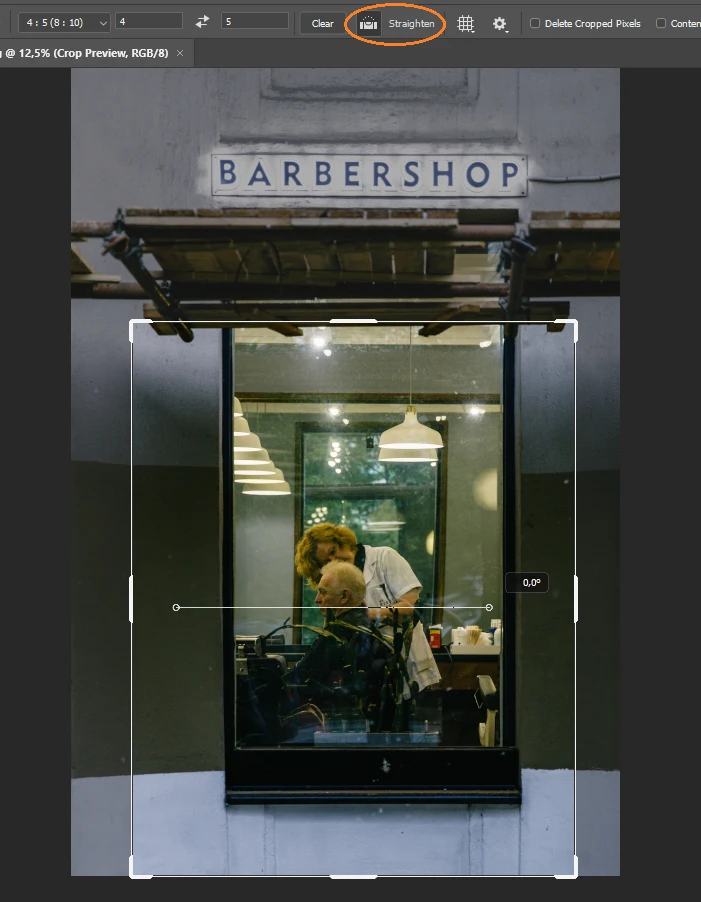
6.Here you can also make use of the Straighten tool. Click on the ruler icon, then draw a line on your image to straighten it. This is a great tool for fixing the tilted horizon.
7.Disable the “Delete Cropped Pixels” option at the top. This way, you won’t lose any pixels and be able to do some adjustments to the cropping area if necessary.

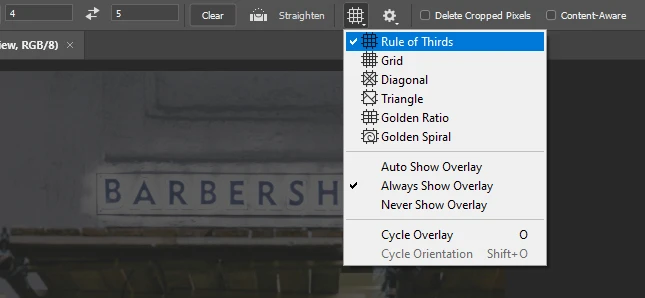
8.Click on the icon of the grid to choose a different overlay or disable it. For instance, you can have the “Rule of Thirds” grid, which will allow you to compose your image better.
9.To apply the cropping, hit “Enter”.
10.To export the image, go to File > Export > Export As. Adjust the settings if necessary, then hit “Export”.
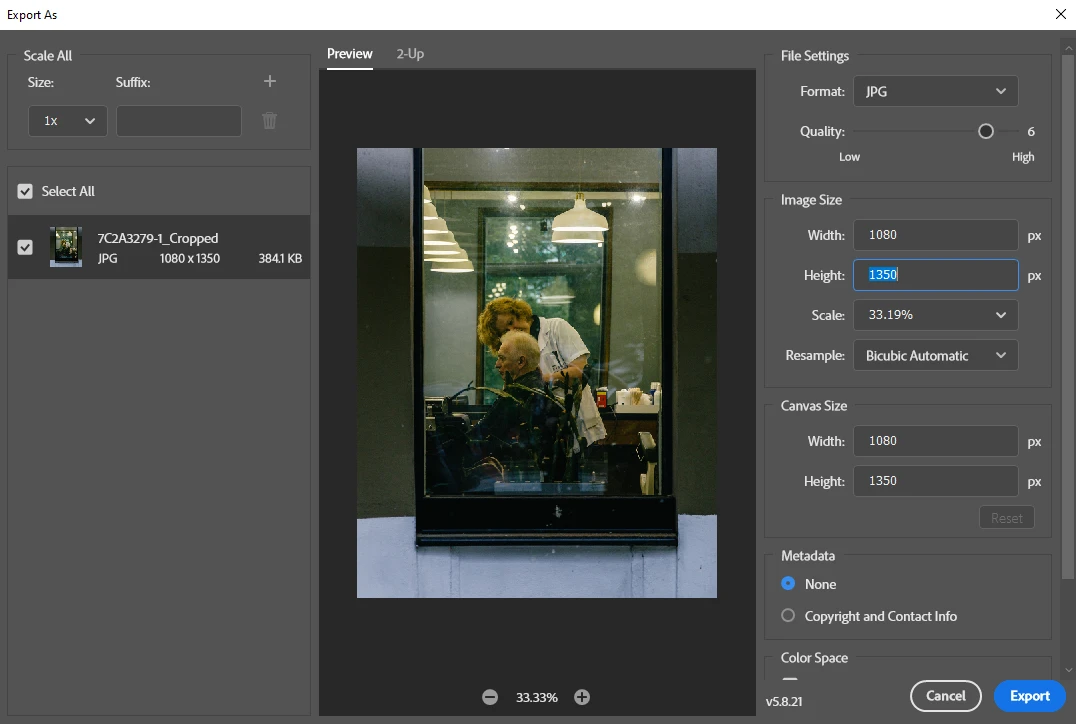
Here’s a piece of advice if you want to share your images on Instagram. If you have a different aspect ratio, first, crop your image. For example, crop it to 4:5. This will make your image smaller, but most likely, it won’t comply with the required pixel dimensions. So, next, use the Image Size Tool and change the pixel dimensions. Alternatively, you can export your image via “Export As” and in the export settings enter new values for pixel dimensions.
How to Resize an Image in Photoshop With the Free Transform Tool
This method is also incredibly easy and kind of combines the previous two.
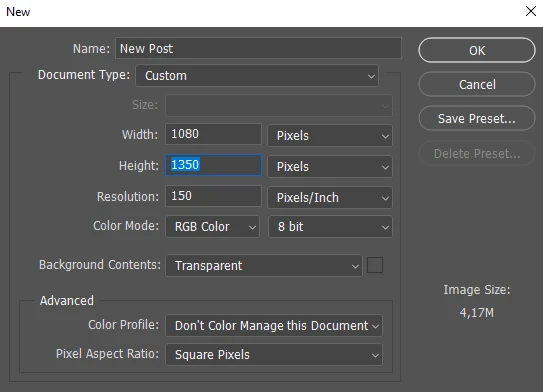
1.Go to “File” > “New”, then type in the name and the values for your new blank image. For instance, it can be 1080x1080 px. Hit “OK”.
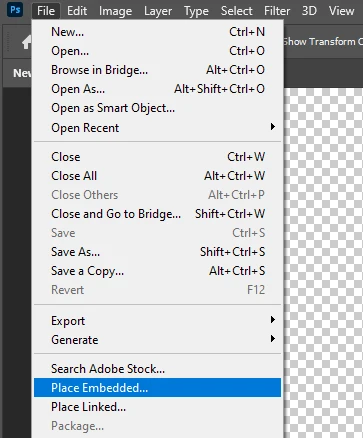
2.Once a new file was created, go to “File” > “Place Embedded” and choose the image that you want to resize.
3.The blue borders on your image show that the Free Transform tool is active. Drag the blue borders until you are happy with the result. You can also reposition your image with the cursor.
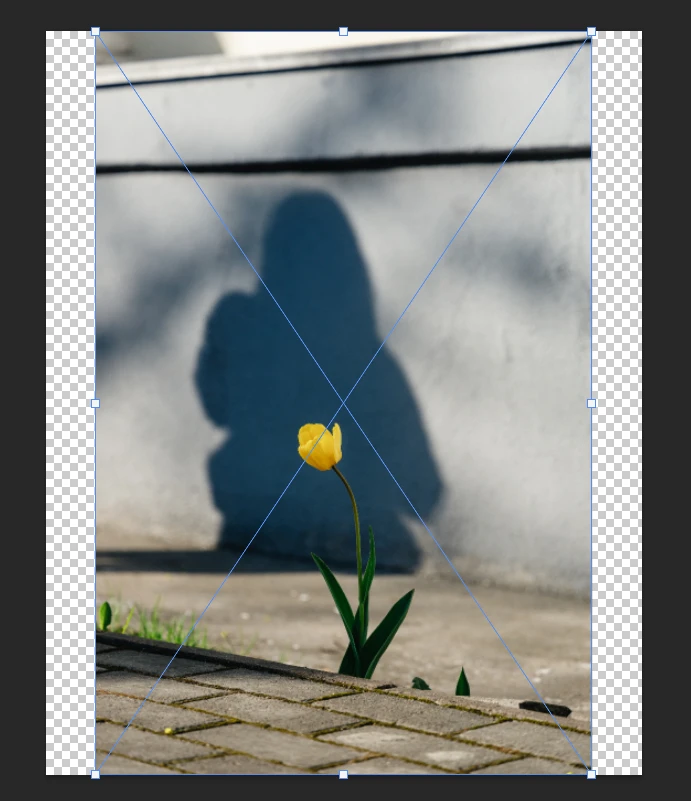
4.Hit “Enter” to apply the transformation.
5.If you want to add some adjustments, use the shortcut Ctrl + T or Option + T to enable the Free Transform again.
6.To export the image, go to File > Export > Export As. Tweak the settings if necessary, then hit “Export”.
As you can see, this is highly similar to cropping, but you don’t need to change the pixel dimensions – you will already have the necessary ones.
These three methods are quick and easy but involve getting rid of parts of your image. What if that’s not what you want?
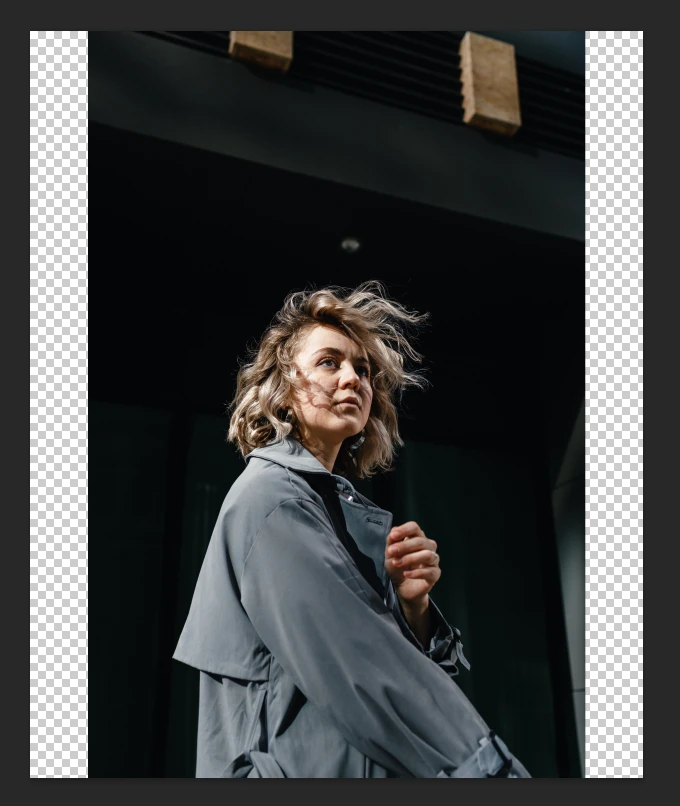
Well, the magic of Photoshop is at your service. With it, you can turn your image with the aspect ratio of 2:3 into the image with the aspect ratio of 4:5 without any cropping. However, you will need to put in some time and work. There are two slightly more advanced, yet amazing ways to resize your image.
How to Resize an Image in Photoshop With Content-Aware Scale
This is a somewhat more advanced technique, but with it, you won’t have to crop anything.
1.Go to “File” > “Open”, then select an image for editing.
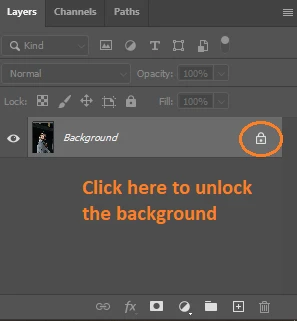
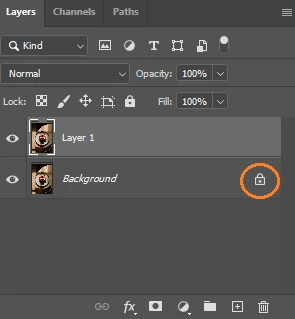
2.Unlock the Background by clicking on the lock icon. Your Background will now be called Layer 0.
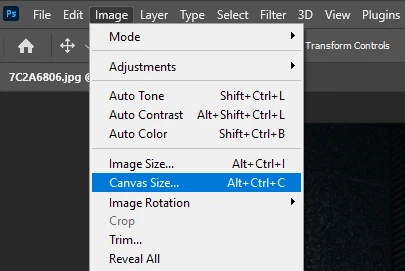
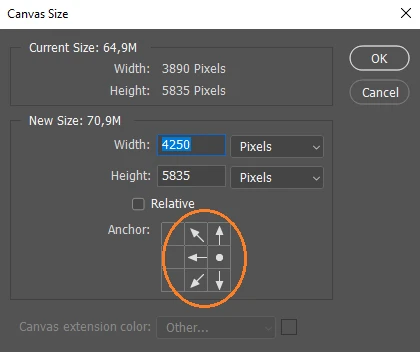
3.Go to “Image” > “Canvas Size”.
4.Type in new values depending on what aspect ratio you need.
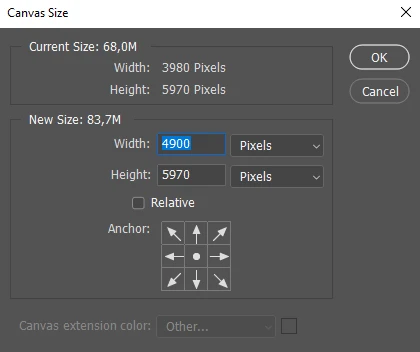
5.Hit “OK”.
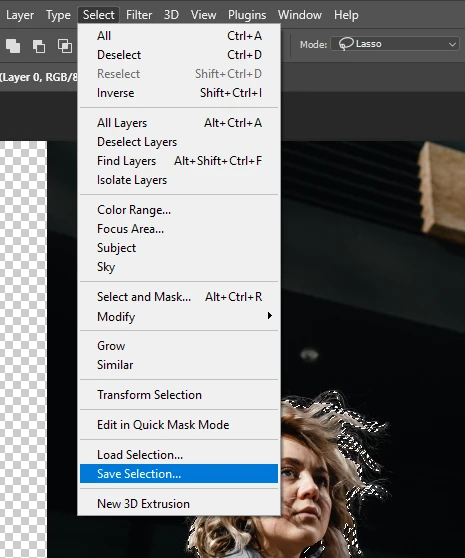
6.Make a quick selection of your subject. The subject is a part that you want to keep unchanged. You can do that in a couple of different ways:
- If your subject is not a person – for example, it’s a car, a tree or something else – pick the Object Selection Tool and draw around your object. You don’t have to be super precise. Photoshop will make a selection of whatever you drew around.
- If your subject is a person, go to “Select” > “Subject”. Photoshop will analyze your image and make the selection of the person automatically.
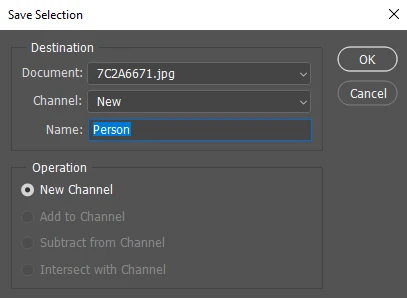
7.Once your subject is selected, go to “Select” > “Save Selection”.
8.There’s no need to change anything in the settings. Just type in whatever name you want into the input area and click “OK”.
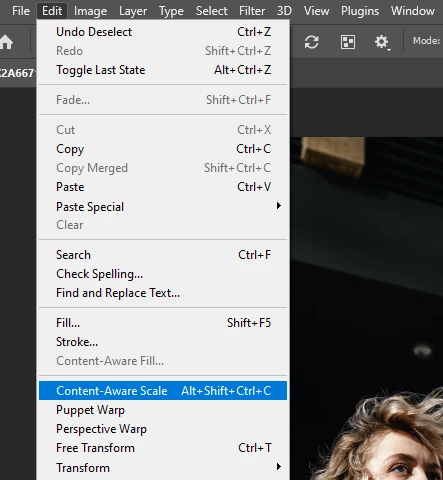
9.Press Ctrl + D or Command + D to deselect your subject.
10.Make sure that Layer 0 is selected. Go to “Edit” > “Content-Aware Scale”.
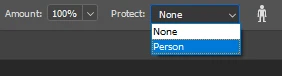
11.In the top part of the screen, go to “Protect” and choose the selection that you have saved.
12.Also, make sure that the aspect ratio is not constrained.

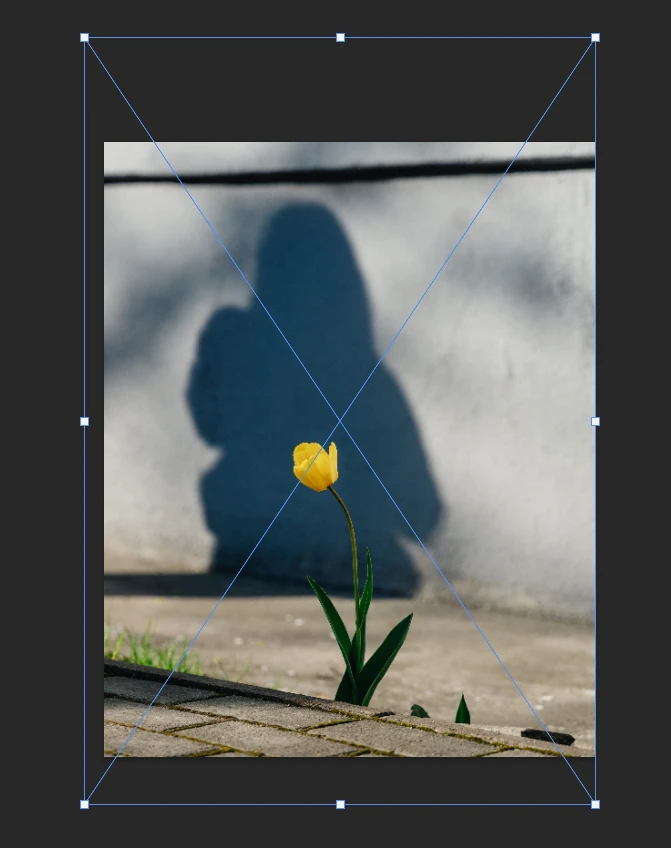
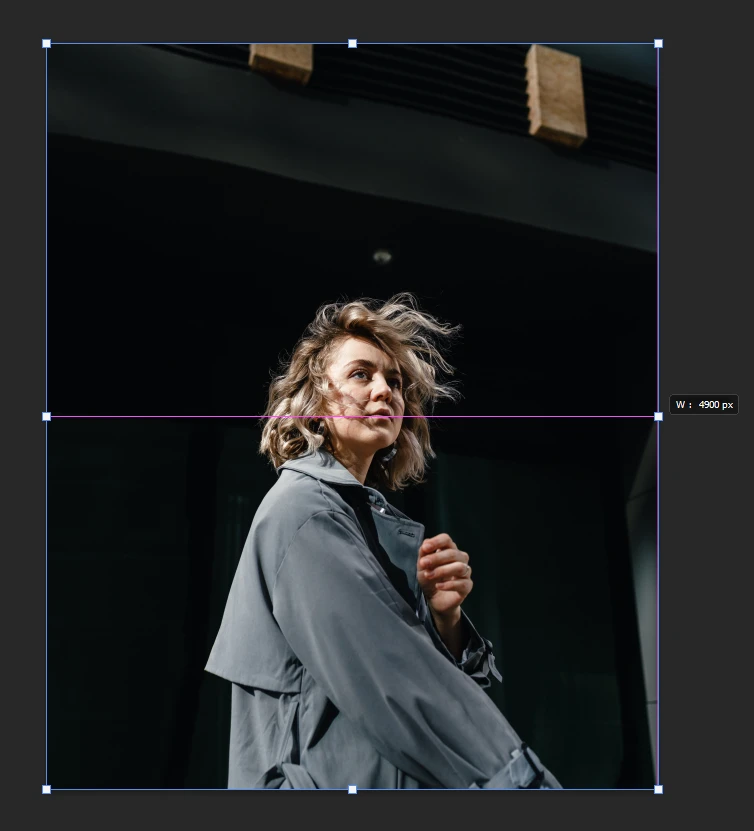
13.Grab the edge of your image and start dragging it. You can also hold Option on Mac or Alt on Windows to drag the edges out on both sides. The magic of the Content Aware Scale is that you can extend the background, while your subject will remain unaffected.
14.Hit “Enter” to apply the changes.
15.Go to File > Export > Export As. Adjust the settings, then click on “Export”.
Content-Aware Scale works best with the backgrounds that have very few details.
How to Resize an Image in Photoshop With Content-Aware Fill
It’s okay if you don’t like Content-Aware Scale or it doesn’t work for a particular image. It’s possible to extend the background by using Content-Aware Fill. However, please note that this method is more challenging and time-consuming than the others.
1.Go to “File” > “Open”, then select the image that you want to modify.
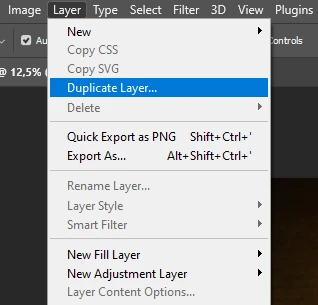
2.Duplicate the layer. You can do this by going to Layer > Duplicate Layer. Alternatively, you can use the shortcut Command or Ctrl + J.
3.Click on the lock icon to unlock the background.
4.Go to Image > Canvas Size. Extend your image to the aspect ratio and size that you need. It’s possible to extend it on one side – click on the arrows to go to the different extension option. Hit OK.

5.Select Layer 1 by clicking on it in the Layers panel.
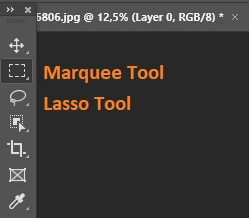
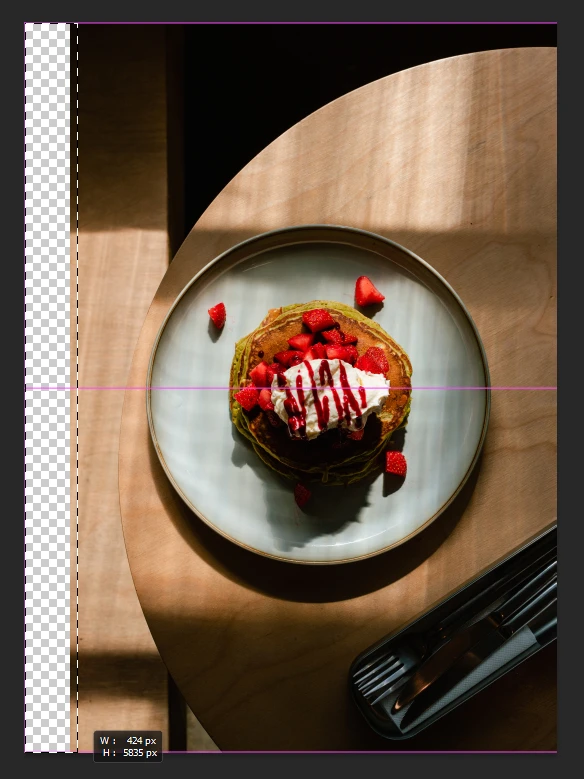
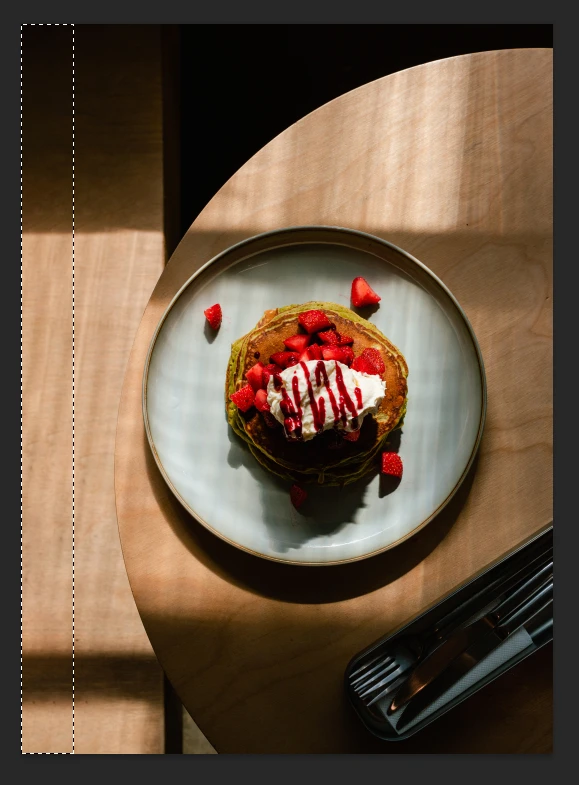
6.Make a selection of the expanded, transparent areas. To do this, grab the Marquee Tool – or Lasso Tool, if you prefer it – and select the empty area. If you extended your image on several sides, you can hold Shift – a small plus sign will appear near the cursor – and select other empty areas. This way all the areas will be included into one selection.
7.Go to “Edit” > “Content-Aware Fill”.
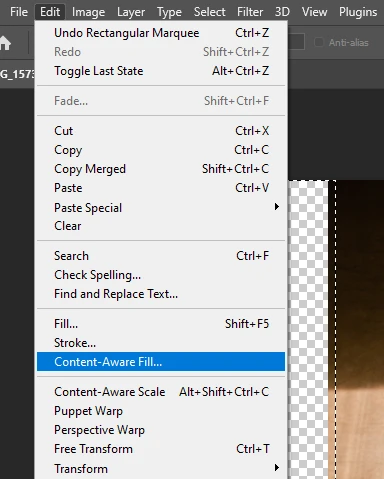
8.You can choose the areas for Photoshop to source pixels from. Everything that is green is analyzed by Photoshop. If the cursor has minus in the center – you can use it to remove things from the selection. If you hold Option or Alt, then the minus will turn into plus and you’ll be able to add things to your selection. You can remove your subject by “painting” over it in the selection.
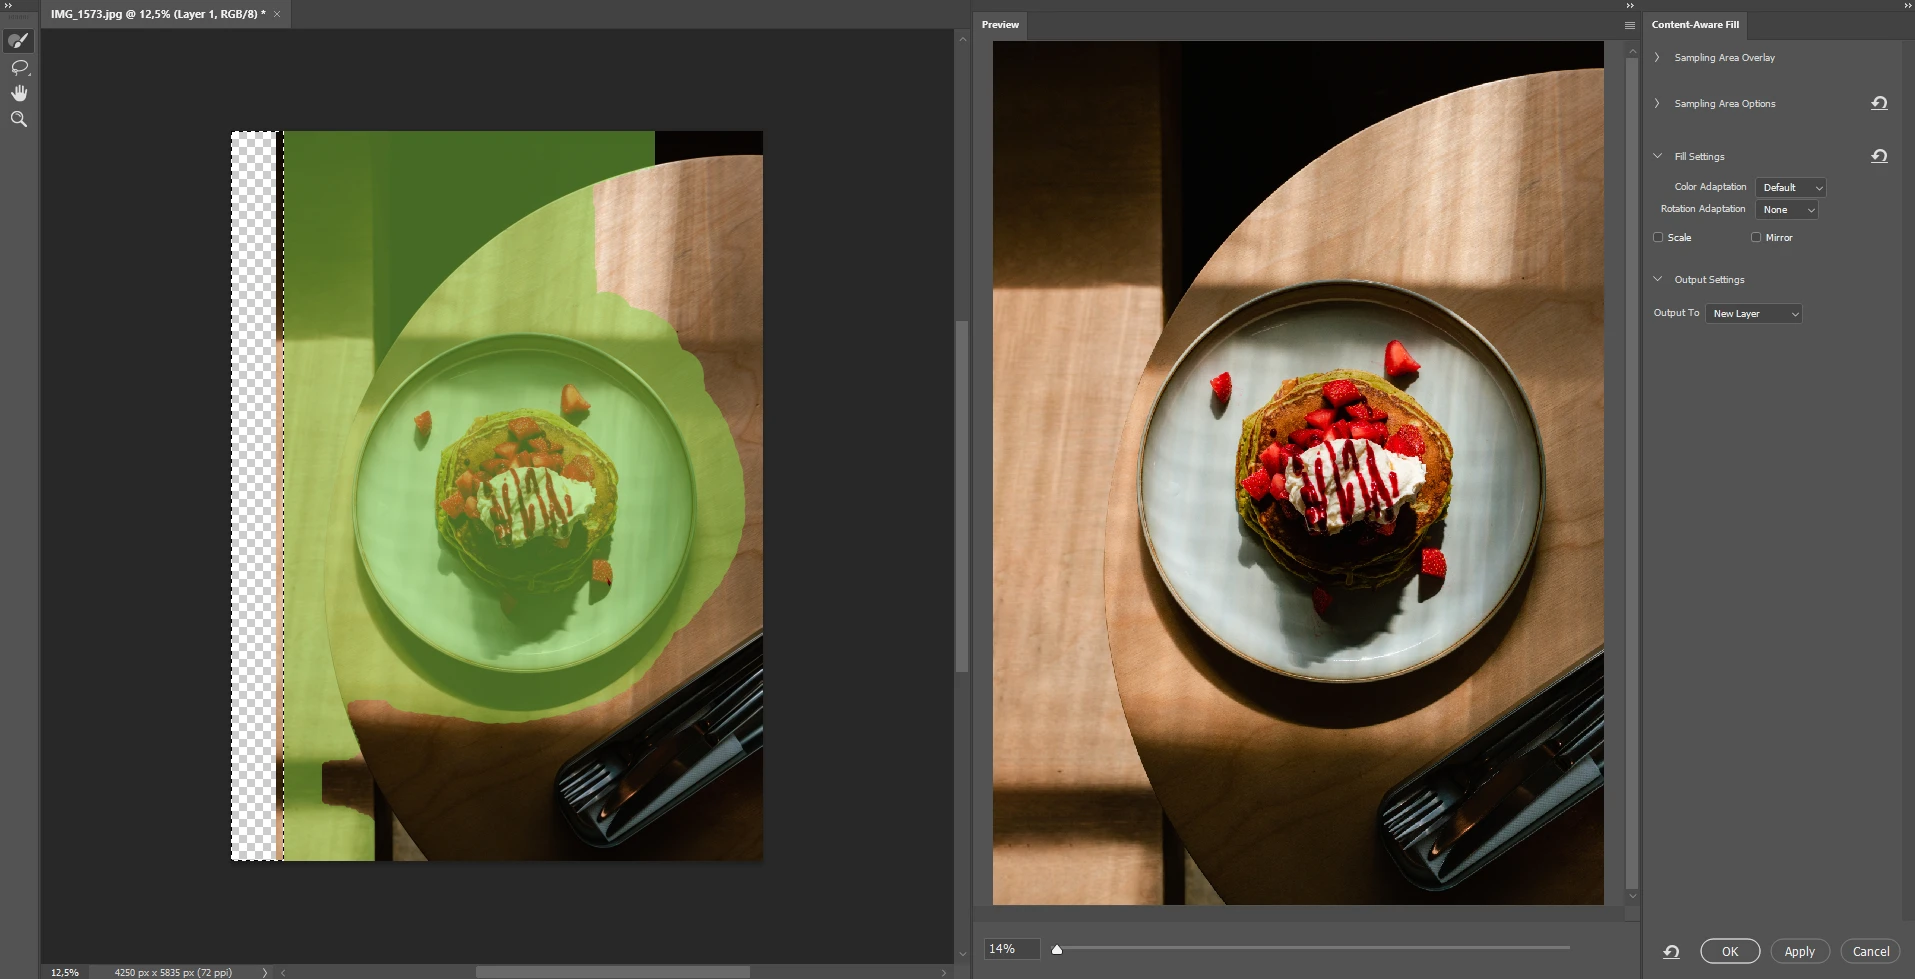
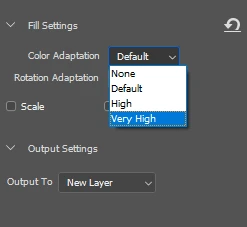
9.You can also go to the Fill Settings and experiment with them. You can pick a different option for the Color Adaptation or Rotation Adaption, although, the latter doesn’t produce good results in the majority of cases. You can also try enabling the Scale and / or Mirror. Please note that it will take a bit for Photoshop to generate new results.
10.Once you are happy, click OK to apply the Content Aware Fill. The changes will be outputted to a new layer.
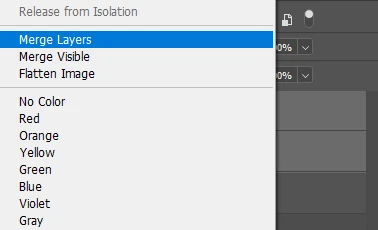
11.To merge the two layers, select one layer, hold Shift and select the second one, then right-click and choose “Merge Layers”.
12.Now, it’s time to make some tweaks and adjustments to make your image look even more natural. Several different tools can help you with this:
- Spot Healing Brush. With it, you can just paint over a spot that you don’t like. Sampling is impossible with the Spot Healing Brush, which is why it might not always produce good results; depending on how much details the area contains.
- Healing Brush. You’ll need to hold Option or Alt to sample an area and then paint over something that you don’t like. The Healing Brush will sample the area, but it will kind of merge those sampling pixels with the pixels of the area that you’re painting over. In other words you won’t get the exact duplicate.
- Patch Tool. It allows sampling as well, but what’s good about this tool is that you can source a patch from another area.
To get the best results, you’ll probably need to mix and match these tools.
13.Hit “Enter” to apply the changes and merge your layers again.
14.Go to File > Export > Export As. Make some changes to the settings if necessary, then hit “Export”.
Just like Content-Aware Scale, Content-Aware Fill will work best on backgrounds that have little to no details.
Watermarkly vs Photoshop
There are some key differences between Watermarkly App and Photoshop.
Watermarkly offers an online photo crop tool, which means you won’t have to download or install anything to crop PNG, crop JPG, crop GIF and other formats. Unlike Photoshop, you can get to work right away.
More to that, our crop tool includes presets for popular social media networks. They have the required aspect ratio and pixel dimensions. There’s no need to search for all the requirements, and you’ll get your cropped images ready for sharing online within a few minutes.
In our crop tool you can also:
- enter your custom pixel dimensions or aspect ratio
- adjust the cropping area however you want
- tilt the image to straighten the horizon.
You can prep your images for posting on social media without downloading, installing and then figuring out such a complex software as Photoshop. Therefore, Watermarkly can save you time. And you will get images of great quality! Watermarkly is also incredibly simple. All you need to do is open the app, upload your images, choose one preset or different ones for every photo, make adjustments to the cropping area and export your files. Plus, your original files won’t be modified – you’ll get cropped copies. This is similar to Photoshop…but it’s easier.
Surely, our online tool doesn’t offer such advanced features as Content-Aware Scale or Content-Aware Fill, but these two tools require more time, skill, and they don’t always produce good results.
With Watermarkly, you’ll save time and effort, while getting images of the same quality. What’s more, you’ll be able to use our app even if you have no experience with image editing.
Conclusion
It isn’t as difficult to resize an image in Photoshop as you might think. There are ways to do it easily and quickly as this complex, yet truly amazing software offers a wide range of tools and features that you can make great use of.
In Photoshop, you can resize your image by changing the pixel dimensions and aspect ratio, cropping your photo as well as expanding the background with two Content-Aware tools. No matter how much experience you have with image editing, there’s a technique that’ll match your skill level.
FAQs
How to resize an image in Photoshop?
First, create a new file with the pixel dimensions that you need. Go to “File” > “New…”, then enter your values for height, width and resolution. Hit “OK”, then go to “File” > “Place Embedded” and import the image that you want to resize. Adjust your image and hit “Enter” once you are happy with the result. Alternatively, you can resize an image by going to “Image” > “Image Size”, then entering the new values for height and width.
What is the shortcut to resize an image in Photoshop?
You can make use of the shortcut Alt + Ctrl + I for Windows or Option + Command + I for Mac – it’ll open the “Image Size” window. There, you can change the pixel dimensions of your image or use any other units of measurements. Another great shortcut is “C” – it’ll activate the Crop Tool. With it, you can crop all the unnecessary elements out of your image, then change the pixel dimensions in the export settings.
How to resize an image without cropping?
This can be done with the help of Content-Aware Scale or Content-Aware Fill. You’ll need to extend your canvas first, then go for one of these tools. Content-Aware Scale allows you to stretch the background. If you go for Content-Aware Fill, Photoshop will automatically figure out and present you an option of how the empty areas can be filled up. Both of these are great for backgrounds that don’t have a lot of details and aren’t busy. In addition to that, in most cases, you’ll need to do some further tweaking with Healing Brush, Patch Tool, or Spot-Healing Brush.
More articles
How to Crop an Image in Photoshop
How to Crop in a Circle in Photoshop
How to Blur Faces in Photoshop
How to Upscale an Image in Photoshop