
How to Reduce a Video File Size. Quick & Easy Ways
by ![]() Lina Thorne • Updated · Posted in Video Editing
Lina Thorne • Updated · Posted in Video Editing
If you want to store and share your videos easily and without waiting a long time for them to upload as well as stream them without experiencing frequent buffering, then you might need to reduce a video file size. This is often achieved with the help of video compression as it allows you to make the file size much smaller while maintaining the audio and video quality as much as possible.
Keep in mind that a file size is how much space a file takes up in a memory storage. It’s measured in Bytes (B), Kilobytes (KB), Megabytes (MB), Gigabytes (GB), and Terabytes (TB).
The most important thing that you need to know when reducing a video file size is that there are two types of video compression.
Lossy Compression
The file size is reduced by removing redundant data as well as pixels of similar hues and some other hardly noticeable information from a video file. Here, the loss of quality is unavoidable.
Another thing to note is that you won’t be able to restore your compressed file to the original state. Nevertheless, you should opt for this type of video compression if you need to drastically reduce your video file size to share and stream them online. It’s also great for casual viewing.
Lossless Compression
The file size of your video will be reduced, while all the details of the original will be preserved. Lossless compression allows you to avoid any loss of quality when video content is edited multiple times. Moreover, if you need to, you can actually restore the compressed video to its original state. For both of these reasons, this type of compression is widely used in film and TV production as well as editing videos for YouTube.
Of course, lossless compression has a downside – since all the details are kept, it’s not possible to drastically reduce the file size. In other words, if you reduce one and the same video file with lossless compression, then with lossy compression, the latter one will produce a video of a much smaller file size.
In this guide you will learn about 5 simple ways to reduce the size of a video file quickly and with minimum effort. You can do this by:
- Changing video format.
- Decreasing video resolution.
- Using HandBrake.
- Trimming.
- Making use of an online video compressor.
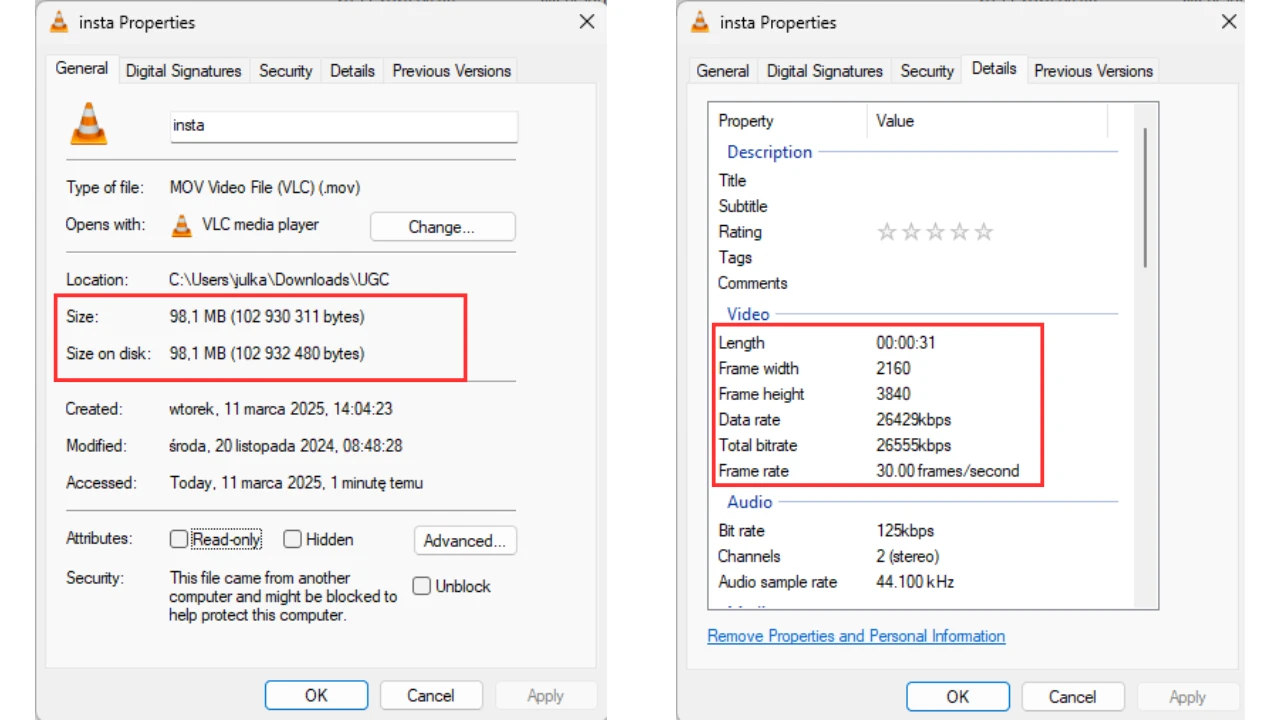
We will take a closer look at how each of these methods work using our video file as an example. Its original file size isn’t too big – only 98 MB. Of course, you will be able to upload it to social media platforms without any issues; you will probably just need to wait a bit for it to get uploaded and processed. However, you won’t be able to send this video as an attachment over an email or some messaging apps because it will exceed the size limit.
Here’s a full properties overview of the original video file:
Now let’s move on to changing its file size.
How to Reduce a Video File Size By Changing Its Format
A video format is a file type that determines how video data is stored, compressed, and played on different devices and media players. It consists of two main components:
- Container (File Extension) - Determines how video, audio, and metadata (subtitles, chapters) are packaged together. Examples: MP4, AVI, MOV.
- Codec (Compression Standard) – Defines how video data is encoded and compressed to optimize file size while also maintaining good quality. Examples: H.264, H.265 (HEVC), VP9, AV1, MPEG-4.
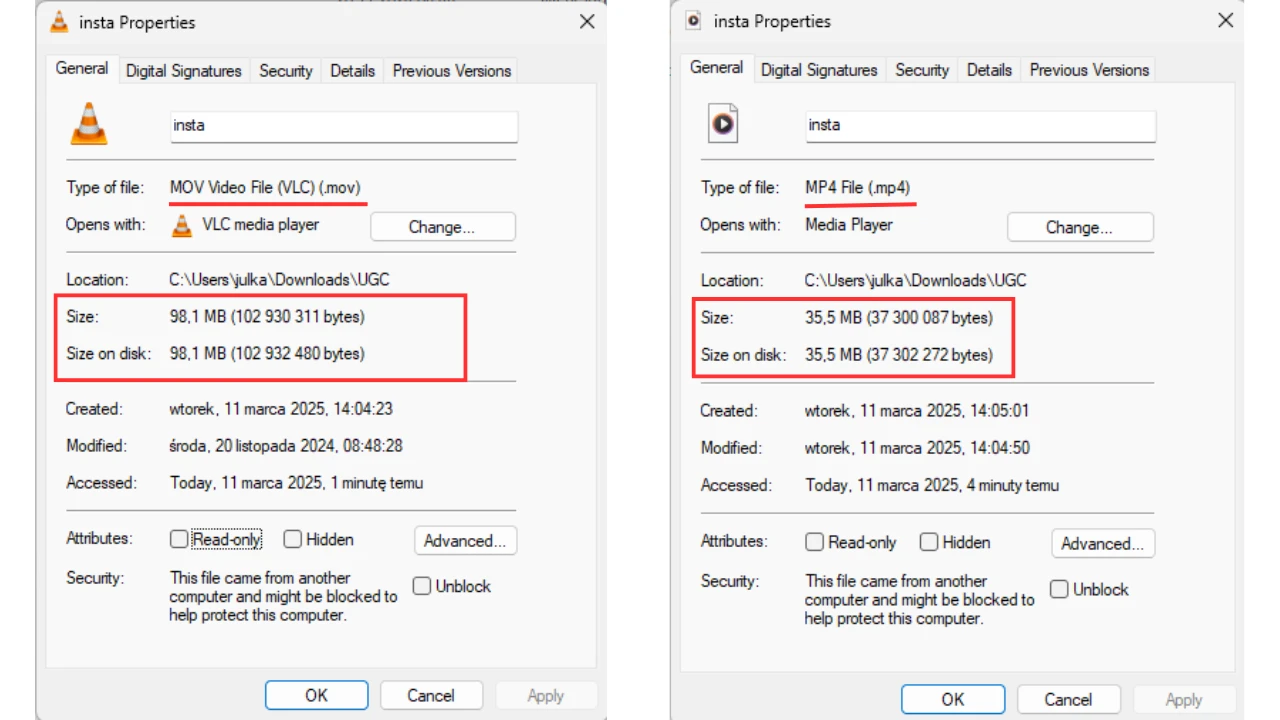
If you need to create professional, high-quality content, then you should go for the MOV or AVI format because they are uncompressed. But keep in mind that they also tend to produce video files of the largest size. What is the most popular video format? MP4, of course. If you go for this format, you will get a video file of a relatively small size yet excellent quality. In a way, it’s the best of both worlds.
If you need to reduce a video file size easily and your original video is in the MOV or AVI format, you can simply convert it to MP4. Yep, it’s that simple. Take a look at the example below, if you are skeptical about this. As you can see, the video file size halved!
Here is a tip
If you want to simply change the format of your video without doing any editing, then you should use a free online converter – for example FreeConvert.
But if you are planning on editing a video – for instance, you want to merge several clips together – then there’s a better way to change the format. The majority of video editors allow you to pick a different format in the export settings. So, when you get to exporting, simply choose MP4 as the file format. Moreover, you can export copies of your edited video in different formats.
How to Reduce a Video File Size By Lowering Its Resolution
Video resolution refers to the number of pixels that’s included in each frame of a video. It can be expressed as width x height, but in most cases, you will see only the height. For instance, the most commonly used resolution for videos is 1080p, which is actually 1920x1080 pixels. The higher the resolution, the sharper, clearer and more detailed your video will be. But as you might have guessed, a detailed, high-resolution video will inevitably have a large file size.
You can reduce a video file size by changing the resolution. To resize our video, we used two different apps – Clideo and Egzif – yet in both cases we:
- maintained the original aspect ratio;
- changed the width and height from 2160 x 3840 px to 1125 x 2000 px;
- did NOT change the format.
The Clideo app managed to decrease the file size of our video from 98,1 MB to 30,4 MB. Whereas the Egzif tool produced even more impressive results – the file size was reduced to 10.4 MB.
Using free online tools to decrease the resolution of your video is one of the quickest and easiest ways to reduce a video file size, but it’s not without drawbacks:
- It’s quick, but it’s not super-quick. In other words, it can take a few minutes to upload and process files, then download the resized copies. What’s more, the processing speed will depend largely on your internet connection. So, if your internet connection is unstable and you need to process your files quickly, it might not be a good choice for you.
- It’s not uncommon for video resizing apps to have a free and a paid version. And the free version can sometimes add watermarks to the processed videos.
- There’s a possibility that you won’t get the exact resolution that you need. For instance, we entered the value of 2000px in the export settings when resizing our video in Egzif. Yet, after the app finished processing, the resized video had the height of 1920px instead of 2000px.
Once you resize your video, check whether all the details are sharp and clear and its overall quality is up to your standards. Keep in mind that some apps can make your video file size significantly smaller, yet it’s quality will also get worse. It might be a good idea to give a try to several video resizing apps and see which one can provide you with the necessary results.
How to Reduce a Video File Size By Using HandBrake
HandBrake is a free, open-source video transcoder with the help of which you can convert, compress, and optimize video files for different devices and formats. It is widely used for reducing file size, changing video formats, and adjusting video settings without significant quality loss. It is available for Linux, Mac, and Windows.
This app offers a rather wide range of features, so you can use it to reduce a video file size in various ways and do so pretty quickly. It includes:
- video compression;
- conversion to MP4, MKV and WebM;
- H.264, H.265 (HEVC), VP9, and AV1 codec support;
- resolution adjustment;
- bitrate and quality control;
- frame rate customization.
And it’s super easy to use!
How to reduce a video file size in HandBrake:
- Download and install the app. Don’t worry, it’s free of charge and safe for your device.
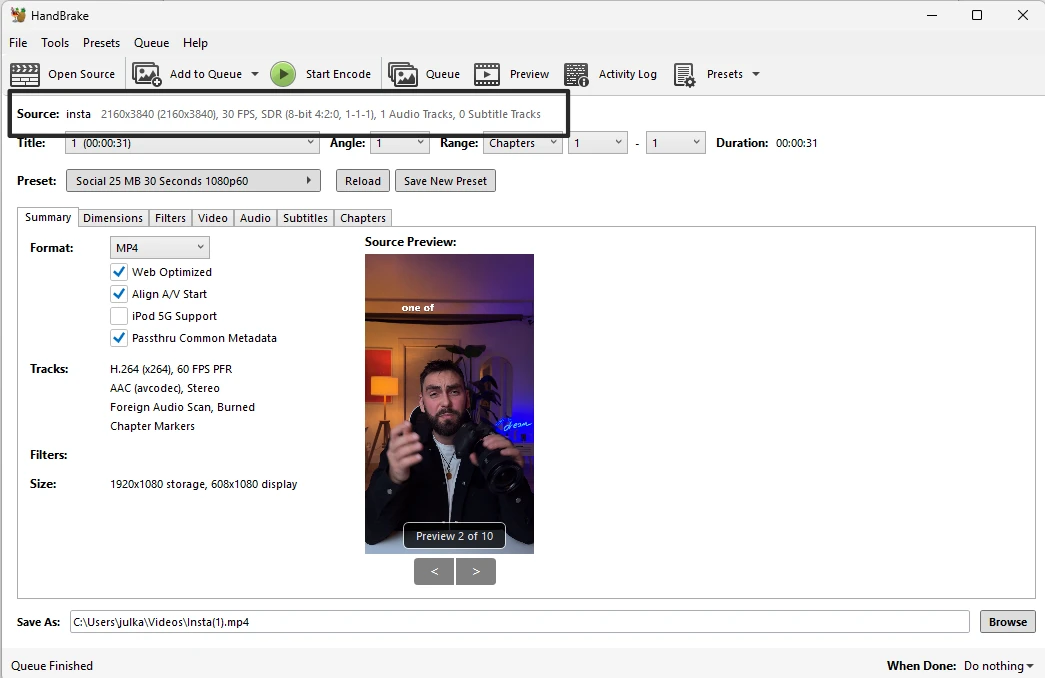
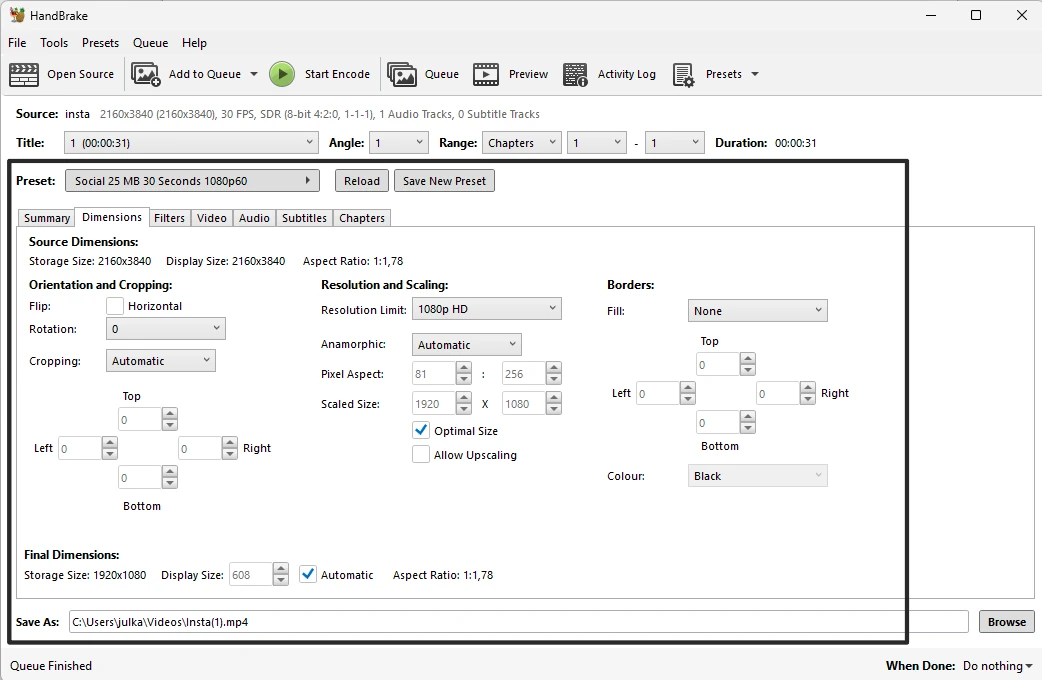
- Next, open the app and click on the Open Source button, then drag & drop your file. In the Source area you will see all the key properties of your original video.
- Choose one of the presets – there’s an impressively big selection of them. If you don’t see a preset that fit your needs, you can adjust the settings manually.
- Are you done with the settings? Click the Start Encode button. By default, your compressed file will be saved to the Videos folder.

Now, let’s take a look at how we reduced the file size of our video in 3 different ways using this app:
- By choosing the “Social 25 MB 30 Seconds 1080p60” preset. As a result, our video file has been reduced from 98,1 MB to 22,7 MB. If your video is up to 30 seconds long and you need to post it on social media, go for this preset. By using it, you will get a video that is around 25 MB or even smaller, which is exactly what you need to share it online or via email. The compressed file will be encoded in H.264 and converted to MP4.
- By choosing the default “Fast 1080p30” preset. Here, our video file size was reduced to 10.9 MB. It was quickly encoded in H.264, converted to MP4 and resized to 1920 x 1080. No changes to the preset settings were made. We simply uploaded our video, selected this preset, then started the processing.
- By changing the Video Encoder to H.265 (x265). Finally, we picked the previous Fast 1080p30 preset, then made only one change – set the video encoder to H.265 (HEVC - High Efficiency Video Coding). It’s actually a more advanced version of H.264 (AVC - Advanced Video Coding) and, thus, it compresses videos in a better and more efficient way. By making this one change, we managed to reduce the video file size even more – to 8,29 MB.
As you can see, by using only a preset and making one small change, it’s perfectly possible to reduce a video file size quite drastically. What’s more, you can actually make the size of your video even smaller by changing the frame rate and bit rate as well as making some minor tweaks to the video quality.
None of the changes will be applied to the original video, anyway. It will stay unchanged. So, don’t be afraid to experiment! Try different presets and different combinations of settings until you get a video that has the right file size and quality.
Also, please note that it’s a good idea to learn more about videos, video formats and codecs as well as video editing. Without this knowledge, you will make all the adjustments blindly and, thus, end up with some subpar results from time to time. But by learning more, you will have a clear understanding of what exactly will have an impact on video size and quality.
Right now, HandBrake is one of the best free video processing apps that can be easily used by both beginners and professionals. Unlike online editors, it doesn’t require registration, has no limits on the number or size of uploaded files, and doesn’t add watermarks to videos. And on top of all that, it can convert, compress and resize video files quickly and easily.
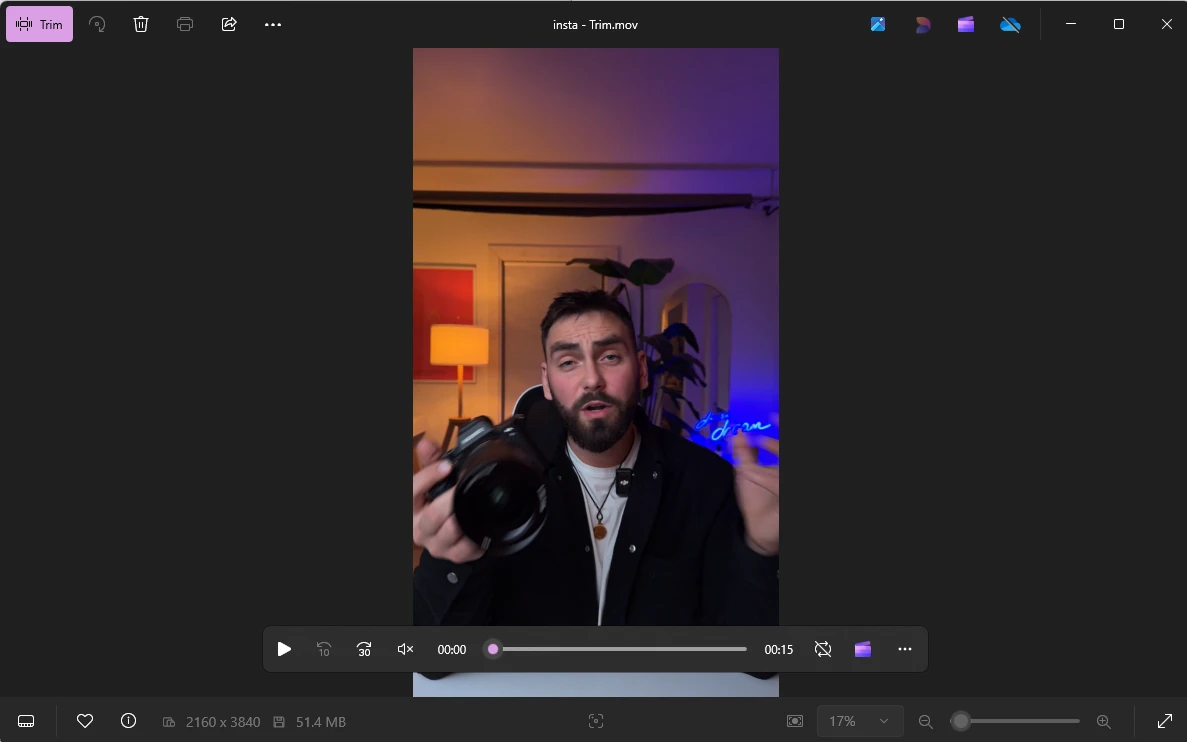
How to Reduce a Video File Size By Trimming
Unlike the previous methods, this one doesn’t involve video compression. Instead, you will need to get rid of unimportant fragments and decrease the length of your video. Making your video shorter will, of course, affect its overall file size.
What you need to keep in mind is that if you shorten your video a bit, then its file size will also be decreased only slightly. But if you remove a big chunk of your video, then its file size will also be reduced pretty drastically.
Naturally, this isn’t the best way to reduce a video file size, but we still decided to include it in this guide because it can help in some cases. In addition to this, it’s pretty easy to trim your videos on both Windows and Mac.
Here’s how you can do this.
To trim a video on Windows, open your video file with the Photos app and click on the Trim button in the upper left corner. When you are in the Trim section, move the slider at the beginning of your video to trim it. Do the same to the end of your video, if necessary.
You can trim only the beginning or only the end, but it’s also possible to trim both. The trimmed video can be saved as a copy without overwriting the original.
Here’s how you can trim a video on a Mac:
- Launch the QuickTime Player app
- Open your video file in it.
- Go to Edit > Trim. Drag the yellow borders to change the length of your video. All the fragments outside the yellow borders will be deleted. Here you can trim both the beginning and the end.
- Save the trimmed video to your device as a copy.
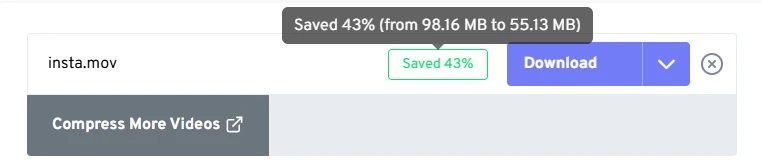
We trimmed our video quite significantly – its length was decreased by half. This led to the reduction of its file size by 47%.
You can easily trim videos using built-in apps. However, the main downside of these built-in editors is that you won’t be able to split your video into two or more clips. It’s only possible to trim the beginning, the ending or both. You won’t be able to remove a certain fragment in the middle of the video. You won’t be able to re-arrange parts of your video or merge multiple clips into one. If that’s what you need, you will have to opt for a more advanced video editor.
How to Reduce a Video File Size By Using Online Video Compressor
What if you want to compress a video with minimum effort? You have no desire to learn more about formats, codes, technical aspects and properties of video files? Afterall, you aren’t planning on becoming a video editor. You simply need to make your video smaller. If that’s the case, then the easiest way to achieve your goal is to use a free online compressor.
Do you remember the FreeConvert app that we mentioned earlier? Surprisingly, you can use it not only for conversion, but for video compression, too. All you need to do to reduce a video file size is to upload your video, press the Compress button, then download the compressed video. Everything is incredibly simple. Depending on the size of the original video, the processing may take a few minutes.
When the compression is done, you will see by how much the file size was reduce. Please note, though, that you won’t know how exactly your video file was compressed – what type of compression was used, what data was removed.
What you need to know is that online video compressors usually don’t change the file extension or resolution of your video. In other words, the resolution and the format of your original video will remain the same.
You should give a try to more than one online video compressor that can be used for free. Only this way you will be able to find out which app can provide the best results – strike the balance between the necessary file size and video quality without adding video watermarks in the free version.
A Small Note At the End
If you checked some other guides on reducing video file size, you might’ve come across another method – compressing a video into a Zip file. But we’ve tried it and unfortunately, it doesn’t work.
For instance, if you try to zip a video in either MOV or AVI (both of them are uncompressed formats), you will see absolutely no difference in the file size. For this reason, we decided not to include this method in our guide; you shouldn’t waste your time on it, either. Instead, try using one of the methods listed above.
Learn More
How to compress a video on iPhone