
How to Make a PDF on iPhone
by ![]() Lina Thorne • Updated · Posted in PDF Editing
Lina Thorne • Updated · Posted in PDF Editing
PDF is a versatile format that can be conveniently used not only on computers but also on mobile devices. Its main advantage is its ability to preserve original formatting across all platforms. Moreover, if you need a higher level of confidentiality, you can easily make your PDF files more secure by protecting them with a PDF watermark, a password, or both.
Working with PDFs is not as hard as you might think, even if you mainly use an iPhone. If you’re skeptical, check out this article How to Edit a PDF on iPhone, and you’ll see how easy it actually is.
If you’d like to learn how to make a PDF on iPhone, this is the guide for you! Here, we’ll explore two main methods. The first one involves converting existing content on your smartphone (e.g., a photo or Word document) into a PDF. Meanwhile, the second method requires you to create a new PDF right on your iPhone using Safari or the Camera app.
Below you’ll find detailed instructions for both methods.
How to Make a PDF on iPhone Using the Notes App
Say, you’ve prepared a project description for your team in the iPhone’s Notes app and need to send it quickly in PDF format. Or perhaps you’ve written down some important thoughts and want to save them as a PDF for easier sharing. You can do both of these things within just a few seconds. More to that, you won’t have to switch to a different app. That’s right! The Notes app allows you to export your files as PDFs. And it’s really easy to do!
How to create a PDF from your notes on iPhone:
- Open the note you want to export as a PDF.
- Tap the Share button at the top.
- From the drop-down menu at the bottom, select Print.
- Since you simply want to create a PDF without printing the file, there’s no need to change any of the settings at the top. All you need to do is enlarge the file preview by slightly spreading it with your fingers. This will automatically generate a PDF.
- To confirm, tap the arrow on the right side of the note’s title. You’ll see the file’s format and size information.
- Depending on whether you want to send the file to someone or just save it on your iPhone, choose Share or Save to Files.
The Notes app offers extensive options for text editing and formatting (such as inserting photos, images, emojis, creating lists and tables). For this reason, it’s an excellent tool for drafting social media posts or small presentations, as well as capturing ideas. And the beauty of making a PDF in the iPhone’s Notes app is that you’ll be able to preserve the formatting exactly as it was.
How to Make a PDF on iPhone Using the Files App
The Files app is where all your downloads are stored, along with documents, files, and images you’ve chosen to save there. If you can’t find a document on your iPhone or aren’t sure where an online image editor saved your photo, the first place to check is the Files app. It’s also a handy tool for creating PDFs on iPhone.
If you’ve saved a Word document and want to convert it to a PDF, here’s what to do:
- Find the necessary file, then tap it to open.
- Tap the Share icon at the bottom left and choose Print. Alternatively, open the options menu at the top and select Print there.
- Just like in the Notes app, zoom in on the preview to create a PDF, then save it to the Files as a separate document.
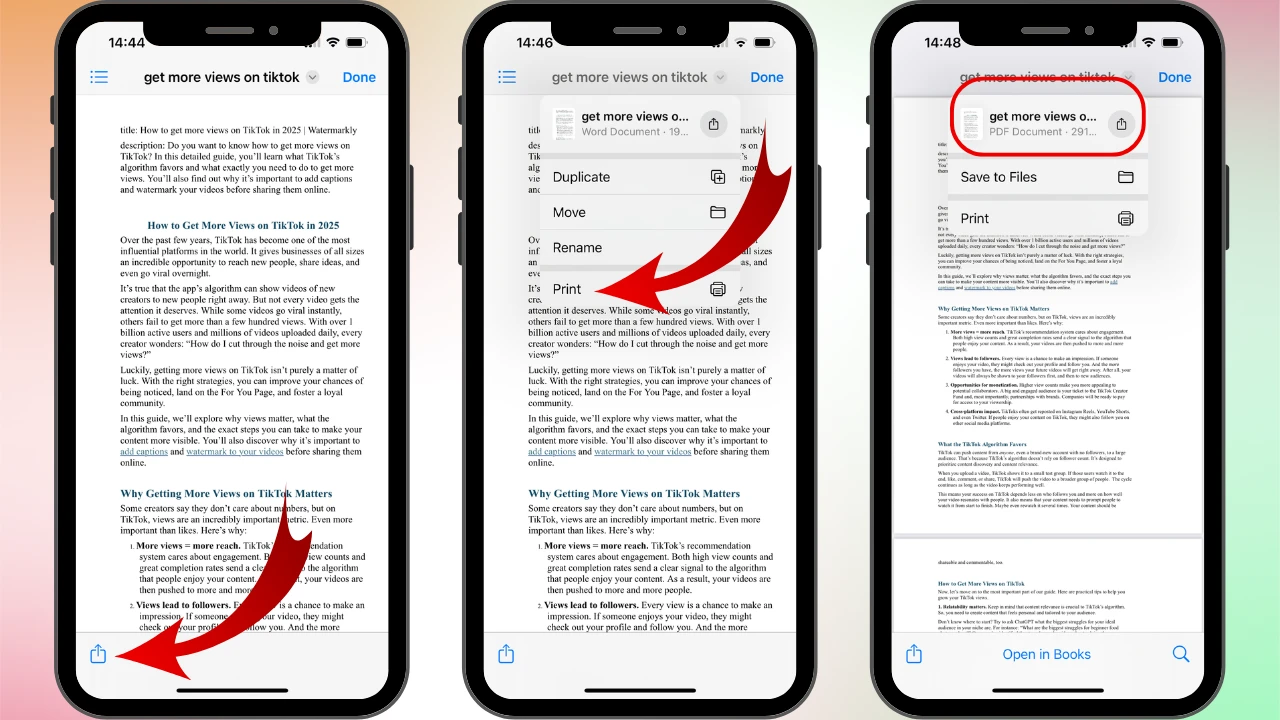
As you can see, to make a PDF on iPhone in the Files, you also need to use the Print function.
But what if you need to convert a picture to PDF on iPhone? Well, this process differs slightly:
- Go to the Files app and find the image you want to convert. Then hold your finger on it until a menu with different options appears.
- Tap Quick Actions > Create PDF.
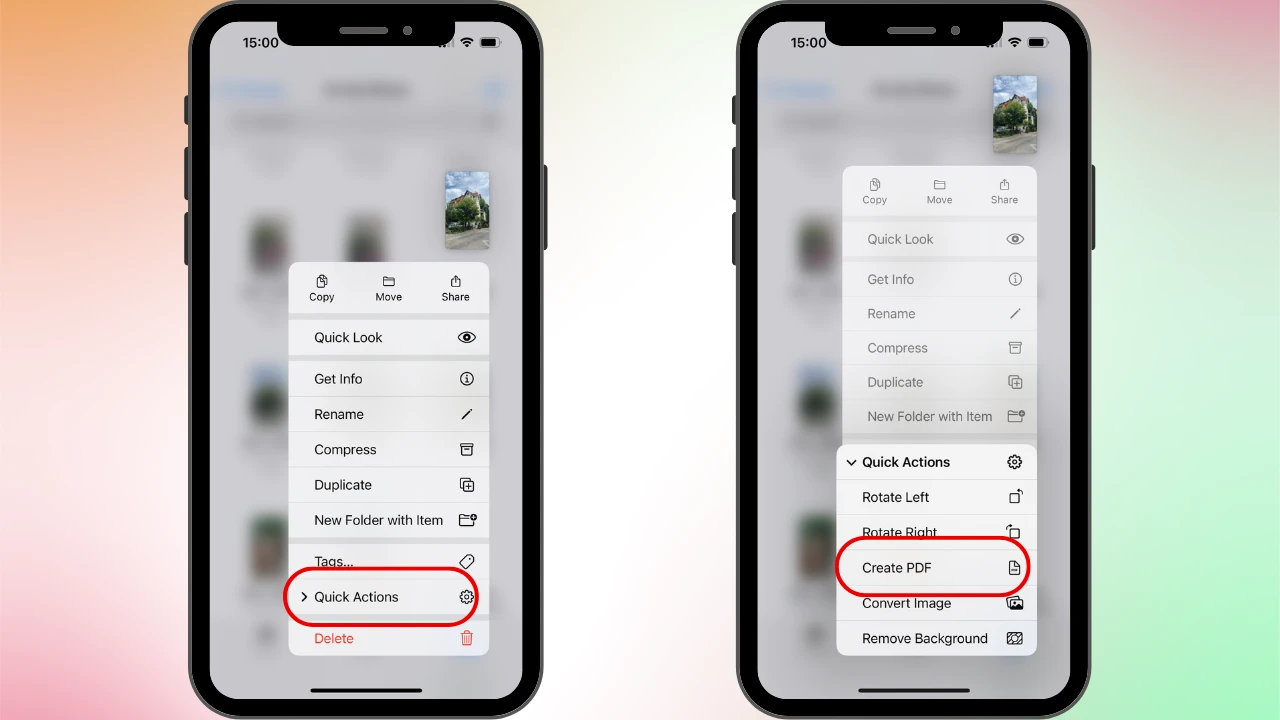
That’s it! The picture will be saved as a PDF next to the original.
How to Create a PDF on iPhone Using Camera
This method of creating a PDF is quick and easy, perfect for saving a new document directly on your phone. Here’s how you can do this:
- Open the Files app and tap the three-dot icon in the top-right corner.
- Select Scan Documents. Your camera will immediately activate and start scanning whatever you point it at.
- Once you’ve captured the image you want, tap Save. The file will automatically be saved as a PDF by default.

It doesn’t matter whether you’re scanning a page of text or a physical object, your camera will make a PDF and save it to Files.
How to Create a PDF on iPhone Using a Browser
It may come as a surprise, but you can actually use Safari to create PDFs on your iPhone. This method is useful for saving blog posts, articles, and entire web pages as PDF files on your phone.
Here’s how:
- Open Safari and go to the webpage you want to save.
- Tap Share > Print.
- Zoom in on the preview, then select Save to Files.

All done! The webpage will be saved as a PDF document.
Pros and cons of this method:
- Pros. It’s a convenient way to save important content to your smartphone, especially if you know that internet access might be limited later. Converting a blog post into a PDF also allows you to annotate it, add comments, or highlight key passages. You can then share the edited document with your colleagues.
- Cons. Online articles often contain ads and pop-ups. When saving a webpage as a PDF, you’ll also capture that visual clutter along with the important content. In addition, the formatting may not always display correctly.
Summing Up
You don’t need any third-party apps to create a PDF on your iPhone. With just a few taps, you can convert any document or image stored on your device into a PDF. It’s also perfectly possible to save a new file in that format. Take full advantage of your iPhone’s built-in features, and you’ll be able to edit and share documents with ease, no matter where you are. The method you choose depends on which app you use most often – Notes, Files, or Safari when browsing the web.