
How to Edit a Video on iPhone for Free
by ![]() Lina Thorne • Updated · Posted in Video Editing
Lina Thorne • Updated · Posted in Video Editing
These days, if you want to grow on social media, you have no other choice but to post some video content. Not to mention that videos can provide much more context than photos, so you might want to record videos for personal use, as well. Regardless of your goals, you don’t really need to invest into a digital camera, lots of lighting equipment and professional editing software; the latter one can actually be really confusing and demanding.
If you’re just starting out, you will only need your iPhone to create high-quality video content. Their smartphone cameras are insanely good! In fact, the latest model of iPhone allows you to shoot in 4K with 60 fps; and you can also pick a different frame rate or resolution, which can also be very useful.
But what about editing, you may ask?
First, here are the tools that you usually need to edit a video on an iPhone:
- Trimming allows you to drag the edges of your video on the timeline to get rid of unwanted parts.
- Splitting allows you to turn one clip into two or more clips by splitting them apart.
- Adjusting allows you to fix brightnesss, change contrast and temperature, adjust highlights and shadows, and so on.
- With filters you can change the colors of your video by applying ready-made color-grading to them.
- Cropping & Rotation allow you to resize and straighten the video as well as change its aspect ratio.
- Text & Titles allow you to add text overlays to make your video clearer and more aesthetically pleasing.
- With music & sound effects you can add background music, voiceover or various effects.
Second, there are actually a few apps that are beginner-friendly, offer basic video editing tools and can be used on iPhone for free. With their help, you will be able to create some beautiful and engaging videos.
Video-editing can be intimidating and complicated, but with the right app, it doesn’t have to be. In this article, you will be introduced to three user-friendly apps that can be used for free. There are also step-by step instructions on how to edit a video on an iPhone using each of these apps.
Let’s dive in!
How To Edit a Video on iPhone Using Photos App
It may come as a surprise, but you can actually use the built-in Photos app for video editing. Yep, iPhone users can make some minor changes to their videos without any third-party apps.
You need to do the following:
- Open Photos app and select the video you want to edit.
- Do you see the Adjustment button at the bottom? Tap on it to enable editing.
- If you want to trim your video, tap on the Video button, then drag the yellow handles to change the length of your video. You can drag them on both ends, if necessary. Tap on Play to preview the changes.
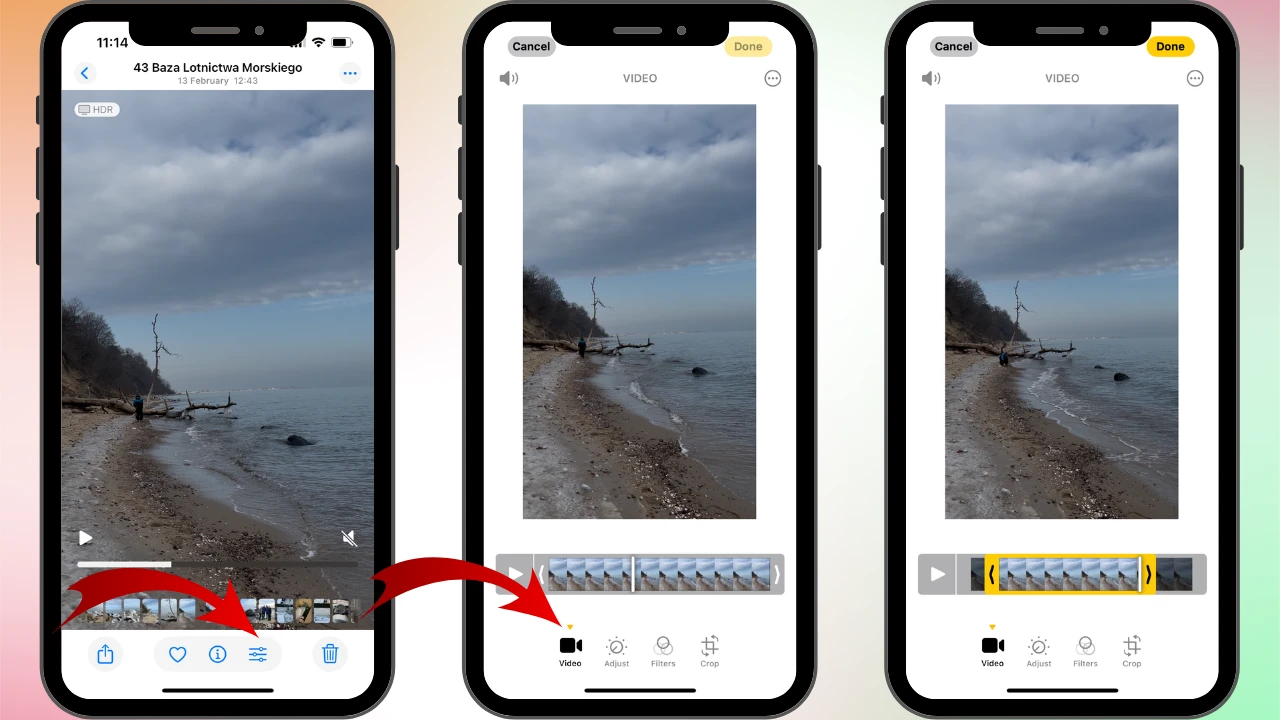
- The Adjust button allows you to make changes to the brightness, contrast, saturation and temperature of your video. You can lift the shadows and darken the highlights. To put it simply, in this section you can make some changes to how your video looks.
- If you want to change the colors in your video even more, consider applying a filter from the Filters section.
- Finally, in the Crop section you can do freehand cropping or crop your video to a certain aspect ratio as well as flip or rotate it if necessary.
- Are you done with editing? Tap on Done to apply all the changes. The Photos App allows you to save your edited video as a new clip or overwrite the original.
Pros & Cons of Editing Videos in the iPhone’s Photos App
Pros:
- Built-in & Free – Since it comes pre-installed on all iPhones, you won’t have to install any third-party apps.
- User-Friendly Interface – The app is pretty straightforward. It’s the perfect choice if you’re a total beginner in video editing.
- Basic Editing Tools – It has everything you need for some basic video editing. You can trim, rotate, adjust brightness and contrast as well as add filters.
- Non-Destructive Editing – You can revert to the original video at any point.
- Fast and Convenient – It’s great for making some quick edits, and the exporting process will take only a few seconds.
- Optimized for iPhone – Since it’s a native app, you can rest assured that it will work smoothly and without any lagging. It’s also super-easy to sync your files in Photos with your iCloud.
Cons:
- Limited Features – It’s not suitable for more advanced video editing since you won’t find any multi-layer editing, special effects, text overlay and some other tools.
- No Music or Audio – You can’t add background music, voiceovers, or adjust audio levels.
- Not a Lot of Filters – The selection of filters is much more limited compared to third-party apps.
- No Multi-Clip Editing – It’s not possible to use this app for merging multiple clips into one because you can edit only one video at a time.
- No Animations – You won’t be able to add any kind of animations.
To sum up, if you’re new to video editing on iPhone and only need to make some small changes, then the Photos app can be a good choice for you. But if you need a broader selection of tools and features, then you should look for something else.
How To Edit a Video on iPhone Using iMovie
iMovie is a video editing app developed by Apple, so it can be used on iPhones, iPads and Macs for free. Please note, though, that it doesn’t always come pre-installed. So, if you can’t find it on your Apple device, you might need to download it from the App Store first.
iMovie has an uncomplicated interface and a nice toolkit of powerful tools that can help you create professional-looking videos even if you have no prior experience in video editing.
Let’s take a look at how you can edit a video on iPhone using iMovie:
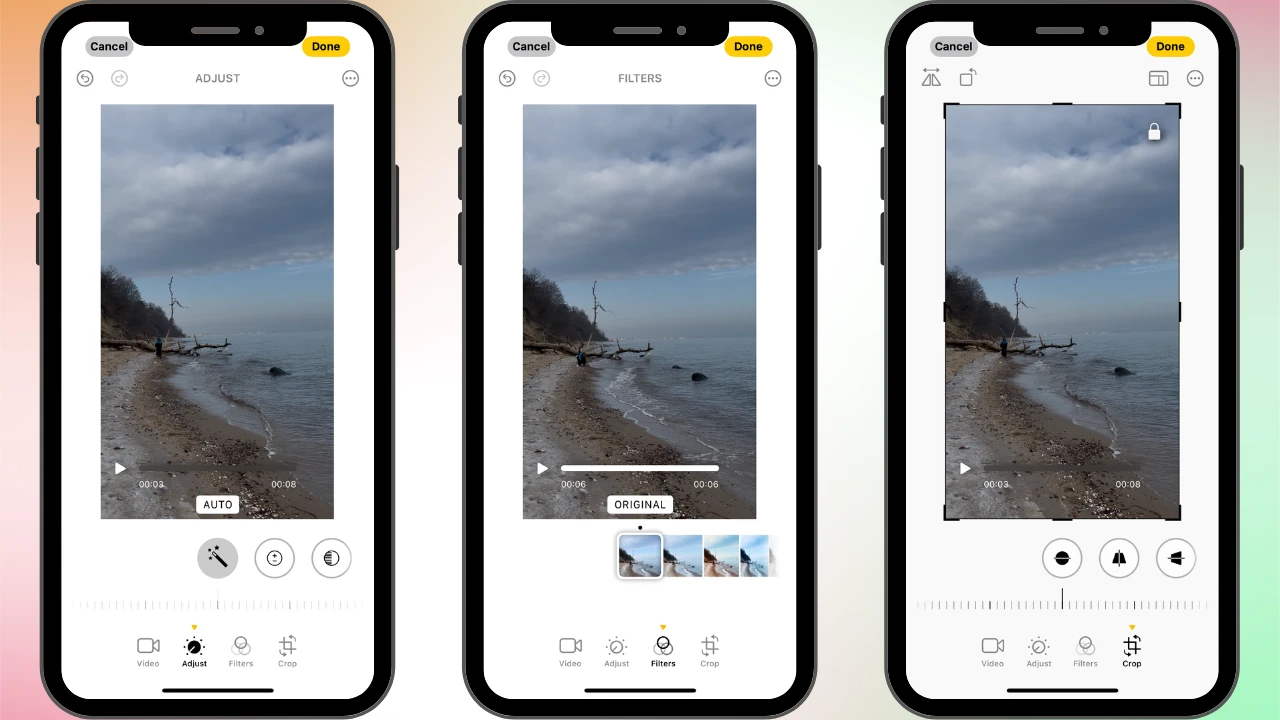
- Download iMovie from the App Store then install it (if you don’t have it on your device yet).
- Open the app and tap on Movie > Media > Video, then select the video you want to edit. Right at this point, it’s possible to trim your video. That’s right, you don’t have to import the whole video, you can adjust its duration, then import the trimmed version.
- When you selected all the clips and adjusted their duration, if necessary, tap on Create Movie.
- Once your video is imported in iMovie, you can slow down or speed it up 2x times, make the audio louder or quieter, add some color grading and overlay text. Moreover, there’s a selection of different text styles, and your text can be visible during the entire video or just at the beginning. You can also trim your video here if you didn’t do it before importing.
- When you’re ready to save the result, tap on Done.
Pros and Cons of Editing Videos in iMovie
Pros:
- free for Apple users;
- uncomplicated interface;
- offers a good mix of basic and more advanced tools;
- nice selection of filters and text styles;
- you can merge clips and add transitions between them.
- no watermarks.
Cons:
- the overall selection of tools and features is still pretty limited;
- limited support for different formats. You might need to convert your files before editing them.
- the choice of export file formats is also limited.
Compared to the Photos app, the selection of video editing capabilities on iPhone is broader in iMovie, but generally speaking, it’s still rather basic. In other words, this app is good for beginners and people who need to make some quick and simple edits. But it’s definitely NOT a good choice for intermediate and advanced users.
How To Edit a Video on iPhone Using CapCut
CapCut is an all-in-one video editing app that has a free version. It was developed by Bytedance, the same company that created TikTok. This app is available for iOS and Android and has a desktop version for Windows and Mac.
CapCut offers a great mix of intuitive interface and an incredibly broad selection of editing tools and features, so it can easily be used by beginners and amateurs. Professionals can benefit greatly from using this app, as well.
Advantages of CapCut compared to Photos app and iMovie:
- You can merge multiple clips and add transitions between them. CapCut offers an amazing selection of transitions.
- It’s possible to add text and image overlays, stickers, filters, various effects and animations. You will be truly amazed by the choice of different options here.
- This app offers features like auto-captioning, background removal, motion-tracking, and AI-enhanced video upscaling.
- There’s also a library of soundtracks and sound effects that are royalty-free.
- You can even make AI-generated voiceovers and subtitles in multiple languages.
In CapCut you can split video clips, use keyframes, use AI-powered tools, and so much more. It can truly take your video editing to the next level and help you produce breathtaking videos.
On top of that, it’s a perfect choice for creating engaging, short form video content for TikTok, Instagram Reels and some other social media platforms.
How to edit a video on iPhone using CapCut:
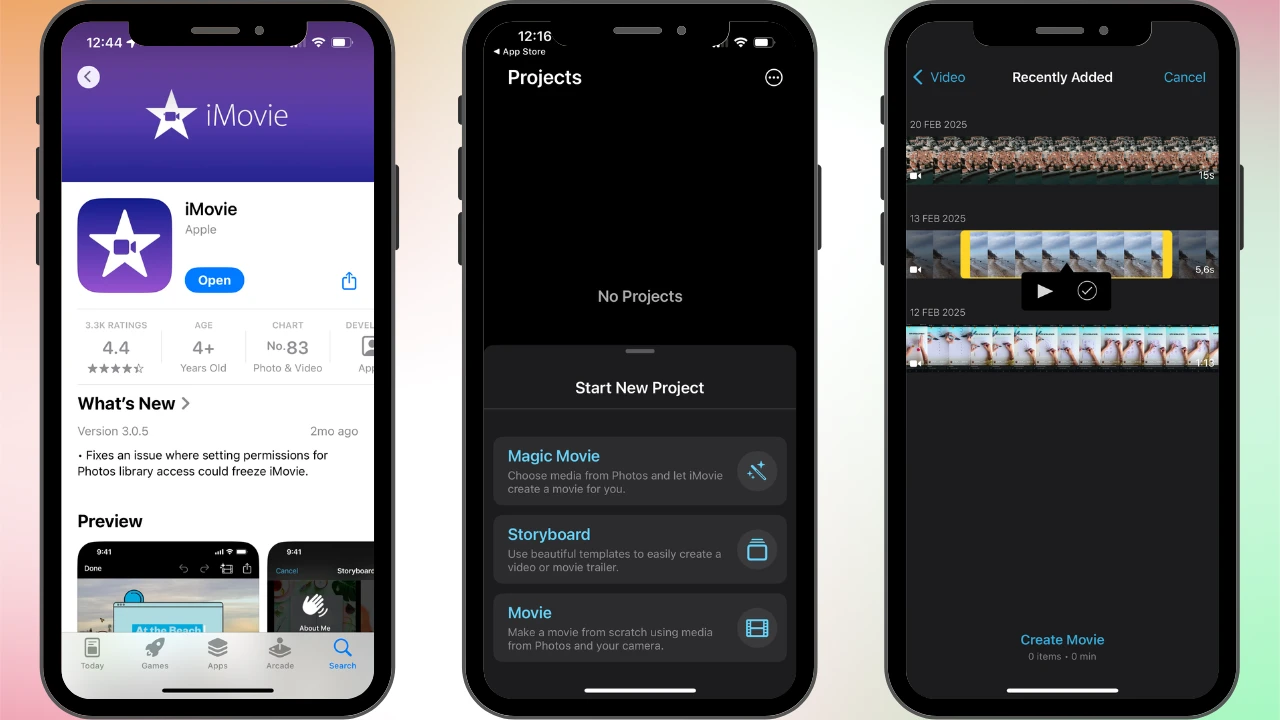
- Download CapCut from the App Store and install it.
- Open the app and tap on “New Project”.
- Select the video(s) you want to edit, then tap on Add. Please note that you can trim your videos before importing them. To do this, open the necessary video, tap on Crop, then adjust its duration.
- After you click on Add, you will see your video(s) on the timeline. Here you will also be able to access different tools and features for editing – they are positioned at the bottom of the screen. Keep in mind that the selection of tools can change depending on whether your video file is selected on the timeline or not. This is also true for other elements. For instance, if your video has an audio, you will be able to see all the tools for audio editing by selecting the audio on the timeline.
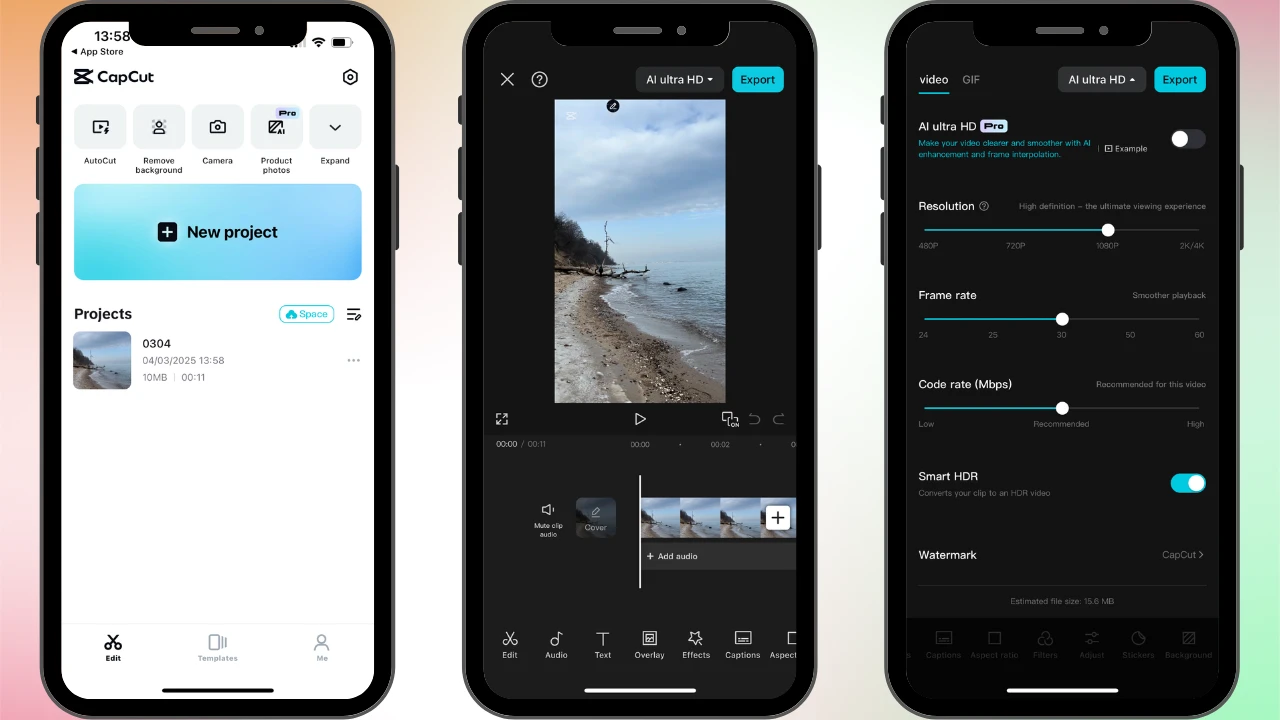
Here is a short overview of what you can do in CapCut:
- Edit – this section includes all the necessary video editing tools –splitting, changing the speed of video, transforming, re-framing, duplicating, adjusting and so on.
- Audio – here you can add music, sound effects, or voiceovers to your video.
- Text – this section can be used to insert customizable titles, subtitles, and animated text as well as drawing on your video.
- Overlay – here you can add an image or a video as an overlay.
- Effects – this section offers a great selection of video and body effects. You can add a blur, a glitch, an explosion, laser eyes and so on. It can help you make your video more eye-catching.
- Captions – here you can generate subtitles automatically or import already created captions. It’s also possible to enter captions manually.
- Aspect ratio – this section allows you to change the aspect ratio of your video and resize it so that it fits into the new aspect ratio. This section is useful if you want to re-purpose your content for different social media platforms.
- Filters – here you can add a ready-made filter to achieve a certain look and mood in your video.
- Adjust – this section allows you to adjust brightness, contrast, temperature, saturation, sharpness and so on.
- Stickers – here you can add funny emojis, GIFs, and animated stickers to your clips.
- Background – in this section it’s possible to blur the background in your video or replace it with an image or a solid color.
As you can imagine, with this broad selection of tools and features, you can really elevate your video content.
Are you ready to export your video? Tap on the 1080p button at the top. Here you can pick the necessary resolution, frame rate and code rate. Then tap the Export button and wait for your video to get exported.
After the exporting is done, you can easily share your video straight to TikTok, Instagram or YouTube.
CapCut turns video editing into a truly fun creative process even if you are not a pro at video editing.
That’s not all! It’s not just for video editing on iPhone — CapCut also offers a great selection of photo editing tools and features. You can crop image, resize photo, add text to photo, blur part of a picture, and more. With CapCut you can create professional-looking images or decorate them with funny stickers – either way, you can prep and elevate your photo content for social media, as well. Just make sure to tap on Photo Editor instead of the New Project on CapCut’s dashboard.
Always Protect Your Videos!
Keep in mind that posting videos on social media always comes with certain risks. There’s always a chance that the content that you’ve spent so much time and energy creating can be copied and shared without your permission or giving you any credit.
That’s right, someone can easily pass your video as their own. Of course, it doesn’t mean that you shouldn’t share your beautiful works with the world. All you need to do is add a watermark to your videos. This way, people will know that you’re the author of the content no matter where they see it. It’s a simple, yet effective way to protect your content as well as promote your brand.
Watermarking videos is actually super easy. It can be done within just a few seconds and without paying a cent. For instance, you can do this in Watermarkly mobile app.
To Sum Up
You don’t need to spend lots of time and money on mastering advanced video editing software. There’s no need to purchase lots of expensive equipment, either. In fact, you can edit videos on an iPhone pretty easily using some native apps like Photos app or iMovie. Both of them offer basic tools that should be enough for making some quick edits.
However, if their toolkits are too limited for you, you can make use of CapCut’s free version. It’s super easy to get creative with its amazing selection of filters, animations, transitions, and other tools and features.
If you are not sure what to choose, you should try out all the apps mentioned in this guide. Only by actually using them, you will be able to determine which one is the best choice for you.
Learn More About Editing on iPhone
How Watermark Photos on iPhone
How to Crop a Picture on iPhone
How to Add Text to Photo on iPhone
How to Reduce Photo File Size on iPhone