
How to Crop Portraits to Improve Them
by ![]() Lina Thorne • Updated · Posted in Photo Editing
Lina Thorne • Updated · Posted in Photo Editing
Some portrait photographers often overlook the importance of image cropping. Surely, such things as makeup, hair, clothing, facial expression of your subject, the surroundings and the light are also important. Each of these elements play its own key role in the overall shot. However, cropping is quite a powerful tool that you can use to improve your images dramatically.
Cropping is easy. It can take only a couple of minutes. But if you do it right, you can turn an average photo into a stunning masterpiece.
As you might have guessed, grabbing a crop tool and getting rid of a tiny sliver of an image won’t be enough in the vast majority of cases. Cropping portraits correctly is a skill that you need to develop. What you also require is to learn the rules of composition and visual storytelling.
In this blog post you will find six valuable tips on how to crop portraits that will help you understand the best ways to crop photos to improve them. By implementing these tips, you can take your images to the next level, get more likes and attract new clients. Let’s dive in!
1. Frame Portraits in Camera
This goes without saying but try to make the most out of your shoot while you are on location. What this means is taking photos from different angles and experimenting with various types of framing. Don’t just take a couple of photos of one pose and then move on to the next. The wider the variety of images that you take, the higher your chances of creating a masterpiece.
Framing is something that can have a massive impact on the entire mood of the scene. It can help you get rid of distractions and focus all the attention on what’s important.
For instance, if you happen to have a 24-105 zoom lens, you can try shooting your subject at 24mm or 35mm to include more of the surroundings. Then you can zoom in and take a picture at 85mm or 105mm. Your portrait can include the subject’s entire body, just the head or even just a part of the face if you zoom in really closely.
Another reason to frame your portraits properly in camera is the background. Different focal lengths provide different depth of field. It means that if you shoot at 35mm and at 85mm – both at f3.5 – you will get less of the background blur in the first case and more of the background blur in the second one. This is something that you won’t be able to achieve with cropping in post-production.
The way you decide to frame your shot is of immense importance. But no matter what you decide, there are 4 main ways to frame a portrait.
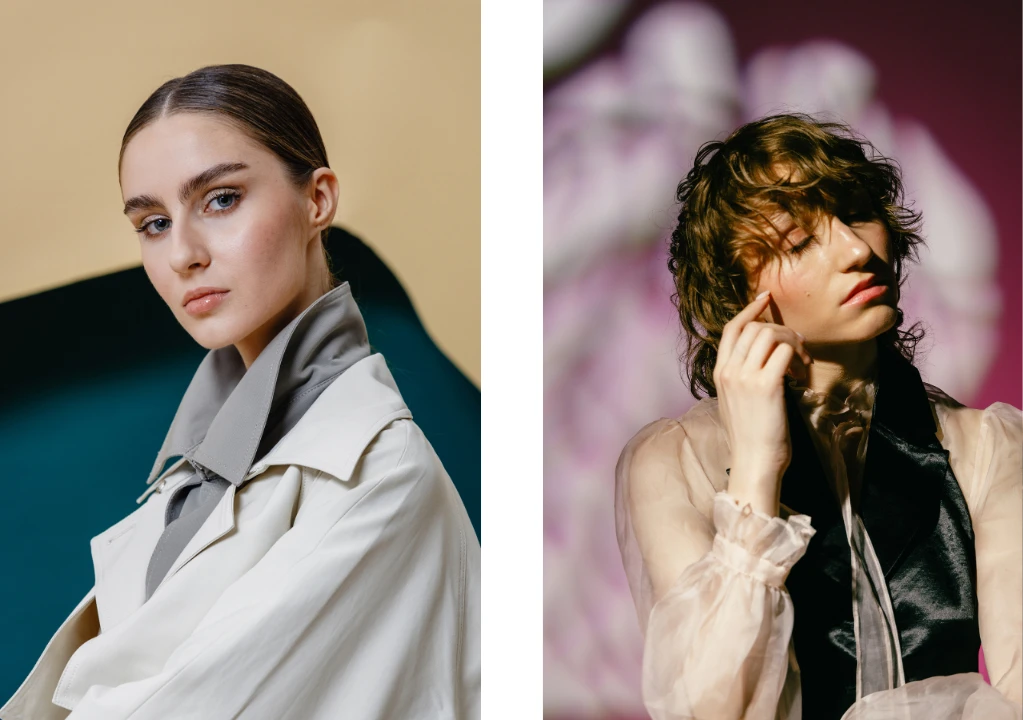
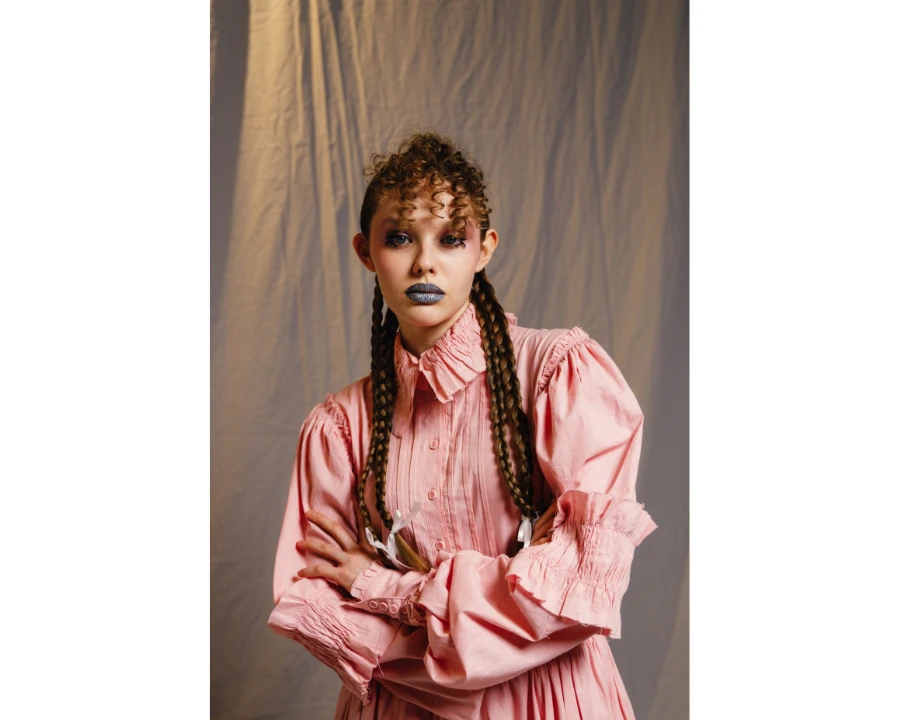
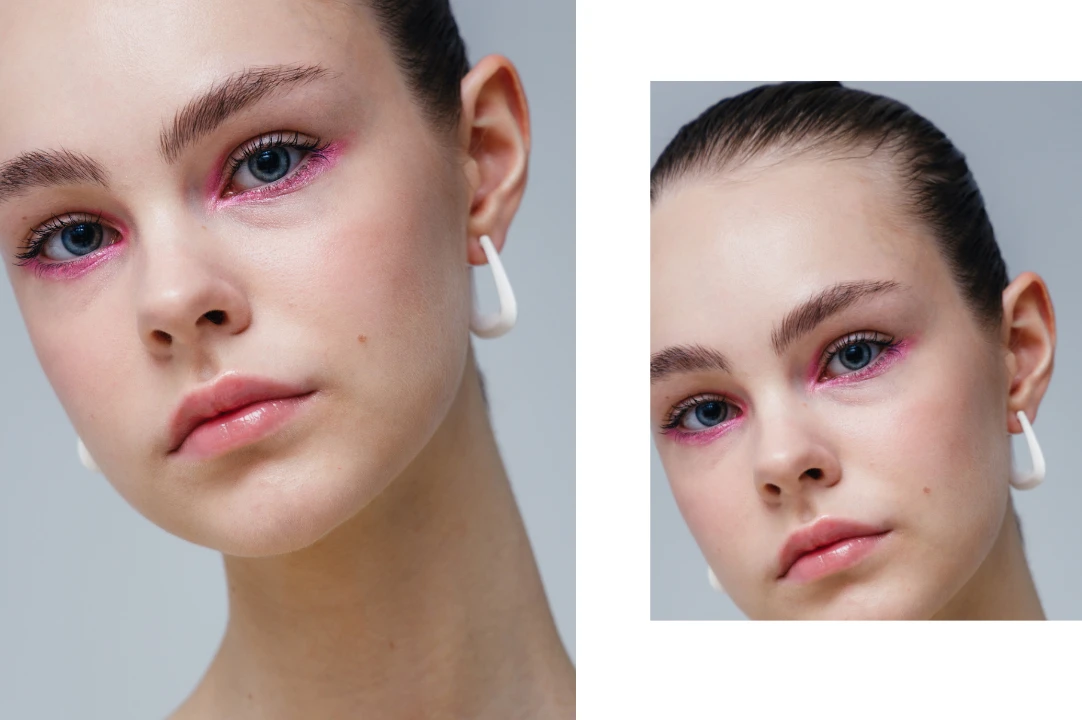
Close-up
To make your portraits more impactful, you can fill nearly your entire frame with your subject’s face. In other words, you can really zoom in on the face. This way you will surely eliminate all the distractions and put all the focus on your subject.
Close-ups can be quite powerful and eye-catching, if your subject has the right facial expression.
For instance, it can be dramatically fierce and stoic or full of pain and anger. It can convey a meaningful message and make a truly lasting impression. Close-ups tend to be magnets for attention on social media.
There are various ways that you can shoot a close-up. You can really zoom in on the face or even just a part of it – for example, you can take a picture of half of a face or just the eye. This is great for beauty shots, when you need to showcase the makeup. Alternatively, you can leave some empty space around your subject’s head. Keep in mind, though, that you shouldn’t crop at your subject’s chin. Otherwise, it might make the entire portrait look awkward and somewhat distorted.
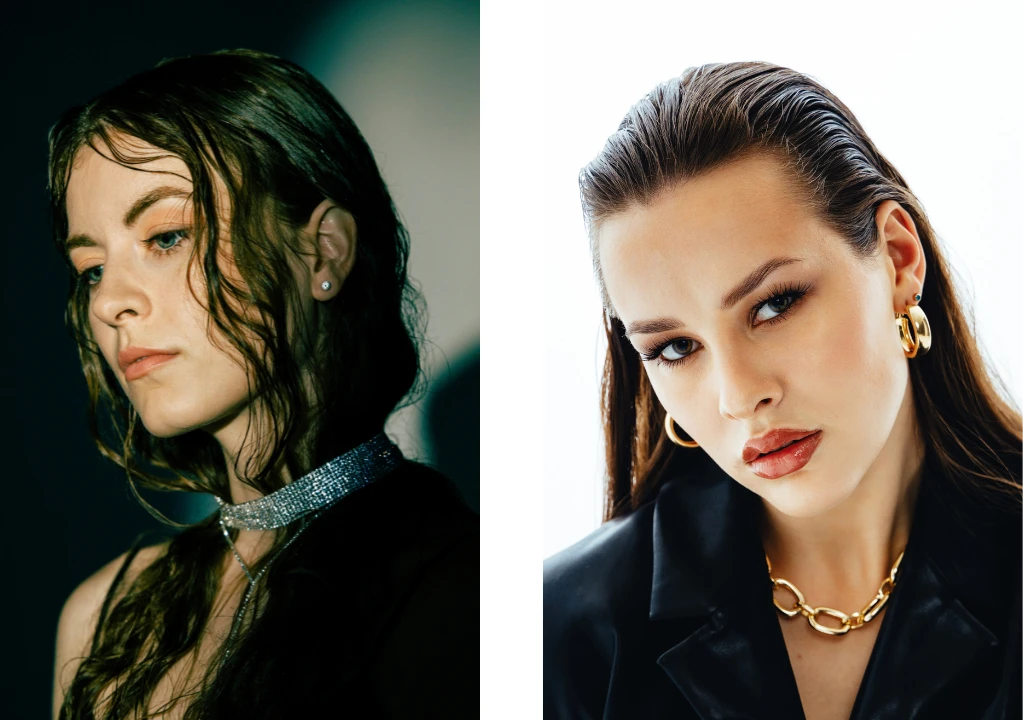
Bust Shot
In a bust shot, your subject is shown from the head to the top of the torso. It’s also necessary to have some negative space around your subject, so it wouldn’t feel like they are jammed into your frame. This framing is often considered more traditional and formal; partially due to the associations with the bust sculptures. It feels a little less personal than a close-up, but with the right background and facial expression, this type of a portrait can be powerful, as well.
By including some of the surroundings and the top of the torso, you provide a little more context, more details about your subject’s personality. This allows viewers to get a better understanding of who the subject is. A bust shot still mostly focuses on the subject’s face, so what’s crucial here is the facial expression. You don’t have to worry about posing and clothing too much. But you do need to make sure that the emotions of your subject are easily readable.
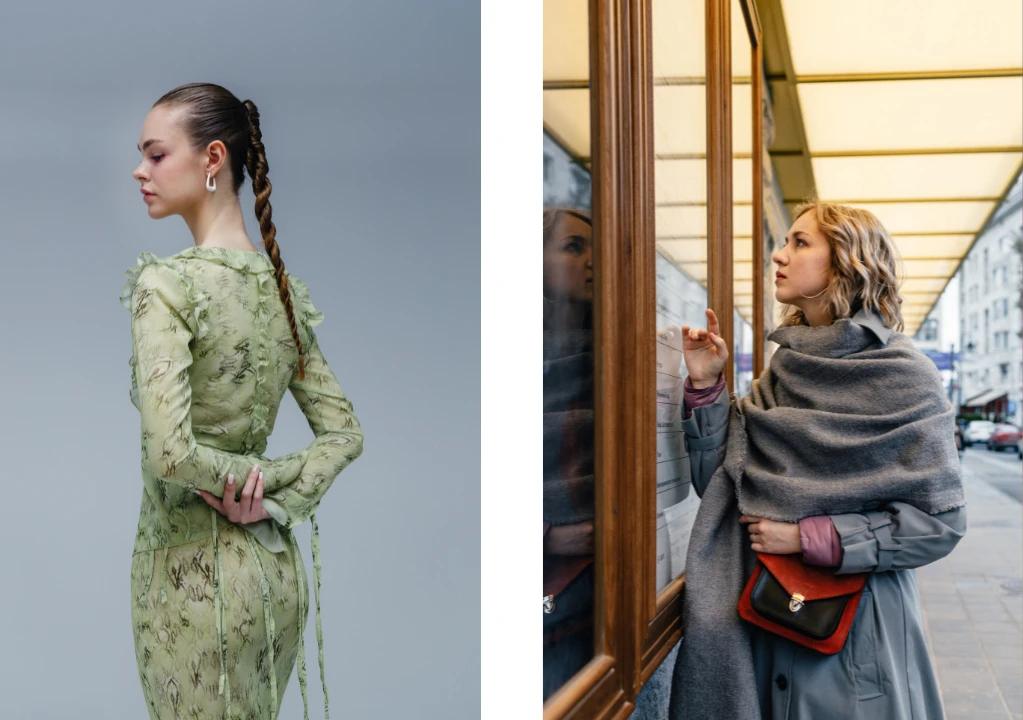
Three-Quarter Length
Three-quarter length portraits show the subject from their head and hair to the mid-thigh. This framing provides even more information – now viewers can see more of the surroundings, what your subject is wearing, etc.
Unlike the bust shot and the close up, the focus isn’t solely on the face. Yes, you can still see the subject’s expression rather well. But if you are shooting a three-quarter length portrait, you need to pay attention to your subject’s posing as well as what’s in the background.
You need to make sure that no elements are distracting from your subject. In other words, this framing requires a bit more work because it gives much more context. Naturally, this framing can be a great choice if your subject isn’t that good at acting or comfortable with showing their real emotions in front of a camera.
Here’s a tip – if your subject looks somewhat intimidated by your equipment, ask them to look in a specific direction and not into the camera.
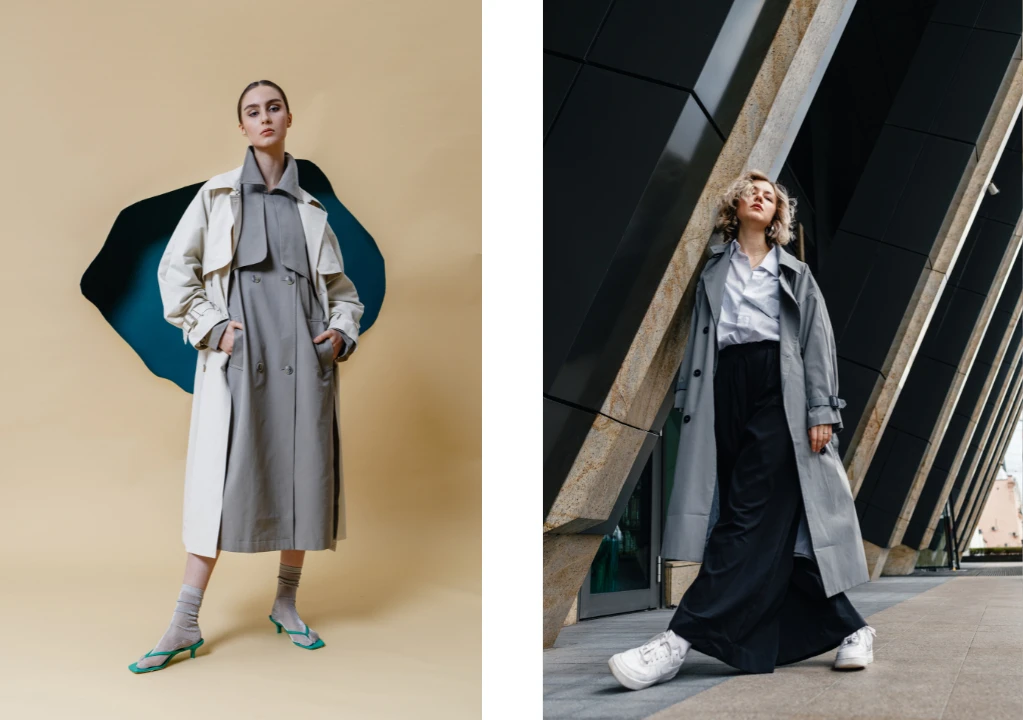
Full Length
The last option is a full-body portrait where your subject is shown from head to toe.
As you might have guessed, this framing provides the biggest amount of details and information. Here, you will surely need to implement your skills of a storyteller since you will need to pay attention to so many parts of an image.
In a full length portrait the focus is on your entire subject, which means that the hair, the makeup, the facial expression, the clothing and the pose – all need to work cohesively and harmoniously together. And don’t forget about the background! You will need to either find an unobtrusive background or figure out how you can fit your subject into the surroundings in a visually pleasing way.
When framing a full-body portrait, it’s important leave enough space around your subject’s head and feet.
You need to leave some room for your subject to breathe. Otherwise, it might look like your subject is crammed into a shot; it creates an unpleasant and unsettling feeling.
2. Avoid Cropping at the Joints
Cropping a portrait can be a challenging task, indeed – one wrong decision can turn your subject into an amputee; or just make them look alien and weird. To avoid this, you need to keep a few rules in mind.
Never let the frame cut through your subject’s joints. It’s perfectly acceptable to crop above or below the joint – in most cases it will look okay. You shouldn’t crop at the joints because then it will look like your subject’s limb was amputated. Unless this is the exact effect that you want to achieve, you should avoid this.
To achieve a visually pleasing result, it’s essential to be cautious about which parts of a body to include in or exclude from the frame. When cropping a portrait, you need to be careful with these:
- knees;
- waist;
- elbows;
- toes;
- fingers;
- ankles;
- wrists.
“Slicing through” any of these parts can make a portrait look odd and awkward.
Don’t be afraid to remove some of the surroundings and other redundant details when cropping. Make sure that the portrait doesn’t look imbalanced. Sometimes, even cropping above the joints may look a little odd. If that’s the case – crop in closer.
Ultimately, when you’re deciding how to crop a portrait, you should consider what effect you want to achieve, what impact the portrait should have on people, what emotions it should evoke. The choice of your composition should be dictated by your goals and intentions. It should be guided by the desired visual impact and the intention behind the portrait. Experimenting with different ways of cropping and framing will help you achieve great results in your portrait photography.
3. Correct Composition is the Key to Success
If your goal is to get a portrait that is balanced and visually pleasing, there are a couple of crucial things that you need to keep in mind:
- Pay attention to where the eyes of your subject are. It’s better to use the Rule of Thirds and position them along the top gridline; so they would be in the upper part of the frame. This way you will get a harmonious composition and the viewers’ attention will go straight to the eyes of your subject. The eyes are supposed to be windows to the soul – this is why they should be the focus of attention. That said, no one is stopping you from experimenting. You can try composing your shot in different ways. For instance, you can try to put the eyes of your subject right in the center. Either way, make sure that the first thing that the viewers’ notice is the eyes.
- Don’t crop at the chin. If you want a photo that shows only the face of your subject, then you shouldn’t crop right at the chin. Otherwise, the face may come across as weird and too boxy. If this isn’t the look that you want to achieve, it’s better to either make sure that the chin is in the frame and there’s a little bit of space around it or you can crop in really close. In other words, fill the entire frame with your subject’s face. The last option is quite common in the beauty photography, where all the attention should be on the makeup.
Composition is incredibly important, especially when it comes to portrait photography. With the right composition, you can guide the viewers’ attention exactly where you want it to be.
If you mess up the composition, you can make a person look alien or ugly. Therefore, being careful and precise when framing your shot is exactly how you can get a beautiful and harmonious portrait.
There are two more things you might want to do.
Firstly, it might be a good idea to look at the works of your favorite photographers. Pay attention to the way they compose their shots. What they do and what they avoid. Implement some of their techniques into your own photography to improve it. This is how you can get better at composing.
Secondly, you should experiment. Rules of composition are not set in stone. Depending on what mood you want to create or what effect you want to achieve, you can break them. Plus, by experimenting, you can discover something new and exciting.
4. Explore Different Cropping Tools
Naturally, it’s better to compose your shot in camera. But it’s not always possible. Maybe there’s no time for that. Maybe you messed up the composition during the shoot or maybe you barely even thought about it because your brain was busy paying attention to other things. But that’s okay!
There’s no need to worry if you didn’t compose the shot in camera. It’s perfectly possible to re-compose the shot after you took it. There is a broad selection of cropping tools to crop JPG, PNG, GIF and other formats that can help you with that. Try some of them and see which one is the most convenient for you. For example, here’s a user-friendly, online photo cropping app called Watermarkly. It’s pretty simple, yet incredibly effcient.
The majority of complex image editing apps offer a cropping feature. There are also online tools – like our online image cropper – that are designed solely for cropping images. What’s great about these tools is that since they don’t have a ton of different features, they tend to be quite convenient and easy to use. Our image cropper is just like that. You don’t need to be a pro at editing. In fact, you might have no experience in cropping images at all. No matter what, you’ll be able to crop a batch of images and get amazing results.
In addition to cropping, our app also offers the ability to resize images or convert them to JPG. It’s also possible to drastically reduce the file size of your images by compressing them. And you’ll be able to do all this quickly and effortlessly.
Alternatively, you can use a more advanced image editing software – if you have it. For example, you can use Adobe Lightroom. It includes a cropping tool, too. And it’s quite powerful. To use it, you need to switch to the Develop module first. Then, under the Histogram, you’ll see a small selection of tools. This is where the crop tool sits. Select it and the gridlines will appear over your image – these are the gridlines of the Rule of Thirds, which can aide you in composing your shot. Here you can rotate the entire image and straighten it automatically. With the cursor, you can make the cropping area bigger or smaller and adjust its position.
If you don’t want to use the Rule of Thirds, you can press the “O” key to go through various overlays. You will see different types of grids, golden ratio, etc. These overlays can greatly help you with composing your image, too.
5. Aspect Ratio is Also Important
Another thing that you need to pay attention to is aspect ratio; that is if you want to share your works on social media. Especially on Instagram. Digital cameras tend to shoot images with the 3:2 aspect ratio. But Instagram doesn’t allow you to post images with it. Thus, if you want to share your works there, you’ll need to crop them.
Why is aspect ratio important?
Firstly, your composition is connected with the aspect ratio. Say, you composed your shot in camera using the rule of thirds and placed the eyes in the upper third of the image. But to post this portrait on Instagram, you’ll need to change the aspect ratio as well as re-compose the image slightly.
Secondly, it’s no secret that portrait-oriented images perform better on Instagram than other aspect ratios. So if you have a horizontal image, you will need to figure out how to crop it, so it will be vertically oriented, while making sure that the composition remains to be balanced.
Here’s the list of aspect ratios that will be good for portraits on Instagram:
4:5 ratio
This is the best aspect ratio for posting portraits on Instagram. Yes, it’s only used for posts. If you crop your images using this aspect ratio, they will occupy a significant amount of space on a smartphone screen. Thus, they will attract more attention than posts with other aspect ratio. Another advantage is that, since digital cameras tend to produce images with the 2:3 aspect ratio, it’ll be easier to crop your portrait to the 4:5 aspect ratio. You won’t have to sacrifice too many details in your image.
1:1 ratio
This is another aspect ratio for a post. It can work great if you’re subject is right in the center. If your shot has a lot of symmetry, this aspect ratio can work great as well. Naturally, you will have to sacrifice more details than with the previous option. But generally speaking, it’s a decent alternative to 4:5 aspect ratio.
9:16 ratio
The previous two options were for Instagram posts. This is for Instagram Story – this platform has only one aspect ratio for a story. Thus, if you want to post your works in stories, you’ll need to crop them to this aspect ratio.
Most digital cameras offer a couple of different aspect ratio; thus you can change the aspect ratio in camera. But it’s better to keep the 2:3 aspect ratio, then crop your images later – this way you will have more freedom and room for experimentation. You’ll easily be able to crop your images to the necessary aspect ratio in post-production since digital cameras produce images of high resolution.
6. Develop Your Unique Style
With cropping, it’s possible to mess up a composition that was decent initially. It’s your job to make sure that this editing tool improves your photo instead of ruining it.
That said, it doesn’t mean that you should follow all the compositional rules diligently. You should focus on what mood you want to create, what emotions you want to evoke in your audience. If you need your photo to feel unsettling and out of balance, breaking the rules is exactly what will help you achieve it.
To stand out from the crowd, you need to develop your unique style. There should be a personal touch in your works. And how you choose to frame and crop your images can help you with that. They can be a part of your style.
Naturally, it takes time and practice to develop your own style. Don’t expect it to form in a day or two. What it also requires is a lot of experimentation. And not every experiment will give you great results. However, only by experimenting and failing you can figure out what works for you and what doesn’t. What you like and what you don’t. You won’t be able to figure this out by mere theorizing. You need to try different camera angles and compositions as well as different ways of cropping. Try cropping one image in different ways then put those side by side and see which option looks the best. Over time, you will develop a better understanding of what your photography should be like.
Experiment as much as you can. Try new things instead of sticking to tried and true. This is how you’ll improve your photography and develop your unique style.