
How to Compress Images Without Losing Quality
by ![]() Lina Thorne • Updated · Posted in Photo Editing
Lina Thorne • Updated · Posted in Photo Editing
Modern photos are huge. A single image taken on a smartphone or professional camera can easily take up several megabytes — and sometimes much more. That is not surprising: today’s devices capture photos in extremely high resolution, preserving millions of pixels and an impressive amount of visual detail.
Take a 4000 × 3000 image, for example. That is already 12 million pixels, each carrying color and tonal information. On top of that, original photos are usually saved with very little compression, which helps preserve fine textures, subtle gradients, and small details such as hair, grass, skin texture, or thin lines.
In many cases, photographers also work with RAW files. Unlike standard image formats, RAW keeps much more data from the camera sensor, giving you greater flexibility when adjusting exposure, white balance, shadows, and dynamic range during editing.
All of this is great for quality — but not for publishing online.
Large images can slow down your website, hurt the user experience, reduce conversions, and negatively affect SEO. Social media platforms and messaging apps create another problem: they often compress uploaded photos automatically, sometimes converting them to a different format in the process. The result can be visible quality loss, including blur, noise, banding, and muddy fine details.
That is why image optimization is an essential step before publishing anything online. The goal is simple: make images smaller in file size while keeping them as sharp, clear, and visually faithful as possible.
In this article, we’ll explore the key aspects of compressing images without losing quality.
Specifically, you’ll learn:
- why images lose quality during compression;
- which image format works best for preserving quality;
- practical methods for reducing file size without visible artifacts.
Let’s get into the details.
Why Do Images Lose Quality During Compression?
When an image file is too large, compression algorithms try to reduce its size by deciding which visual data is less important and can be discarded. As a result, fine details may be simplified, textures can become smoother, subtle color transitions may disappear, and visible artifacts such as blur, noise, banding, and pixelation can appear.
There are two main types of image compression:
- Lossless compression reduces file size without removing any of the original image data. This means the visual quality remains unchanged, although the reduction in file size is usually more limited.
- Lossy compression, on the other hand, achieves much smaller file sizes by permanently removing some image data. That is why compressed images can look less sharp or lose fine detail.
Quality loss becomes especially noticeable when the image is compressed too aggressively or an already compressed photo is compressed again.
Why Does Image Format Matter When You Compress an Image Without Losing Quality?
If you want to compress an image without losing quality, choosing the right file format is one of the most important decisions you can make. Each format uses a different compression method, results in a different file size, and works best for specific types of images.
For most online publishing scenarios, the choice usually comes down to three main formats: JPEG (JPG), PNG, and WebP.
JPEG (JPG)
JPEG remains one of the most practical image formats for online publishing. Its biggest advantage is the balance it offers between relatively small file sizes and good visual quality.
Although JPEG uses lossy compression, the reduction in quality is often minimal when compression is applied carefully, especially in photographs.
JPEG performs particularly well with images that contain natural lighting, complex color transitions, and fine visual detail.
That makes it a strong choice for portraits, travel photos, lifestyle images, and other photo-heavy content intended for the web.
Choose JPEG if…
- You need a strong size-to-quality balance. JPEG can reduce file size significantly without causing a dramatic drop in visual quality, which makes high-resolution images easier to store, upload, and share.
- You want broad compatibility. JPEG works across nearly all devices, browsers, platforms, and editing tools, making it one of the most universally supported image formats available.
- Fast loading speed matters. Smaller JPEG files load quickly on web pages, which helps improve both user experience and overall site performance. Also JPEG is faster to decode by visitors’ computers.
Do Not Choose JPEG if…
- You need to preserve all original image data. JPEG uses lossy compression, which means some visual information is permanently removed during compression and cannot be restored later.
- You plan to edit and resave the image multiple times. Every time a JPEG is re-edited and saved, it can lose a bit more quality, which may eventually lead to visible blur, blockiness, or other compression artifacts.
- Your image contains text, logos, screenshots, or flat-color graphics. JPEG is designed primarily for photographs and does not handle sharp edges or solid-color elements particularly well. As a result, this type of content can look soft, fuzzy, or slightly pixelated.
- You need a transparent background. JPEG does not support transparency, so it is not suitable for cut-out objects, icons, logos, or any other visuals that need to be placed on a transparent background.
- You plan to do heavy post-processing. Compared with RAW files, JPEG stores 4-16 times less image data, which gives you less flexibility when adjusting exposure, white balance, shadows, or dynamic range after the image has been captured.
- Your image includes smooth gradients that need to stay perfectly clean. Because JPEG typically uses 8-bit color depth, it can sometimes produce visible banding, where color transitions appear as stripes instead of smooth blends.
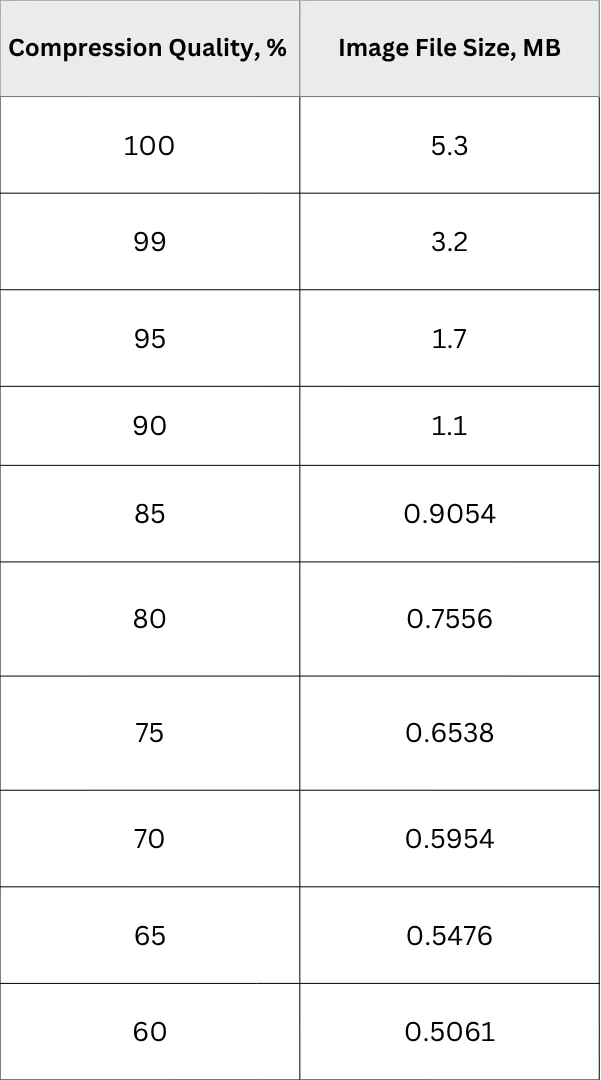
When exporting a photo from Photoshop or similar editing software, it is a good idea to test different compression quality settings. With JPEG files, visible artifacts — especially in gradients and skin tones — often begin to appear below 60% quality. In most cases, the optimal balance between smaller file size and good visual quality is around 80–88%.

Even without lowering the JPEG quality setting, converting a PSD or RAW file to JPEG can reduce file size dramatically. In some cases, a source file may become more than 40 times smaller even at 100% quality. The biggest reduction, however, is usually seen when the export quality is lowered from 100% to 90%.
File size of a 73.2 MB PSD file after exporting as JPEG at different quality settings:
PNG
PNG is a lossless image format, which means it preserves the original image data during compression.
PNG is especially useful when an image needs to be edited, saved, or compressed multiple times without quality degradation.
Choose PNG if…
- You need to preserve image quality exactly as it is. With PNG, no visual data is discarded during compression.
- You plan to edit and resave the image multiple times. PNG does not introduce generational quality loss, so repeated editing and saving will not gradually degrade the image.
- Your image contains text, diagrams, screenshots, or sharp edges. PNG is especially well suited for graphics that require crisp lines and pixel-perfect clarity. It is often one of the best choices for screenshots, interface elements, and other text-heavy images.
- You need transparency or semi-transparency. PNG supports full alpha transparency, which makes it ideal for logos, interface elements, and cut-out graphics.
- You need broad compatibility. PNG is supported across modern browsers, devices, and editing tools, so it works well in most online publishing workflows.
Do Not Choose PNG if…
- You need the smallest possible file size for a photograph. PNG files can become very large, especially when used for high-resolution photos. In most cases, they cannot be compressed nearly as efficiently as JPEG.
- You are optimizing photo-heavy web pages for speed. Because PNG files are often much heavier than JPEG or WebP, using them for large photographic images can slow down page loading and hurt overall web performance.
- Your image is a high-detail photograph with subtle tonal transitions. PNG is not usually the most practical format for this kind of content. While it preserves all data, it often produces unnecessarily large files without offering a meaningful visual advantage for online viewing.
- You are preparing files for commercial printing. PNG uses the RGB color model and does not support CMYK, which makes it a poor choice for print workflows.
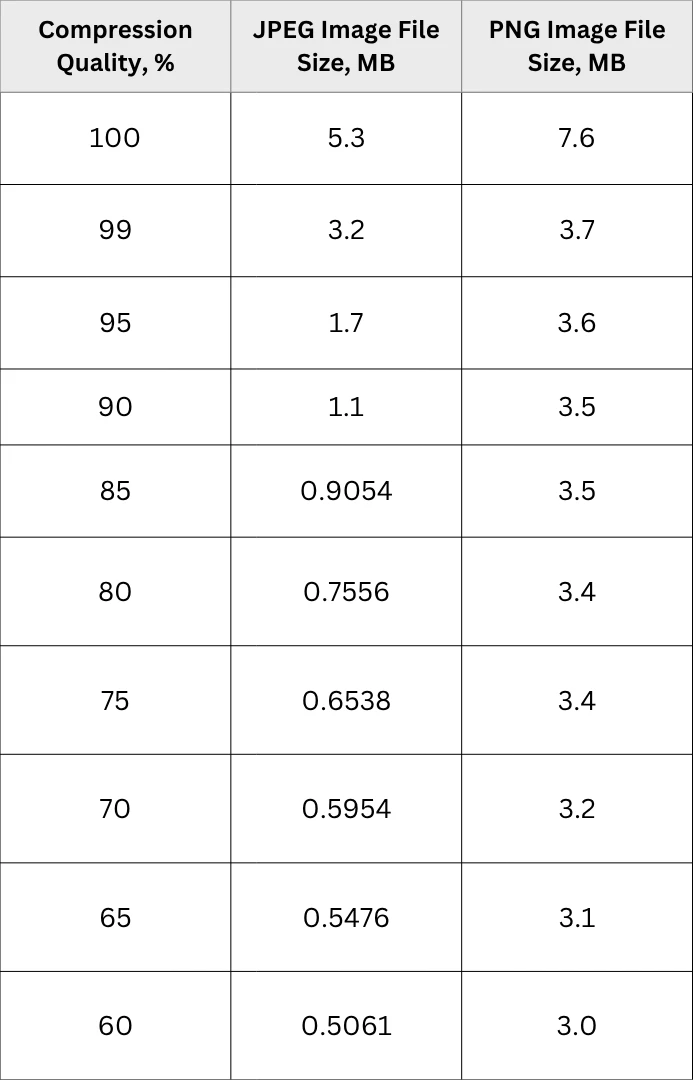
Just like JPEG, PNG can make the original file significantly smaller even when exported at 100% quality. The difference is that, with PNG, adjusting the compression settings further usually results in only minor file size reductions.
File size of a 73.2 MB PSD file after exporting as JPEG and PNG at different quality settings:
WebP
WebP is an image format introduced by Google in 2010 as a modern alternative to both JPEG and PNG. It combines several of the key advantages of these older formats: like PNG, it supports lossless compression and alpha transparency, and like JPEG, it also supports lossy compression. At the same time, WebP files are often significantly smaller than both JPEG and PNG images at a similar visual quality.
One of WebP’s main strengths is its more advanced compression technology.
WebP can reduce file size substantially without causing a noticeable drop in image quality, which makes it especially useful for online publishing.
File size of a 73.2 MB PSD file after exporting as JPEG, PNG and WebP at different quality settings:

WebP also handles colors, gradients, and fine detail very well, which makes it suitable for a wide range of visuals, including photographs, web graphics, and text-based images. In many cases, WebP can deliver better compression efficiency than older formats while preserving strong overall image quality.
Choose WebP if…
- You want the smallest possible file size without a noticeable drop in quality. WebP often produces lighter files than JPEG and PNG while maintaining a very similar visual result.
- You are optimizing images for web performance. Smaller files load faster, which helps improve user experience, page speed, and overall website performance — especially on mobile devices and slower internet connections.
- You need support for both transparency and efficient compression. WebP supports alpha transparency, making it suitable for logos, overlays, icons, and other graphics that need transparent backgrounds.
- You want one flexible format for different types of visual content. WebP works well with photographs, web graphics, illustrations, and even text-heavy images, which makes it a practical all-in-one solution for many online use cases.
- You need support for animation. Unlike JPEG and PNG, WebP can also support animated images, which makes it a useful alternative to GIF in some situations.
Do Not Choose WebP if…
- You need maximum compatibility across all tools and platforms. Although WebP is widely supported in modern browsers and many apps, it is still not as universally compatible as JPEG or PNG in every workflow.
- You work with software that may not fully support WebP. Before choosing this format, it is worth making sure that the tools, platforms, or systems you rely on can open, edit, and export WebP files without issues.
How to Compress Images Without Losing Quality. Practical Tips
If you want to compress an image without losing quality, choosing the right format is only the first step. If your files are still too large after conversion to JPEG or PNG, there are several additional ways to reduce file size while preserving the highest possible visual quality.
Convert PNG to Lossless WebP
This method works best only if your original image is saved in a lossless format such as PNG. In that case, converting it to a lossless WebP file can reduce the file size by more than half without any visible loss of quality.
Here is the result produced by Watermarkly’s WebP Converter:
Convert PNG to JPEG
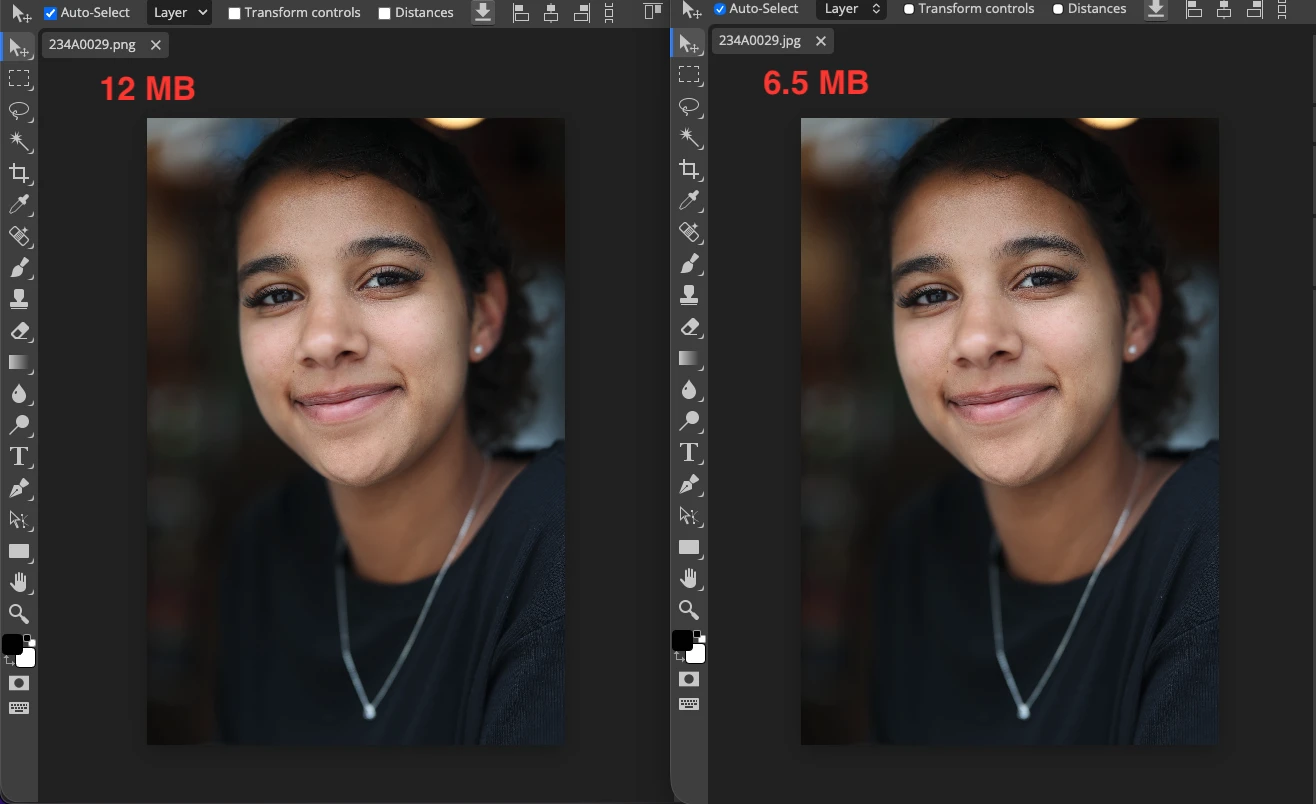
If you do not plan to edit your image further, add a watermark or text, and the image does not contain a transparent background, simply converting it from PNG to JPEG can significantly reduce file size while keeping the visual quality at a very good level.
Here is the result produced by Watermarkly’s Convert to JPG tool when the “Maximum Quality” option is selected:
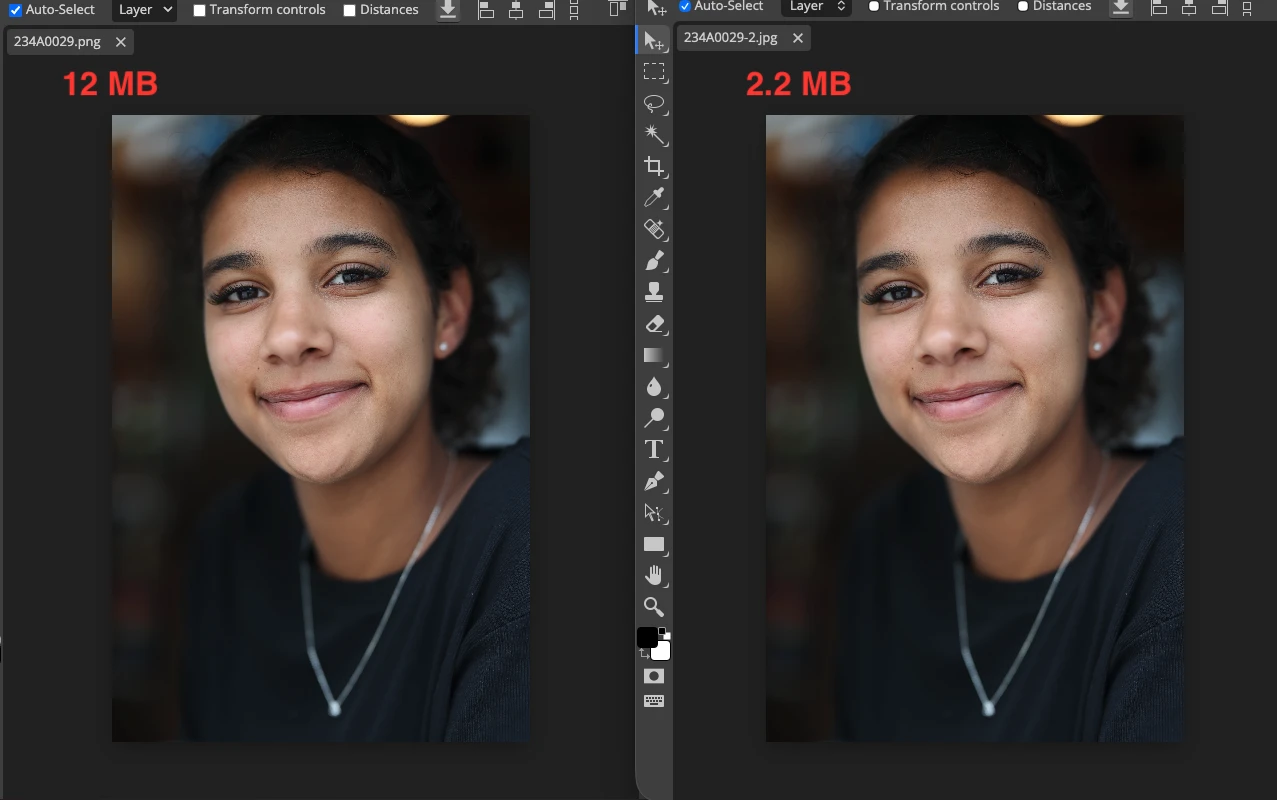
Here is the result produced by Watermarkly’s Convert to JPG tool when the “Standard Quality” option is selected:
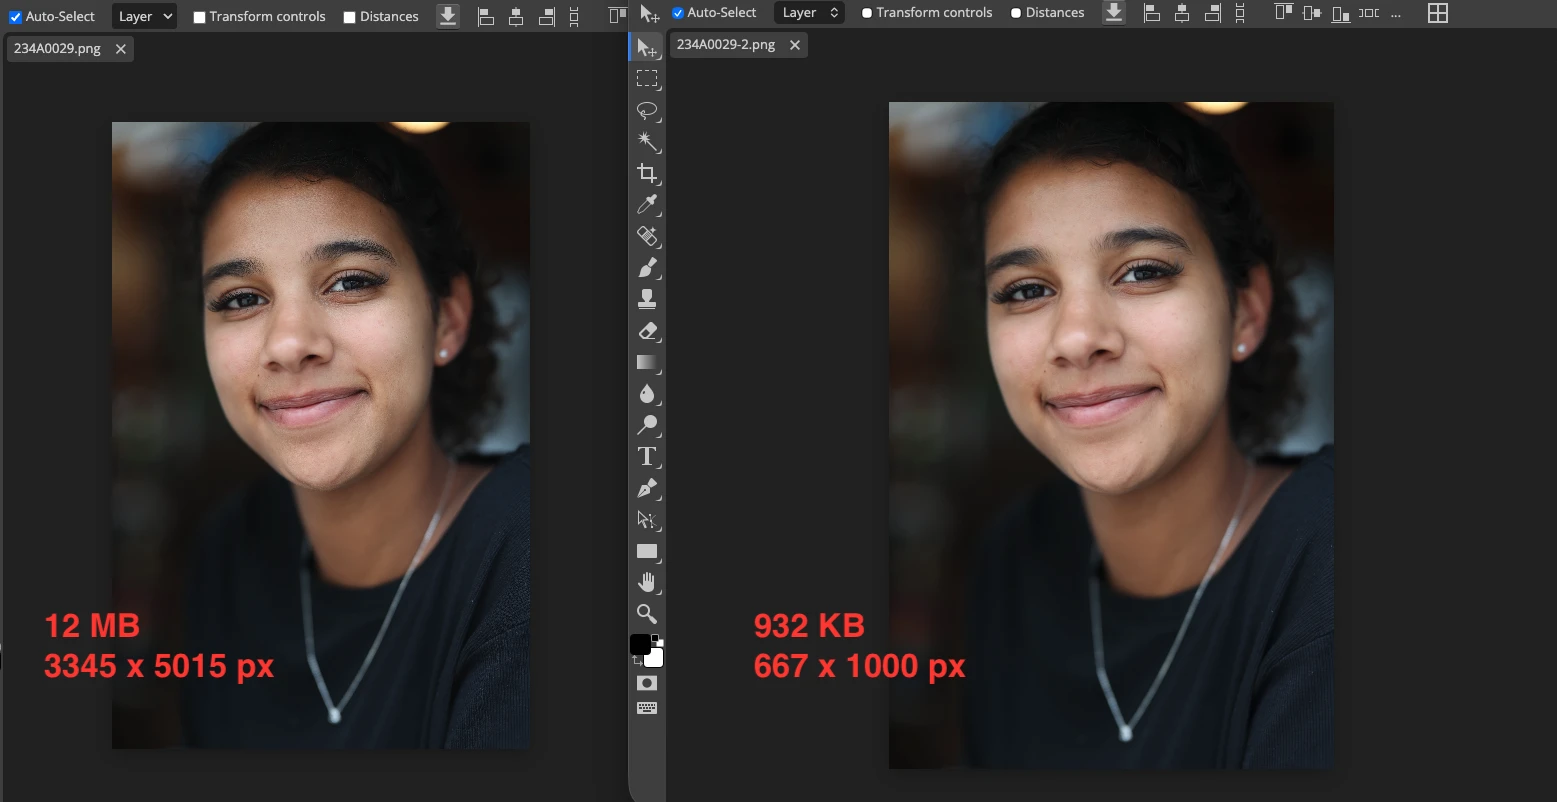
Resize Images to Match the Required Dimensions
Reducing an image’s pixel dimensions is one of the most effective ways to lower file size and prepare it for proper display on websites and social media platforms. It is important to remember that every platform has its own recommended image dimensions based on where and how the image will be displayed.
For example, if most of your audience uses mobile devices, there is little reason to make them load an image that is 1600 × 900 px when 800 × 600 px would be more than enough.
If you run a blog, it makes sense to match image width to the maximum width of your content area.
If you publish on social media, it is best to resize images according to the recommended dimensions that each platform provides for different post types.
Resizing images in advance solves two important problems at once. First, it reduces file size without causing a significant drop in visual quality. Second, it helps you upload an image that is already close to the platform’s target dimensions and resolution, which can reduce the risk of additional aggressive compression on the platform’s side.
Leanr more - How to Resize an Image Without Losing Quality
Choose the Right Compression Method
If you want to compress an image without losing quality, choose a tool that lets you control compression settings instead of applying aggressive optimization by default. In paid software, this can be done in apps such as Photoshop or Lightroom, where you can adjust the quality level on a scale from 0 to 100%. Among free tools, you can use Watermarkly’s Image Compressor, which offers several compression options, including Better Quality.
Even if the exact compression algorithms vary from one app to another, the ability to choose compression settings gives you far more control over the final image. In practice, this is one of the most effective ways to reduce file size without introducing noticeable visual artifacts.
Make Compression the Final Step in Image Editing
If you plan to add text to a photo, blur faces or other elements, or adjust colors and shadows before publishing an image online, it is best to do all of that on the original high-resolution file. Compression should only be applied once the editing is fully complete.
Ideally, all changes should be made within a single app, without repeated downloading, uploading, or re-exporting between tools. Each additional step can reduce image quality, especially when working with JPEG files.
Compare Compressed Images with the Originals
Always keep the original files and make sure your image compressor does not overwrite them. This allows you to try different compression methods and compare the results visually.
Compressing images without losing quality is always a matter of finding the right balance between file size and visual quality.
Conclusion
Reducing image file size without visible quality loss is not about applying the strongest compression possible. It is about making the right decisions at every step: choosing the appropriate file format, resizing the image to the required dimensions, finishing all edits before export, and using compression settings carefully.
In most cases, there is no single format or method that works best for every image. JPEG is usually the right choice for photographs, PNG works better for graphics and images with transparency, and WebP is often the most efficient option for web publishing when compatibility is not a concern.
The key is to find the right balance between file size and visual quality. If you keep the original file, compare compressed versions, and optimize each image for its publishing platform, you can compress images without losing quality in most real-world scenarios.