
How to Compress a Video on iPhone
by ![]() Lina Thorne • Updated · Posted in Video Editing
Lina Thorne • Updated · Posted in Video Editing
These days, you can easily record high-quality videos using your iPhone. This is great, of course. But the higher the resolution, the larger your file will be. If you keep recording videos in the highest possible quality, you will run out of free memory space pretty quickly. Moreover, if you need to send a large-sized file of high-resolution over an email or a messaging app, you will surely run into some issues.
Fortunately, there’s a solution – you can compress your videos. There’s no need for you to master any complex software. In fact, you can easily do this within just a couple of minutes or even less. Knowing how to compress a video on your iPhone will allow you to free up some memory space as well as share your video files with your colleagues and friends effortlessly.
In this guide you will find several methods for compressing videos on an iPhone without paying a cent.
Before we begin, though, there a couple of things that you should know.
First, some quality loss is inevitable. However, with the right settings, the changes will be barely noticeable, so your videos will still look good.
Second, the contents of the original video will remain intact. Making your video shorter or removing the audio track can help with decreasing the file size. But that’s not what you will need to do. This guide will teach you how to compress a video on an iPhone without making changes to its actual contents.
Reduce Video File Size Beforehand
Are you merely planning to shoot videos on your iPhones? You haven’t created anything yet? In that case, you might need to check the video recording settings. There’s a chance that the highest possible quality is currently set there, which is something that you might not need. So, you can change the settings and, thus, the size of videos you will create will be much smaller.
How can you check this? Go to Settings > Camera > Record Video.
In the Record Video settings, you can set the resolution and frame rate for your videos. Both of them impact video quality and file size.
Let’s take a closer look at the available options:
Resolution:
- 720p HD – this is the lowest quality offered by iPhone. It produces videos of a smaller size and decent quality. If you don’t need super sharp videos, you might consider going for this option.
- 1080p HD – iPhone tends to record videos in this resolution by default. It offers a great balance between video quality and manageable file size.
- 4K – the highest possible quality that iPhone can offer. Naturally, videos in this resolution will look incredibly clear and sharp, but their file size will also be quite large.
Frame Rate:
- 24 fps – Cinematic look. Motion looks natural and it’s commonly used in movies.
- 30 fps – Smooth playback. This used to be the standard for television. This is also the default frame rate in iPhone.
- 60 fps – commonly used for slow motion. It can also be good for sports or recorded video game footage. Creates really smooth motion.
FPS stands for frames per second.
Please note that by default iPhone records videos with 1080p HD at 30 fps.
HDR Video (High Dynamic Range)
You can turn on the HDR mode. HDR captures more detail in shadows and highlights, so it can help you achieve better contrast and color accuracy.
Also, note that there are two formats available for your iPhone videos:
- High Efficiency (HEVC / H.265) – it’s a great choice if you need small file size and good video quality, yet not all devices and platforms support this format.
- Most Compatible (H.264) – It produces files of a larger size than HEVC. The video quality is also excellent. But this format is broadly supported by different devices and platforms.
A minute of iPhone video will be approximately:
- 720p HD at 30 fps – 45 MB
- 1080p HD at 30 fps – 65 MB
- 1080p HD at 60 fps – 100 MB
- 4K at 24 fps – 150 MB
- 4K at 30 fps – 190 MB
- 4K at 60 fps – 440 MB
By choosing the right combination of all these options, you might not even need to compress your videos on iPhone after you record them. 1080p at 30 fps is the perfect choice for everyday use – your videos will be of good quality yet pretty manageable file size.
If you want to capture all the details in the highest possible quality – maybe you’re using your iPhone to shoot a movie – then definitely go for 4K at 24 fps. This will give you the cinematic look, as well. Surely, you will end up with quite large video files. But if some of them need to be shared, you can simply compress your videos on iPhone.
How to Compress a Video on iPhone for Free
Unfortunately, you cannot use iPhone’s Photos app to compress videos. There’s no native app for compressing videos, either. Fortunately, it doesn’t mean that you will need to pay to reduce the size of your video files. The App Store offers plenty of free apps for video compression.
For instance, you can give a try to Compress Videos & Resize Video app.
How to Compress a Video on iPhone Using Compress Videos App
The whole process is pretty simple. Install the app on your smartphone, upload your video file, then adjust the frame rate and the video dimensions. Then tap on Compress and wait a bit. The app will show you the new file size of your video.
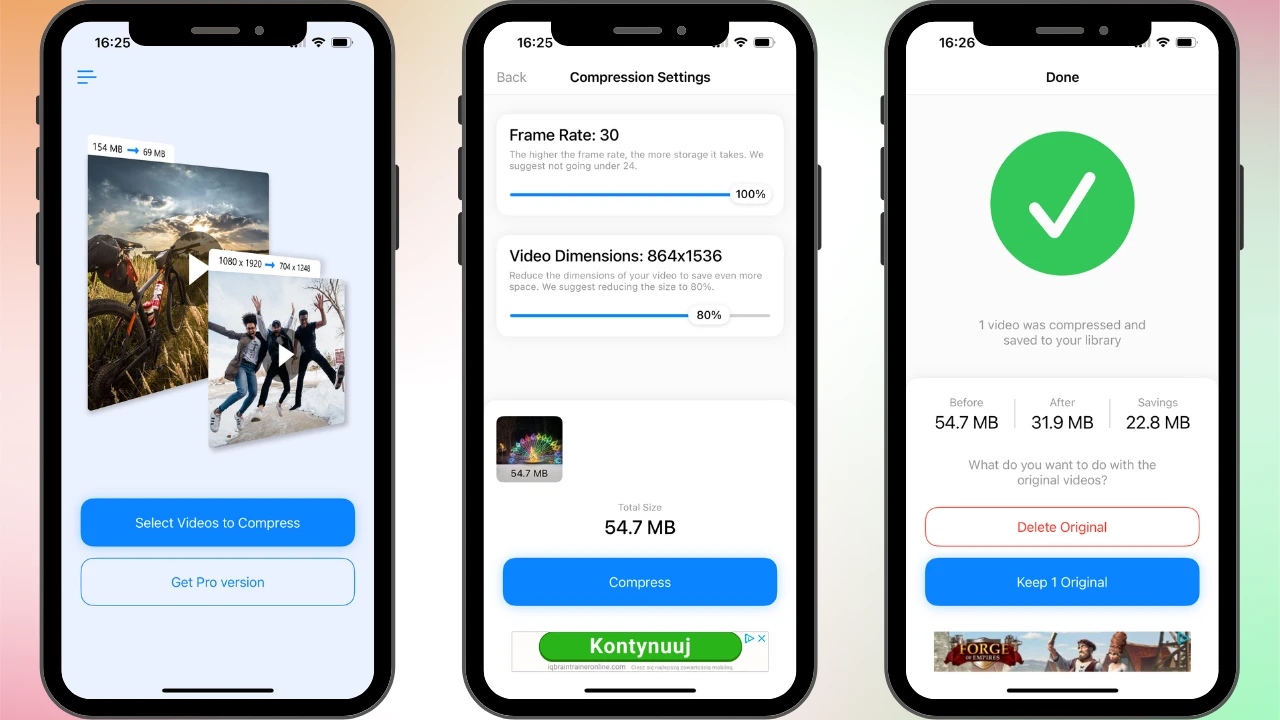
Pros:
- The app’s interface is very simple.
- You can compress one video for free (after watching an ad)
- You can keep the original file if needed (just tell the app not to overwrite it).
Cons:
- Batch processing is available only in Pro version.
- The final file size is shown only after the compression is done. There’s no preview.
How to Compress a Video on iPhone Using Video Compressor App
There’s another app that you might try. It’s called Video Compressor. This app allows you to trim and compress videos on iPhone as well as compress photos.
Once the app is installed, open it and chose either Compress Video or Compress Videos in Batches. The latter one allows you to reduce the size of multiple files in one go.
Import one or several files and tap Done in the bottom right corner.
In the free version of the app, you can pick the resolution (video size) and bit rate. When you are done with the settings, tap on the arrow button in the top right corner. Once the compression is done, you can save the compressed video to Photos or share it right away.
Pros:
- You will be able to preview the final size while you are adjusting the settings. This app gives you more control over the result.
- You can preview not only the final size, but the actual video, too! Yep, before the compression is done. This will help you to determine whether the compressed video will suit your needs. To preview the video, tap on the play button on the necessary video on the right.
- You can save your compressed videos for free without watching an ad.
- It doesn’t overwrite the original files.
Cons
- The interface with a bunch of colorful buttons and flashing ads may seem a bit confusing at first.
Here’s a Tip
Surely, the whole point of compression is to reduce the file size and free up some space. Nevertheless, it might not be a good idea to delete the original video completely. What you should do instead is to move the original video from your device to an external hard drive. This way, you will still be able to get back to the original file, if necessary, while enjoying all the extra memory space you freed up on your device.
It’s vital for you to know that it’s not possible to perfectly restore a compressed video file back to its original state. Which is why you should keep the original safe somewhere; especially if the videos are important to you.
What Are the Benefits Of Compressing a Video On an iPhone?
Compressing a video on an iPhone offers several advantages. You can:
- Free up storage space. High-resolution videos, especially if they are in 4K, tend to take up quite a lot of memory. Video compression makes the file size drastically smaller, which will help you free up some space for more photos, videos and apps.
- Share faster & easier. It will take forever to send a large video file over AirDrop. And you probably won’t be able to send it via a mail or messaging service at all, since the majority of them have a file size limit. Reduce the size of your videos by compressing them, and you will be able to share your files without any issues.
- Reduce data usage. Generally, it’s not a good idea to upload and send videos when using the mobile internet, but especially large-size ones. It will require lots of bandwidth and traffic. But since compressed videos have a much smaller file size, you won’t have to worry about this.
- Make sure your videos look good on any device. There might be some stuttering issues on old devices if your videos are high-bitrate. Apps for compressing videos usually allow you to set a lower bitrate. Therefore, it will be possible to play your videos smoothly on practically any smartphone, tablet or computer; even older ones.
- Store files easily. Cloud services like iCloud, Google Drive, or Dropbox often have a limit on how much storage you can use for free. Since compressed videos take up less space, you will be able to store more content without paying.
How to Compress a Video on iPhone without Losing Quality
Keep these things in mind if you want to compress a video on iPhone while also maintaining good quality:
- Pick the format that’s suitable for you. H.265 (HEVC) compresses video twice as efficiently as H.264 without noticeable quality loss. So, if you want to reduce the file size more efficiently, go for the HEVC (H.265) format. But if you’re looking for better compatibility, you should opt for MP4 (H.264). Both of these formats offer excellent video quality. Also, it’s better to avoid older formats like AVI or MOV because they will produce files that are too large.
- Avoid drastic changes to the resolution. Naturally, changing the resolution (e.g., from 4K to 1080p) can make the size of your video smaller. But it can also have a negative effect on video quality. It’s better to stick to the original resolution in most cases; unless you’re okay with sacrificing good quality to achieve the necessary smaller size.
- Select the proper bitrate. Bit rate can impact video quality and file size. Lower it too much and you’ll get a pixelated video with lots of artifacts. If your video is high-quality and in 1080p HD, it’s better to keep the bit rate above 10 Mbps. You should also use the variable bit rate (VBR) instead of the constant bit rate (CBR).
- Lower the frame rate. A video with a higher frame rate (e.g., 60 fps) will be larger because it contains more frames. So, it’s better to shoot your videos with 24 fps or 30 fps or lower the frame rate in post-production. Unless you need the motion in your video to be very smooth (sports, gaming), of course.
- Don’t go overboard with compression. Video compression can help you reduce the file size significantly, while maintaining the quality. But if you go overboard with it, you might end up with some super blurry and pixelated footage. So, don’t get rid of the original file until you are happy with the compressed version. You should also experiment with the compression settings until you strike the necessary balance between video quality and file size.
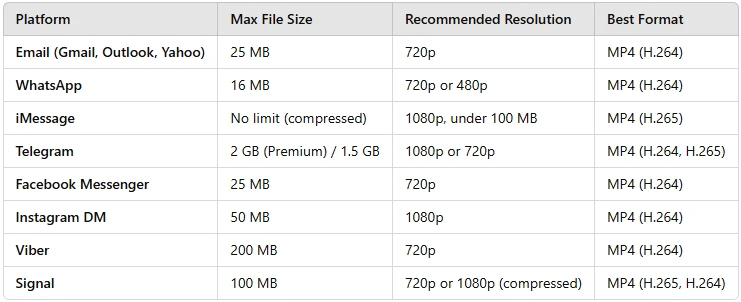
Best Video Sizes for Email & Messengers
Different services have their file size limits. It’s important for you to learn what they are before you get to compressing videos on an iPhone. Otherwise, you might end up with compressed files that you will still be unable to share.
Here’s the cheat sheet with the best video sizes for popular mail and messaging apps:
Remember to Protect Your Videos Before Sharing
Do you need to compress a video on iPhone to publish it on your social media account or a website? Keep in mind that when you share content online, you lose control over its future, which can be risky. In other words, your content can be copied and re-posted. Yes, without your permission or giving you credit. You’ve poured so many resources and energy into creating your unique and engaging content…you don’t want it to be stolen, do you?
Luckily, you can use a watermark on a video to protect your content from unauthorized use. It’s rather difficult to remove a watermark from a video. But you can make it even more challenging by using the Tile feature. It will fill the entire video frame with repeated watermarks. Your watermark can be semi-transparent if necessary.
You can create a textual watermark with your brand name or use your logo as a watermark, then place it in either corners of the frame or right in the middle. Your watermark can have nearly any design you want. It can really help you with claiming authorship as well as promoting your brand.
You can add a watermark to video files right on your iPhone with the help of Watermarkly’s mobile app. It allows you to process up to 10 videos per day without paying a cent.
Wrapping Up
Compressing a video on an iPhone is not a complicated task. There’s no native app for this, but it’s not a problem. In this guide you’ve learnt about two easy-to-use apps that have a free version. No matter which one you choose, you’ll be able to compress your videos within a couple of minutes.
Still, it can be a bit of a challenge to strike the balance between the optimal file size and good video quality. You might need to experiment with the settings a little bit before you find the combination that works best for you. Hopefully, with the help of the instructions in this guide you will be able to achieve the desired results.
Learn More About Editing on iPhone
How Watermark Photos on iPhone
How to Crop a Picture on iPhone
How to Add Text to Photo on iPhone
How to Reduce Photo File Size on iPhone